Aerospike Database Enterprise Edition on AWS
Partner Solution Deployment Guide

November 2021
Marek Counts and Sourabh Bhagat, Aerospike Inc.
Troy Ameigh, Andrew Gargan, AWS Partner Solution team

| Refer to the GitHub repository to view source files, report bugs, submit feature ideas, and post feedback about this Partner Solution. To comment on the documentation, refer to Feedback. |
This Partner Solution was created by Aerospike Inc. in collaboration with Amazon Web Services (AWS). Partner Solutions are automated reference deployments that help people deploy popular technologies on AWS according to AWS best practices. If you’re unfamiliar with AWS Partner Solutions, refer to the AWS Partner Solution General Information Guide.
Overview
This guide covers the information you need to deploy the Aerospike Database Enterprise Edition Partner Solution in the AWS Cloud.
Costs and licenses
The Partner Solution requires a subscription to the Amazon Machine Image (AMI) for Aerospike Database Enterprise Edition in AWS Marketplace. Additional pricing, terms, and conditions may apply. For instructions, see Subscribe to the Aerospike AMI.
If you don’t have a license, the Partner Solution deploys with a trial license. The Partner Solution deploys with a single-node trial license unless you request a three-node trial license. The trial license gives you all the enterprise features in a nonproduction environment. If you want to upgrade to a production license, contact Aerospike.
Architecture
Deploying this Partner Solution with default parameters builds the following Aerospike environment in the AWS Cloud.
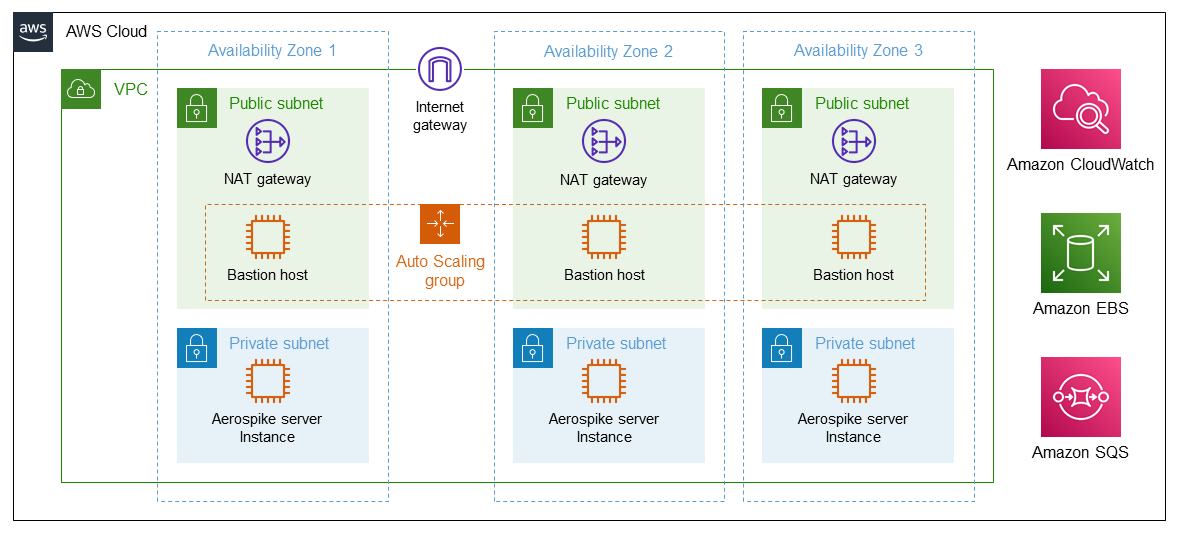
As shown in Figure 1, this Partner Solution sets up the following:
-
A highly available architecture that spans two or more Availability Zones.*
-
A VPC configured with public and private subnets, according to AWS best practices, to provide you with your own virtual network on AWS.*
-
In the public subnets:
-
Managed network address translation (NAT) gateways to allow outbound internet access for resources in the private subnets.*
-
A Linux bastion host in an Auto Scaling group to allow inbound Secure Shell (SSH) access to Amazon Elastic Compute Cloud (Amazon EC2) instances in public and private subnets.*
-
-
In the private subnets:
-
An Auto Scaling group of EC2 instances configured with Aerospike Database Enterprise Edition and Aerospike tools.
-
An Amazon Elastic Block Store (Amazon EBS) volume in each subnet.
-
-
Amazon CloudWatch for logging and monitoring the Aerospike instances.
-
Amazon Simple Queue Service (Amazon SQS) for Aerospike migration.
* The template that deploys this Partner Solution into an existing VPC skips the components marked by asterisks and prompts you for your existing VPC configuration.
Deployment options
This Partner Solution provides the following deployment options:
-
Deploy Aerospike into a new VPC. This option builds a new AWS environment that consists of the VPC, subnets, NAT gateways, security groups, bastion hosts, and other infrastructure components. It then deploys Aerospike into this new VPC.
-
Deploy Aerospike into an existing VPC. This option provisions Aerospike in your existing AWS infrastructure.
This Partner Solution provides separate templates for these options. It also lets you configure Classless Inter-Domain Routing (CIDR) blocks, instance types, and Aerospike settings.
Predeployment steps
Subscribe to the Aerospike AMI
This Partner Solution requires a subscription to the AMI for Aerospike in AWS Marketplace.
-
Sign in to your AWS account.
-
Open the page for the Aerospike AMI in AWS Marketplace, and then choose Continue to Subscribe.
-
Review the terms and conditions for software usage, and then choose Accept Terms.
A confirmation page loads, and an email confirmation is sent to the account owner. For detailed subscription instructions, see the AWS Marketplace documentation.
-
When the subscription process is complete, exit out of AWS Marketplace without further action. Do not provision the software from AWS Marketplace—the Partner Solution deploys the AMI for you.
-
If you’re deploying a three-node Aerospike cluster, request a license using this form. For additional tips and tools for configuring the settings, see Aerospike Partner Solution for AWS.
Launch the Partner Solution
| If you’re deploying Aerospike into an existing VPC, make sure that your VPC has at least two private subnets in different Availability Zones for the workload instances and that the subnets aren’t shared. This Partner Solution doesn’t support shared subnets. These subnets require NAT gateways in their route tables to allow the instances to download packages and software without exposing them to the internet. Also make sure that the domain name option in the DHCP options is configured as explained in DHCP options sets. You provide your VPC settings when you launch the Partner Solution. |
Each deployment takes about 15 minutes to complete.
-
Sign in to your AWS account, and choose one of the following options to launch the AWS CloudFormation template. For help with choosing an option, see Deployment options earlier in this guide.
-
Check the AWS Region that’s displayed in the upper-right corner of the navigation bar, and change it if necessary. This Region is where the network infrastructure for Aerospike is built. The template is launched in the us-east-2 Region by default. For other choices, see Supported Regions earlier in this guide.
-
On the Create stack page, keep the default setting for the template URL, and then choose Next.
-
On the Specify stack details page, change the stack name if needed. Review the parameters for the template. Provide values for the parameters that require input. For all other parameters, review the default settings and customize them as necessary. For details on each parameter, see the Parameter reference section of this guide. When you finish reviewing and customizing the parameters, choose Next.
Deployment steps
-
Sign in to your AWS account, and launch this Partner Solution, as described under Deployment options. The AWS CloudFormation console opens with a prepopulated template.
-
Choose the correct AWS Region, and then choose Next.
-
On the Create stack page, keep the default setting for the template URL, and then choose Next.
-
On the Specify stack details page, change the stack name if needed. Review the parameters for the template. Provide values for the parameters that require input. For all other parameters, review the default settings and customize them as necessary. When you finish reviewing and customizing the parameters, choose Next.
Unless you’re customizing the Partner Solution templates or are instructed otherwise in this guide’s Predeployment section, don’t change the default settings for the following parameters: QSS3BucketName,QSS3BucketRegion, andQSS3KeyPrefix. Changing the values of these parameters will modify code references that point to the Amazon Simple Storage Service (Amazon S3) bucket name and key prefix. For more information, refer to the AWS Partner Solutions Contributor’s Guide. -
On the Configure stack options page, you can specify tags (key-value pairs) for resources in your stack and set advanced options. When you finish, choose Next.
-
On the Review page, review and confirm the template settings. Under Capabilities, select all of the check boxes to acknowledge that the template creates AWS Identity and Access Management (IAM) resources that might require the ability to automatically expand macros.
-
Choose Create stack. The stack takes about 15 minutes to deploy.
-
Monitor the stack’s status, and when the status is CREATE_COMPLETE, the Aerospike Database Enterprise Edition deployment is ready.
-
To view the created resources, choose the Outputs tab.
Postdeployment steps
Test the deployment
After the AWS CloudFormation stack is complete, test the deployment by checking whether the instances were properly enrolled with your Aerospike project.
To validate the system and verify the system configuration, follow these steps:
-
From the bastion host, use SSH to log in to one of the Aerospike instances created by Partner Solution template. Use SSH key forwarding for security purposes. For more info on SSH key forwarding, see Using SSH agent forwarding.
$ ssh ec2-user@<aerospike-instance>
-
Verify cluster information using
asadmcommand. More information, see Aerospike Admin (asadm). A two-node cluster output looks like this:$ asadm Seed: [('127.0.0.1', 3000, None)] Config_file: /home/ec2-user/.aerospike/astools.conf, /etc/aerospike/astools.conf Aerospike Interactive Shell, version 2.0.1 Found 2 nodes Online: 10.0.3.128:3000, 10.0.35.3:3000 Admin> summary Cluster (Migrations in Progress) ================================= 1. Server Version : E-5.5.0.4 2. OS Version : Amazon Linux 2 (4.14.231-173.361.amzn2.x86_64) 3. Cluster Size : 2 4. Devices : Total 0, per-node 0 5. Memory : Total 16.000 GB, 0.00% used (0.000 B), 100.00% available (16.000 GB) 6. Disk : Total 0.000 B, 0.00% used (0.000 B), 0.00% available contiguous space (0.000 B) 7. Usage (Unique Data): None 8. Active Namespaces : 0 of 2 9. Features : ~~~~~~~~~~~~~~~~~~~~~~~~~~~~~~~~~~~~~~~~~~~~~~~~~Namespaces~~~~~~~~~~~~~~~~~~~~~~~~~~~~~~~~~~~~~~~~~~~~~~~~ Namespace|~~~Devices~~~~|~~~~~~~~Memory~~~~~~~|~~~~~~~~~Disk~~~~~~~~|Replication| Master|~~~~~~Usage~~~~~~~ |Total|Per-Node| Total|Used%|Avail%| Total|Used%|Avail%| Factors|Objects|~~(Unique-Data)~~~ | | | | | | | | | | |In-Memory| On-Disk bar | 0| 0|8.000 GB| 0| 100|0.000 B | 0| 0| 2|0.000 | 0.000 B |0.000 B test | 0| 0|8.000 GB| 0| 100|0.000 B | 0| 0| 2|0.000 | 0.000 B |0.000 B Number of rows: 2 -
Insert record using aql. The following commands insert a record in test namespace. Replace foo with the set name and bar with the bin name.
$ aql
Seed:         127.0.0.1
User:         None
Config File:  /etc/aerospike/astools.conf /home/ec2-user/.aerospike/astools.conf
Aerospike Query Client
Version 5.0.1
C Client Version 4.6.17
Copyright 2012-2020 Aerospike. All rights reserved.

aql> insert into test.foo (PK, bar) values (123, 'you did it!')
OK, 1 record affected.

aql> select * from test.foo
+---------------+
| bar           |
+---------------+
| "you did it!" |
+---------------+
1 row in set (0.036 secs)

OK
For more information on testing, see Benchmarks. With the benchmark application, you can exercise and demo load on the new Aerospike cluster.
Best practices for using Aerospike on AWS
Follow these best practices: Aerospike on Amazon EC2 - Recommendations.
Also set up a backup plan your Aerospike data. For details, see Backup and Recovery in AWS.
Security
When you run Aerospike in production, review and ensure that your security best practices are understood and followed. You’ll find some recommended security best practices in Aerospike on Amazon EC2 - Recommendations.
Other useful information
After your deployment is up and ready, read and understand the following sections of the Aerospike documentation. Use the navigation panel to open each subsection within these main sections.
For information on the architecture and system, see the Aerospike Architecture Overview and System Overview
For information on monitoring your stack, see Overview to the Aerospike Monitoring Stack.
For information on querying your database, see Query.
For information on setting up and using connectors to stream data into your new cluster, see Overview of Aerospike Connect.
For information on using asbench and monitoring stack with quickstart, see Enhancements for Aerospike’s AWS Quickstart.
For more General AeroSpike information see the following:
-
Explainer Videos in our Developer Hub
-
Tutorials and Blog Posts
-
The Community Forum is where you’ll find a large and enthusiastic community of users with excellent knowledge of the platform and the desire to help others.
Troubleshooting
For troubleshooting common Partner Solution issues, refer to the AWS Partner Solution General Information Guide and Troubleshooting CloudFormation.
-
If you created a cluster of three machines, but they don’t seem to be clustering.
-
Most likely you did not get a production license. You can rerun the Partner Solution ensuring that you apply your production license. If you don’t have a license, you can obtain one on the Get started with Aerospike page.
-
Customer responsibility
After you deploy a Partner Solution, confirm that your resources and services are updated and configured—including any required patches—to meet your security and other needs. For more information, refer to the Shared Responsibility Model.
Feedback
To submit feature ideas and report bugs, use the Issues section of the GitHub repository for this Partner Solution. To submit code, refer to the Partner Solution Contributor’s Guide. To submit feedback on this deployment guide, use the following GitHub links:
Notices
This document is provided for informational purposes only. It represents current AWS product offerings and practices as of the date of issue of this document, which are subject to change without notice. Customers are responsible for making their own independent assessment of the information in this document and any use of AWS products or services, each of which is provided "as is" without warranty of any kind, whether expressed or implied. This document does not create any warranties, representations, contractual commitments, conditions, or assurances from AWS, its affiliates, suppliers, or licensors. The responsibilities and liabilities of AWS to its customers are controlled by AWS agreements, and this document is not part of, nor does it modify, any agreement between AWS and its customers.
The software included with this paper is licensed under the Apache License, version 2.0 (the "License"). You may not use this file except in compliance with the License. A copy of the License is located at https://aws.amazon.com/apache2.0/ or in the accompanying "license" file. This code is distributed on an "as is" basis, without warranties or conditions of any kind, either expressed or implied. Refer to the License for specific language governing permissions and limitations.