Jira Data Center on AWS
Partner Solution Deployment Guide

October 2020
Adam Brokes, Ben Partridge, Carlos Corredor, Chris Szmajda, Don Domingo, Dylan Rathbone, Felix Haehnel, Steve Smith, Varun Arbatti, Atlassian
Tony Vattathil, AWS Integration & Automation team

| Refer to the GitHub repository to view source files, report bugs, submit feature ideas, and post feedback about this Partner Solution. To comment on the documentation, refer to Feedback. |
This Partner Solution was created by Atlassian in collaboration with Amazon Web Services (AWS). Partner Solutions are automated reference deployments that help people deploy popular technologies on AWS according to AWS best practices. If you’re unfamiliar with AWS Partner Solutions, refer to the AWS Partner Solution General Information Guide.
Overview
This guide covers the information you need to deploy the Jira Data Center Partner Solution in the AWS Cloud.
This Partner Solution uses the Atlassian Standard Infrastructure (ASI) as a foundation. You can choose to build a new ASI for your deployment or deploy Jira into your existing ASI. You can also deploy Confluence, Bitbucket, and Crowd Data Center within the same ASI.
Costs and licenses
This Quick Start deploys a cluster-ready infrastructure for either Jira Software Data Center or Jira Service Management Data Center. A license for either one is required. See the Atlassian pricing page for licensing information.
Architecture
Deploying this Partner Solution with default parameters builds the following Jira environment in the AWS Cloud.
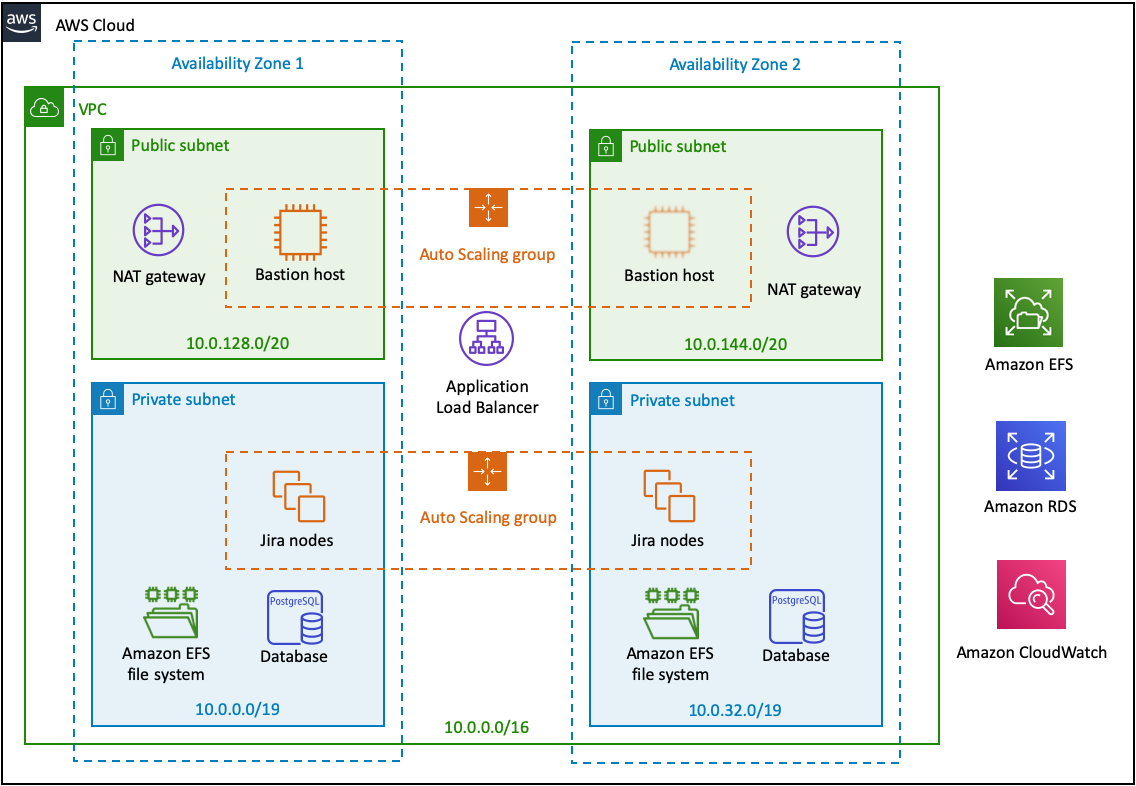
As shown in Figure 1, this Partner Solution sets up the following:
-
A highly available architecture that spans two Availability Zones.
-
In the public subnets:
-
A network address translation (NAT) gateway to allow outbound internet access for resources in the private subnets.
-
A bastion host that enables secure access to Jira without exposing it to the internet. For more information, see Bastion Hosts). You can choose not to provision a bastion host if you prefer to access Jira nodes through the AWS Systems Manager.
-
-
In the private subnets:
-
Amazon Elastic File System (Amazon EFS) to store artifacts such as attachments, avatars, icons, import and export files, and plug-ins in a common location that can be accessed by all Jira nodes.
-
Amazon Relational Database Service (Amazon RDS) for PostgreSQL in a high-availability (Multi-AZ) configuration, which mitigates failover if the master node fails. You can choose Amazon Aurora PostgreSQL instead.
-
-
Amazon Elastic Compute Cloud (Amazon EC2) Auto Scaling groups for scaling the bastion hosts in the public subnets and the Jira nodes in the private subnets. The instances are based on Amazon Linux, a Linux server operating system from AWS, and use an Atlassian-provided Amazon Machine Image (AMI).
-
An Application Load Balancer, which works both as a load balancer and a Secure Sockets Layer (SSL) termination reverse proxy.
-
Amazon CloudWatch for basic monitoring of all application and database nodes in your deployment. By default, CloudWatch collects and stores logs from each monitored node. Amazon CloudWatch is an optional component.
Auto Scaling groups in this Quick Start
This Quick Start uses Auto Scaling groups to statically control the number of its nodes. Don’t use Auto Scaling to dynamically scale the size of your cluster. Adding an application node to the cluster usually takes more than 20 minutes, which isn’t fast enough to address sudden load spikes.
If you can identify periods of high and low loads, you can schedule the application node cluster to scale accordingly. For more information, see Scheduled Scaling for Amazon EC2 Auto Scaling.
To study trends in your organization’s load, be sure to monitor the performance of your deployment.
Amazon Aurora database for high availability
The Quick Start also allows you to deploy Jira Data Center with an Amazon Aurora clustered database (instead of RDS).
You can also use this Quick Start to deploy Jira Data Center with an Aurora clustered database that’s compatible with PostgreSQL. The cluster configuration is illustrated in Figure 2. It features a primary database writer that replicates to two database readers in a different Availability Zone. If the writer fails, Aurora promotes one of the readers to take its place with no downtime. For more information, see Amazon Aurora Features: PostgreSQLCompatible Edition.
The Aurora configuration with a single database writer and two readers is designed to provide high availability without degrading performance.

Amazon Aurora is supported on Jira Software Data Center 8.4, Jira Service Management 4.4, and all later versions of both.
Deployment options
This Partner Solution provides the following deployment options:
-
Deploy Jira into a new ASI. This option builds a new AWS environment that consists of the VPC, subnets, NAT gateways, security groups,and other infrastructure components. It then deploys Jira into this new VPC.
-
Deploy Jira into an existing ASI. This option provisions Jira in your existing AWS infrastructure.
This Partner Solution provides separate templates for these options. It also lets you configure Classless Inter-Domain Routing (CIDR) blocks, instance types, and Jira settings.
Deployment steps
-
Sign in to your AWS account, and launch this Partner Solution, as described under Deployment options. The AWS CloudFormation console opens with a prepopulated template.
-
Choose the correct AWS Region, and then choose Next.
-
On the Create stack page, keep the default setting for the template URL, and then choose Next.
-
On the Specify stack details page, change the stack name if needed. Review the parameters for the template. Provide values for the parameters that require input. For all other parameters, review the default settings and customize them as necessary. When you finish reviewing and customizing the parameters, choose Next.
Unless you’re customizing the Partner Solution templates or are instructed otherwise in this guide’s Predeployment section, don’t change the default settings for the following parameters: QSS3BucketName,QSS3BucketRegion, andQSS3KeyPrefix. Changing the values of these parameters will modify code references that point to the Amazon Simple Storage Service (Amazon S3) bucket name and key prefix. For more information, refer to the AWS Partner Solutions Contributor’s Guide. -
On the Configure stack options page, you can specify tags (key-value pairs) for resources in your stack and set advanced options. When you finish, choose Next.
-
On the Review page, review and confirm the template settings. Under Capabilities, select all of the check boxes to acknowledge that the template creates AWS Identity and Access Management (IAM) resources that might require the ability to automatically expand macros.
-
Choose Create stack. The stack takes about 30-60 minutes to deploy.
-
Monitor the stack’s status, and when the status is CREATE_COMPLETE, the Jira Data Center deployment is ready.
-
To view the created resources, choose the Outputs tab.
Postdeployment steps
The following procedure helps you set up your new Jira deployment.
-
Choose the URL that is displayed in the Outputs tab of the AWS CloudFormation stack to go to the Jira configuration page.
If you get an HTTP Error 503 response when you access the URL, it means that Jira is still loading. This is expected, and you should wait a couple of minutes before trying again. -
On the Setup application properties page, enter a title for your Jira application deployment, choose the Mode you want, leave the base URL unchanged, and then choose Next.
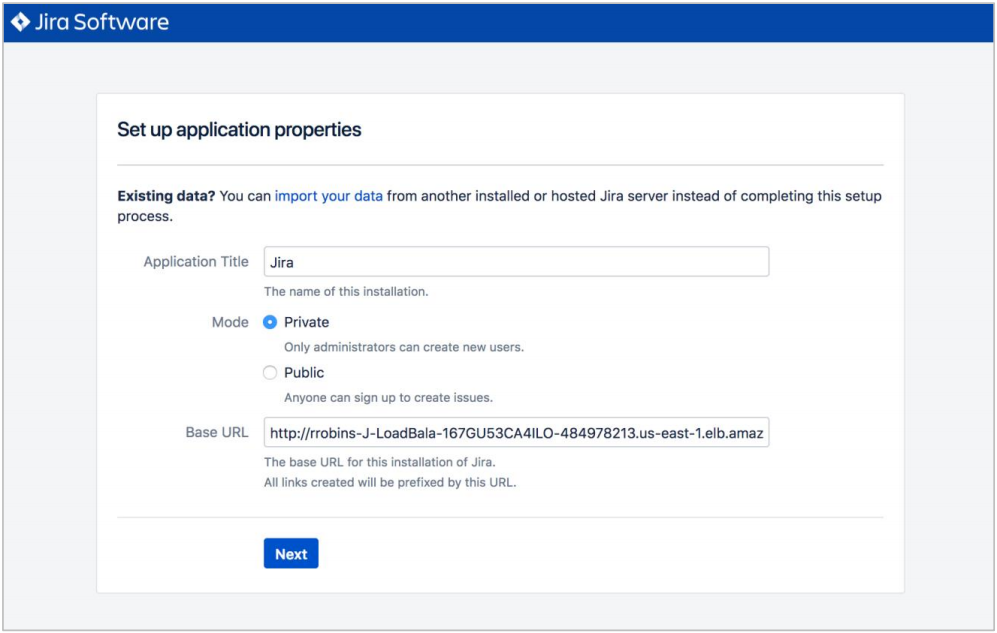 Figure 3. Setting up properties
 -
On the Specify your license key page, enter a valid Jira Software or Service Management Data Center license key. If you don’t have a valid license for the Jira application you’ve selected to deploy, choose generate a Jira trial license and sign up for an evaluation Data Center license.
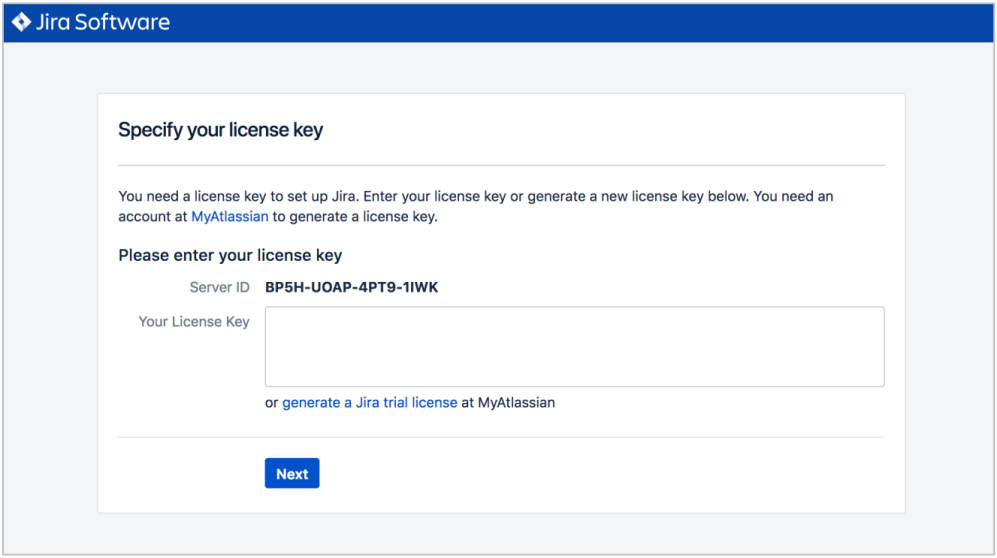 Figure 4. Jira licensing
 -
To set up the Jira application, you need to create an Administrator account and password. The Administrator account has full access to all data in Jira, so we highly recommend that you choose a strong password for this account. Enter the Administrator’s user details in the setup screen (Figure 5), and then choose Next.
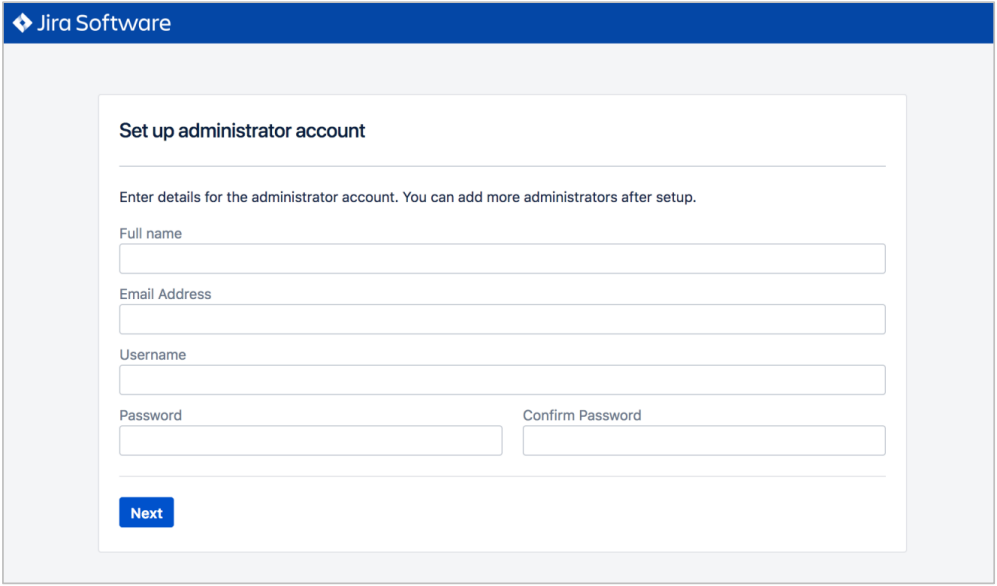 Figure 5. Setting up properties
 -
On the Set up email notifications page, choose Later, and then choose Finish.
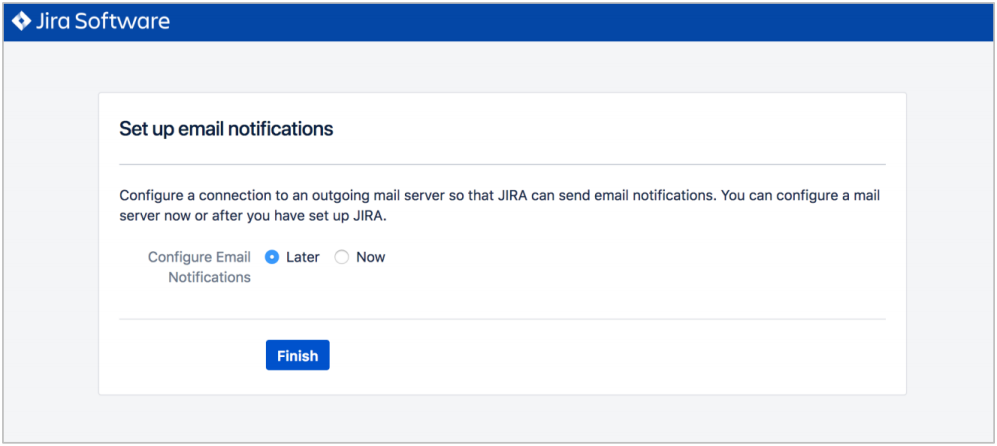 Figure 6. Email notifications page
 -
In the first Welcome to Jira page, choose a language and then choose Continue.
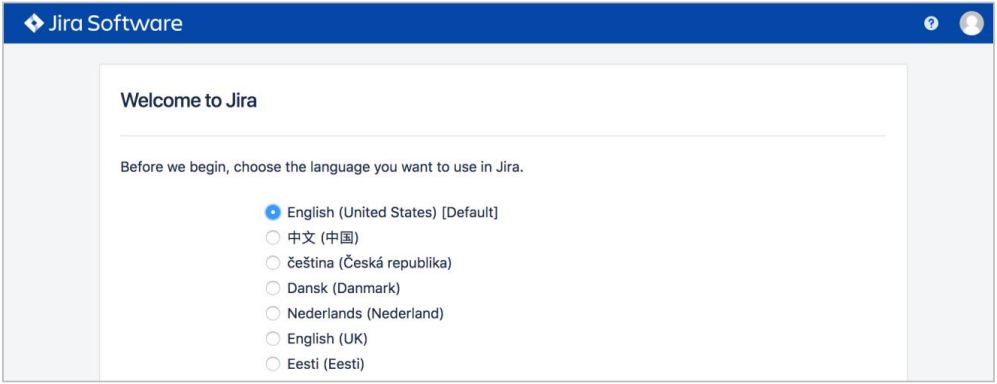 Figure 7. Choosing a language
 -
In the second Welcome to Jira page, choose an avatar for your profile, if you wish, and then choose Next.
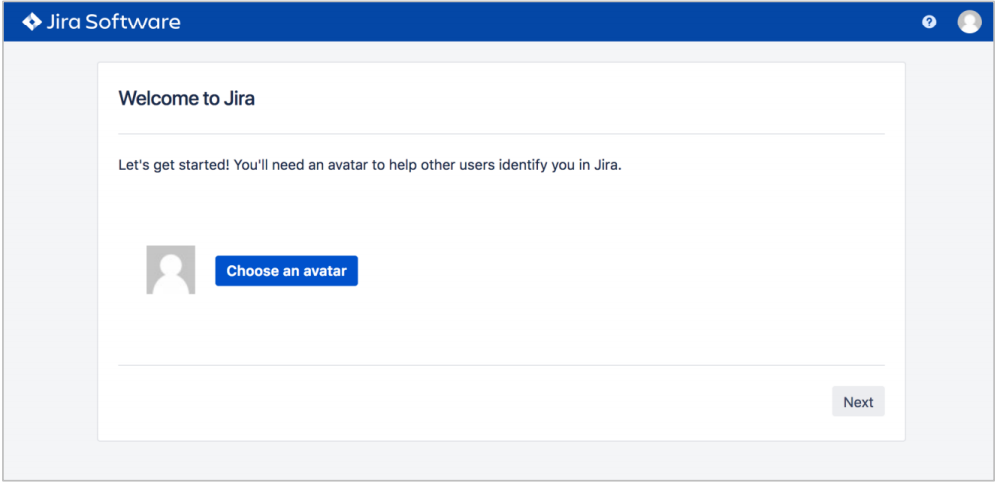 Figure 8. Choosing an avatar
 -
On the next Welcome page, choose Create sample project, and enter a name for the project.
-
Choose Settings (the gear icon in the upper right), and then choose System. You should see a page similar to the one below.
 Figure 9. Viewing systemm info
 -
Scroll down to the Cluster Nodes section. You should see your current node in the Active state.
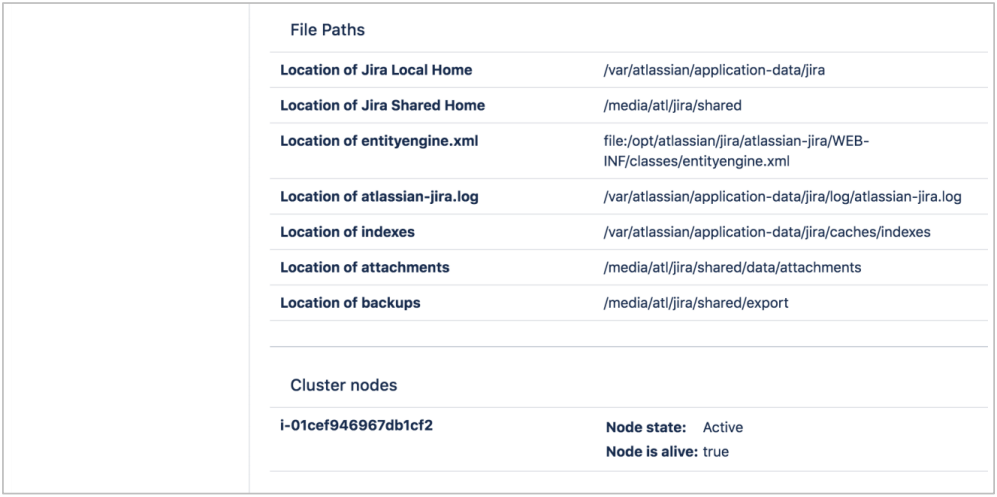 Figure 10. Viewing cluster nodes
Troubleshooting
For troubleshooting common Partner Solution issues, refer to the AWS Partner Solution General Information Guide and Troubleshooting CloudFormation.
Customer responsibility
After you deploy a Partner Solution, confirm that your resources and services are updated and configured—including any required patches—to meet your security and other needs. For more information, refer to the Shared Responsibility Model.
Feedback
To submit feature ideas and report bugs, use the Issues section of the GitHub repository for this Partner Solution. To submit code, refer to the Partner Solution Contributor’s Guide. To submit feedback on this deployment guide, use the following GitHub links:
Notices
This document is provided for informational purposes only. It represents current AWS product offerings and practices as of the date of issue of this document, which are subject to change without notice. Customers are responsible for making their own independent assessment of the information in this document and any use of AWS products or services, each of which is provided "as is" without warranty of any kind, whether expressed or implied. This document does not create any warranties, representations, contractual commitments, conditions, or assurances from AWS, its affiliates, suppliers, or licensors. The responsibilities and liabilities of AWS to its customers are controlled by AWS agreements, and this document is not part of, nor does it modify, any agreement between AWS and its customers.
The software included with this paper is licensed under the Apache License, version 2.0 (the "License"). You may not use this file except in compliance with the License. A copy of the License is located at https://aws.amazon.com/apache2.0/ or in the accompanying "license" file. This code is distributed on an "as is" basis, without warranties or conditions of any kind, either expressed or implied. Refer to the License for specific language governing permissions and limitations.