CI/CD Pipeline for Blue-Green Deployment on AWS
Partner Solution Deployment Guide

July 2023
Kirankumar Chandrashekar and Shivansh Singh, AWS

| Refer to the GitHub repository to view source files, report bugs, submit feature ideas, and post feedback about this Partner Solution. To comment on the documentation, refer to Feedback. |
This Partner Solution was created by AWS in collaboration with Amazon Web Services (AWS). Partner Solutions are automated reference deployments that help people deploy popular technologies on AWS according to AWS best practices. If you’re unfamiliar with AWS Partner Solutions, refer to the AWS Partner Solution General Information Guide.
Overview
This guide covers the information you need to deploy the CI/CD Pipeline for Blue-Green Deployment Partner Solution in the AWS Cloud.
CI/CD Pipeline for Blue-Green Deployment on AWS
From a disaster recovery and development perspective, when an application is developed and deployed to an Elastic Beanstalk environment, having two separate, but identical, environments—blue and green—helps increase availability and reduce risk. In this case, the blue environment is the production environment that normally handles live traffic. The CI/CD pipeline architecture creates a clone (green) of the live Elastic Beanstalk environment (blue). The pipeline then swaps the URLs between the two environments.
While CodePipeline deploys application code to the original environment—and testing and maintenance take place—the temporary clone environment handles the live traffic.
Suppose deployment to the blue environment fails because of issues with the application code. While the code is being corrected and recommitted to the repository, the green environment serves the live traffic, and there is no downtime. Once deployment to the blue environment is successful, and code review and code testing are completed, the pipeline once again swaps the URLs between the green and blue environments. The blue environment starts serving the live traffic again, and the pipeline terminates the temporarily created green environment. Not having to continuously run parallel environments saves costs.
This solution also allows integration with Git repositories via Git webhooks and enables automatic code deployment, immediately after the code is committed to the Git repository.
| To implement Git to S3 integration, which triggers the pipeline automatically after committing the code to a Git repository, use the Git Webhooks with AWS services deployment guide for Git Webhooks with AWS services. |
Costs and licenses
There is no cost to use this Partner Solution, but you will be billed for any AWS services or resources that this Partner Solution deploys. For more information, refer to the AWS Partner Solution General Information Guide.
Architecture
Deploying this Partner Solution with default parameters builds the following CI/CD Pipeline for Blue-Green Deployment environment in the AWS Cloud.
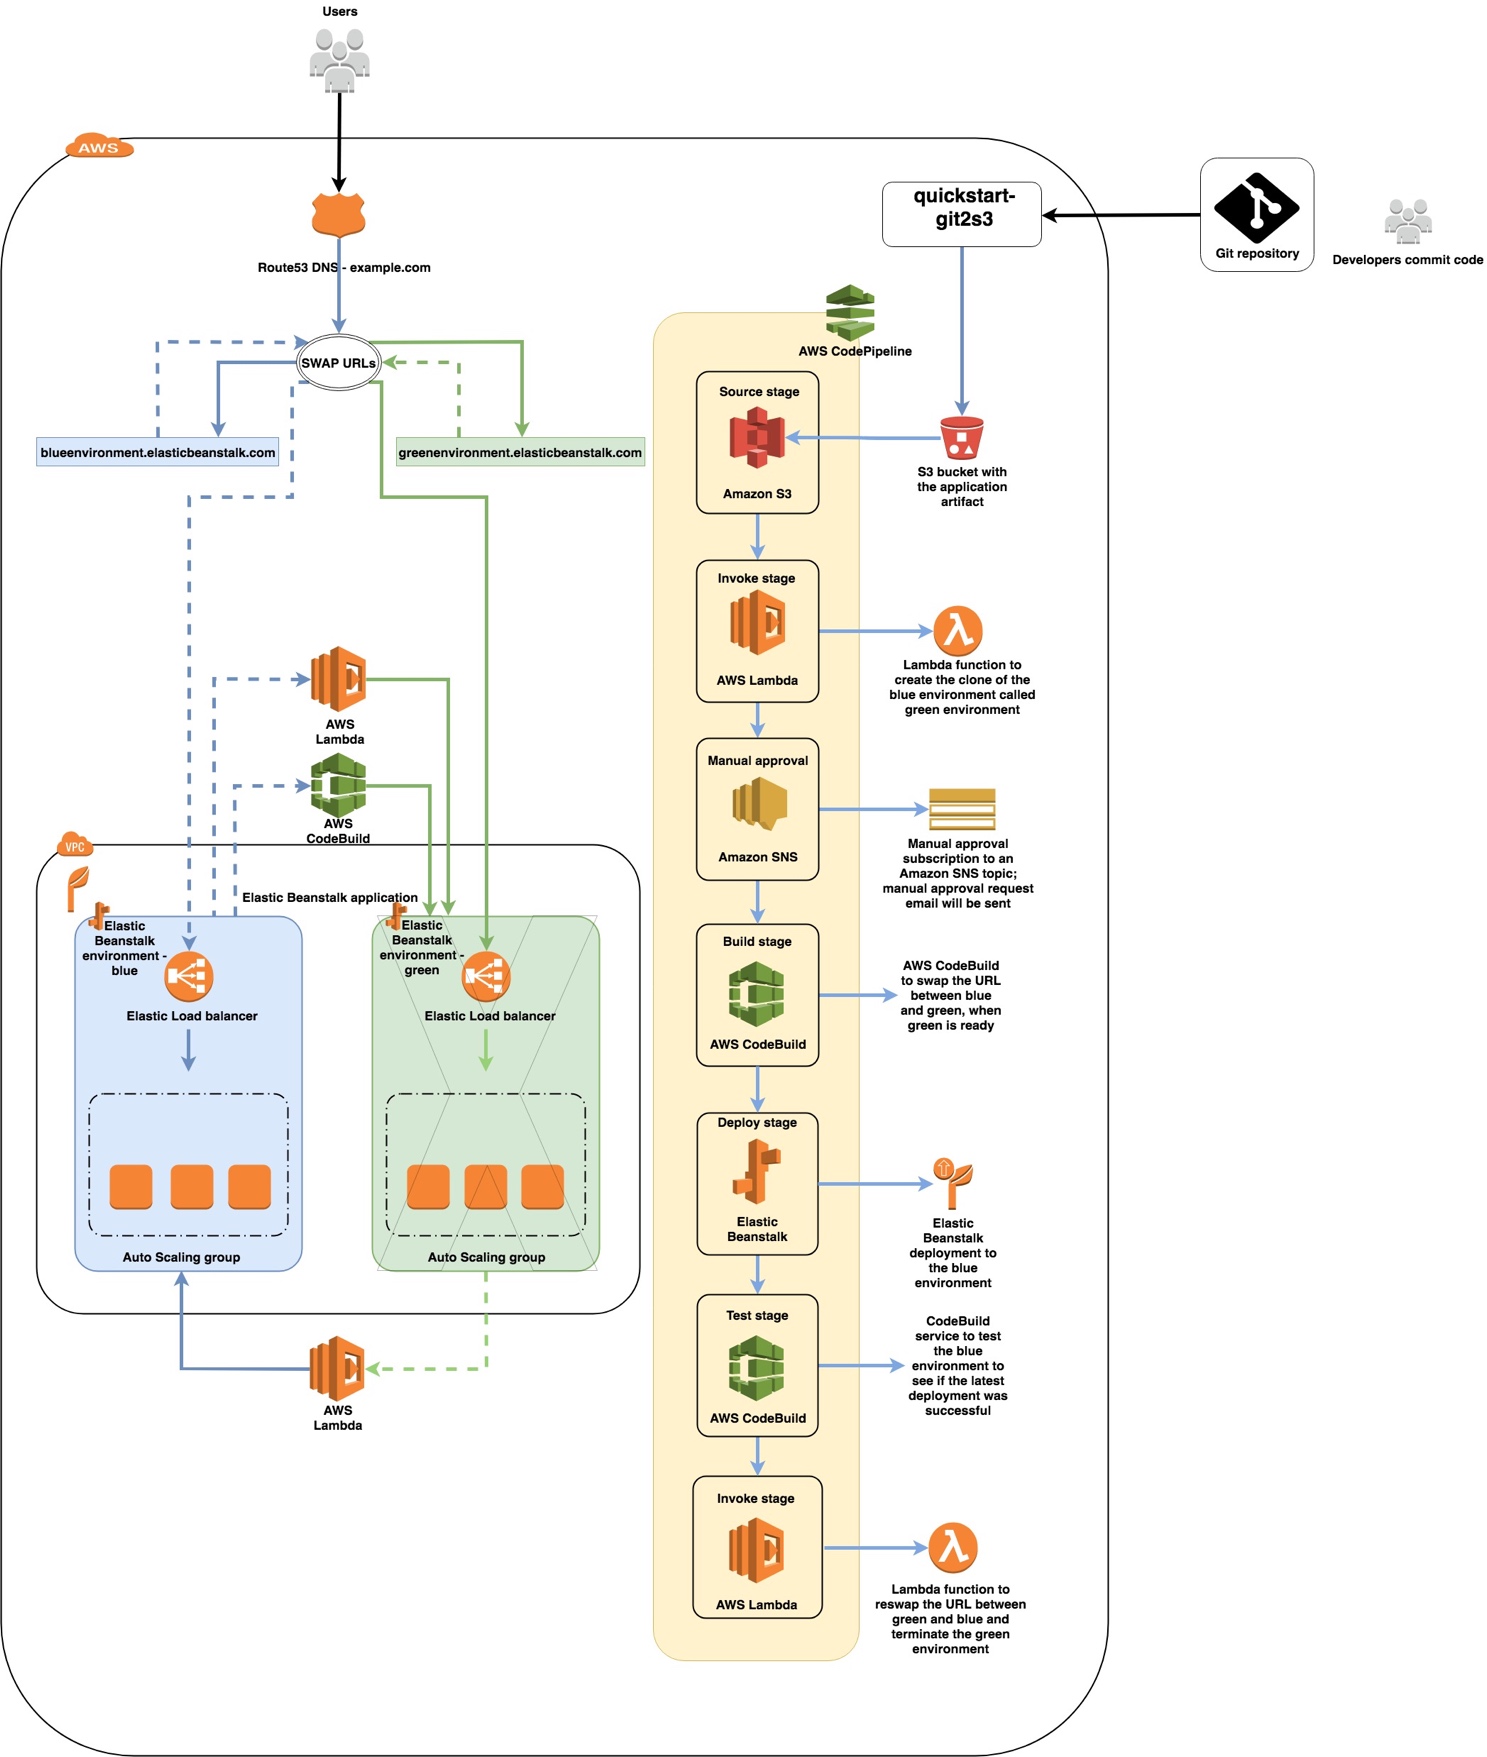
As shown in Figure 1, this Partner Solution sets up the following:
The Quick Start sets up the following components:
-
A pipeline created by CodePipeline, which is triggered when the S3 bucket referenced in the source stage is uploaded with a new version of the application package required for deploying to the Elastic Beanstalk environment.
-
Lambda functions to clone the blue environment as the green environment, to re-swap the URLs, and to terminate the green environment when deployment and testing for the blue environment are complete.
-
CodeBuild projects to perform the initial URL swap between the blue and green environments and to test the deployment of the blue environment.
-
An SNS topic for setting up the CodePipeline approval stage and for sending the approval email.
-
IAM roles for the Lambda functions, CodeBuild projects, CodePipeline, and service role for the Elastic Beanstalk sample application.
-
Separate Amazon S3 buckets for the CodePipeline Artifact Store, the Lambda Function assets, and the CodeBuild assets. You can have an optional S3 bucket for storing the zip package that contains application code for the Elastic Beanstalk deployment.
-
If an existing Elastic Beanstalk environment and the application where it exists is not provided, this Quick Start creates a sample environment named BlueEnvironment in the application named BlueGreenBeanstalkApplication.
If Git to S3 integration is enabled (when the parameter GitToS3integration is set to True), it creates the following components in addition to the preceding ones:
-
An API Gateway endpoint to accept webhook requests from Git.
-
Lambda functions to connect to the Git service, either over Secure Shell (SSH) or through the Git service’s endpoint. These functions zip the code and upload it to Amazon S3.
| Important The Lambda functions that this Quick Start deploys must be able to communicate with your Git repository. For example, you can use a software as a service (SaaS)-based Git service that the Lambda service can reach through the internet. |
-
An AWS KMS key to encrypt the SSH private key that is used to connect to the repository over SSH.
-
Two S3 buckets: One bucket stores the zipped contents of your Git repository, and the second bucket stores the AWS KMS-encrypted SSH private keys that are generated during stack creation. Note that the first bucket has versioning enabled, and all previous versions are retained indefinitely. If you’d like to manage the retention period for old versions, follow the instructions in the Amazon S3 documentation.
-
Several IAM roles required for the Lambda functions and API Gateway. The inline permissions attached to these roles are scoped using the least privilege model.
-
Two Lambda-backed AWS CloudFormation custom resources. One resource generates an SSH key pair, encrypts it using AWS KMS, and stores it in Amazon S3. The second resource deletes the content of the two S3 buckets on stack deletion.
| If you need backups, copy the contents of the Amazon S3 bucket before you delete the CloudFormation stack. |
For more information about Git to S3 integration, see Git Webhooks with AWS services.
Blue-Green Deployment Process
When the code is pushed to your Git repository, you can use the Git Webhooks with AWS Services Quick Start to upload the code to an S3 bucket.
Using the Git Webhooks with AWS Quick Start is optional. You can also upload the zipped application package to the S3 bucket that’s used as the source stage in CodePipeline. When the code is uploaded to this S3 bucket, the deployment starts. The source stage pulls the zipped package from the S3 bucket and creates an artifact that is used for deployment.
If the blue environment is serving the live traffic, and the green environment is the clone, the pipeline automatically performs the following actions shown in Figure 2:

-
The first stage of the pipeline pulls the artifact from the source bucket and provides it for deployment to the Elastic Beanstalk environment.
-
The second stage triggers a Lambda function that clones the blue environment, which results in a green environment.
-
The third stage waits for manual approval before proceeding to the next stage.
-
The fourth stage swaps the URLs between the blue and the green environments using a CodeBuild project. Once this is complete, the green environment serves the live traffic.
-
The fifth stage performs the deployment to the blue environment.
-
If the deployment is successful, the sixth stage triggers a test on the blue environment to see if it can access a 200 OK in the response. If the response is other than 200 OK, the pipeline doesn’t proceed, and marks this stage as failed.
-
If the test stage is successful, another Lambda function is triggered in the seventh stage, which again swaps the URLs between the blue and green environments and then terminates the green environment. The blue environment gets back its initial Elastic Beanstalk CNAME that it initially had for serving the live traffic.
Best Practices
| This Quick Start is intended for an already existing Elastic Beanstalk environment that you can use as a blue environment. The sample Elastic Beanstalk environment that is created via this Quick Start is for illustration and demonstration purposes only. |
The architecture built by this Quick Start supports AWS best practices for high availability and security. We recommend that you adhere to the following best practices:
-
Do not make any changes to the AWS resources created by this Quick Start directly on the AWS Management Console, command-line interface, or SDK, especially when the pipeline is running.
-
Use a valid email address for the approval stage of the pipeline. This stage is crucial for the pipeline to proceed, swap the URLs, and perform the deployments.
Deployment options
This Quick Start provides two deployment options, using the same template, depending on whether the GitToS3integration parameter is set to true or false:
-
Deploy with Git to S3 integration This option builds a new AWS environment consisting of the pipeline created by AWS CodePipeline, along with other infrastructure components. It also builds an API Gateway interface and Lambda functions that allow an automatic trigger to the pipeline via webhooks, when the code is committed to the Git repository. The Git to S3 integration automatically uploads the code into the S3 bucket location referenced by the source stage of the pipeline, which automatically triggers code deployment on the pipeline.
-
Deploy without Git to S3 integration This option builds a new AWS environment consisting of the pipeline created by CodePipeline, along with other infrastructure components. The pipeline gets automatically triggered when the zip file package is uploaded to the S3 bucket location that is referenced in the source stage.
Predeployment steps
Create an Elastic Beanstalk environment in your AWS account, or make sure that you already have an environment that can be considered a blue environment. To create an Elastic Beanstalk environment, follow the steps in AWS Elastic Beanstalk environment.
If you do not have an Elastic Beanstalk environment in your account, you can launch this Quick Start with the sample application, which deploys a PHP sample solution. The Quick Start will deploy a sample application by default, in this case.
To have a different solution stack as part of the sample environment, provide the appropriate values for the parameters SolutionStackForNewBeanstalkEnv, AppPackageS3Bucket and AppPackageS3key within the Mappings section of bluegreen-deployment-master.template when you launch the CloudFormation stack for this Quick Start.
(Optional) Make a Note of an Existing Elastic Beanstalk Environment and Application
-
Navigate to the Elastic Beanstalk service on the console.
-
Click the environment where you want to apply the blue-green deployment architecture. Note down the name of the Elastic Beanstalk environment and the Elastic Beanstalk application where it exists.
-
You can ignore this if you would like to test this architecture with a sample Elastic Beanstalk environment and application.
Deployment steps
-
Sign in to your AWS account, and launch this Partner Solution, as described under Deployment options. The AWS CloudFormation console opens with a prepopulated template.
-
Choose the correct AWS Region, and then choose Next.
-
On the Create stack page, keep the default setting for the template URL, and then choose Next.
-
On the Specify stack details page, change the stack name if needed. Review the parameters for the template. Provide values for the parameters that require input. For all other parameters, review the default settings and customize them as necessary. When you finish reviewing and customizing the parameters, choose Next.
Unless you’re customizing the Partner Solution templates or are instructed otherwise in this guide’s Predeployment section, don’t change the default settings for the following parameters: QSS3BucketName,QSS3BucketRegion, andQSS3KeyPrefix. Changing the values of these parameters will modify code references that point to the Amazon Simple Storage Service (Amazon S3) bucket name and key prefix. For more information, refer to the AWS Partner Solutions Contributor’s Guide. -
On the Configure stack options page, you can specify tags (key-value pairs) for resources in your stack and set advanced options. When you finish, choose Next.
-
On the Review page, review and confirm the template settings. Under Capabilities, select all of the check boxes to acknowledge that the template creates AWS Identity and Access Management (IAM) resources that might require the ability to automatically expand macros.
-
Choose Create stack. The stack takes about 15 minutes to deploy.
-
Monitor the stack’s status, and when the status is CREATE_COMPLETE, the CI/CD Pipeline for Blue-Green Deployment deployment is ready.
-
To view the created resources, choose the Outputs tab.
Postdeployment steps
(Optional) If Git to S3 integration is enabled, configure your Git repository.
If the GitToS3integration parameter is set to true, you need to configure the webhooks for your Git repository
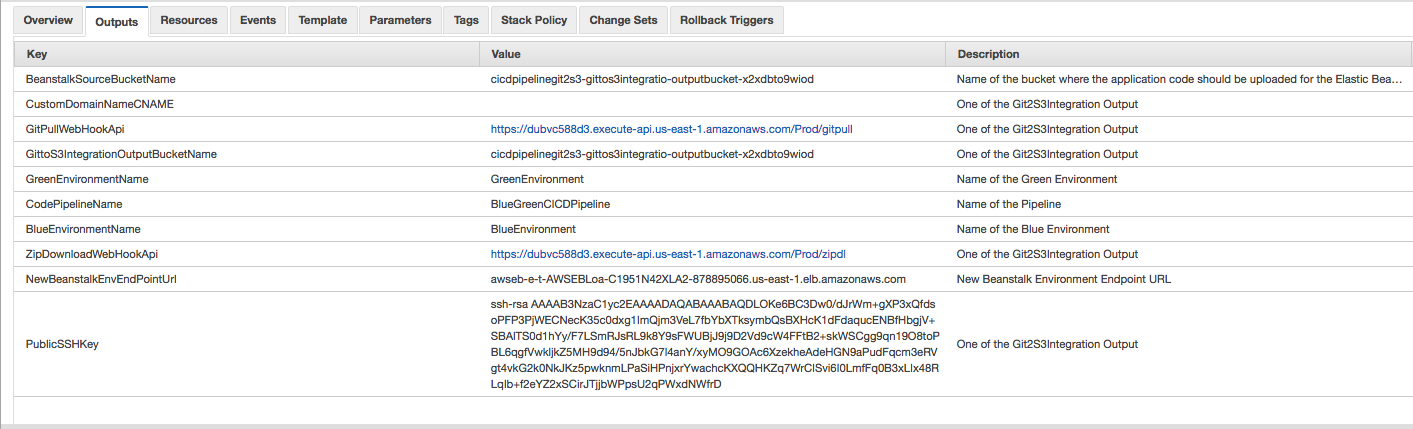
GitPullWebHookApi is the webhook endpoint to use if you choose the Git pull method described in the Webhook Endpoints section of the Git Webhooks with AWS Services Partner Solution deployment guide.
ZipDownloadWebHookApi is the webhook endpoint to use if you choose the zip download method described in the Webhook Endpoints section of the Git Webhooks with AWS Services Partner Solution deployment guide.
PublicSSHKey is the public SSH key that you use to connect to your repository if you’re using the Git pull endpoint. This key can be configured as a read-only machine user or as a deployment key in your Git service. The exact process to set up webhooks differs from service to service. For step-by-step instructions, consult your Git service’s documentation
(Optional) Test a commit.
Check that the GitToS3integration parameter is set to true and that the webhooks are set up correctly. If so, when you commit the code to the Git repository, your application code will be zipped and placed in the S3 bucket that is displayed in the Outputs section of the CloudFormation stack called BeanstalkSourceBucketName. This bucket should have a key in the following format:
S3://output-bucket-name/git-user/git-repository/git-user_git-repository.zip
where:
-
git-user is the owner or path prefix of the repository. In some Git services, this may be an organization name.
-
Some Git services do not return a Git user or organization for a repository. In these cases, you can omit the git-user parts of the path.
-
Because this is the S3 bucket and key referred to in the source stage of the S3 bucket, the pipeline triggers and starts the deployment.
If the GitToS3integration parameter is set to false, manually upload the zip file that contains the application package to the S3 bucket that is displayed in the Outputs section of the AWS CloudFormation stack called BeanstalkSourceBucketName. The pipeline will automatically start the deployment process. The key name for the zip file should align with the value provided for the BeanstalkSourceStageS3BucketKey parameter when you create the stack.
| You can update the value of the BeanstalkSourceStageS3BucketKey parameter by performing stack updates. |

| If you are using the sample environment and you want to test this Partner Solution, download the zip files that contain the Elastic Beanstalk sample application from the Elastic Beanstalk documentation. |
Troubleshooting
For troubleshooting common Partner Solution issues, refer to the AWS Partner Solution General Information Guide and Troubleshooting CloudFormation.
If your commits are not being pushed through to Amazon S3 when using Git to S3 integration, check the following:
-
In your Git webhooks configuration, check that your configured security parameters and he endpoint are correct. Consult the Git service documentation for detailed guidance on configuration.
-
Check the Lambda logs for errors. These are stored in Amazon CloudWatch Logs. To access the logs, open the endpoint’s Lambda function in the AWS Lambda console, navigate to the Monitoring tab, and then choose View logs in CloudWatch.
Additional Resources
Git webhooks
-
GitHub Developer Repository Webhooks API https://developer.github.com/v3/repos/hooks/
-
Atlassian Bitbucket Webhooks documentation https://confluence.atlassian.com/bitbucket/manage-webhooks-735643732.html
-
GitLab Webhooks documentation https://docs.gitlab.com/ce/user/project/integrations/webhooks.html
Quick Start Git to S3
-
Git Webhooks with AWS services https://aws.amazon.com/quickstart/architecture/git-to-s3-using-webhooks/
-
Git Webhooks with AWS services documentation https://aws-quickstart.s3.amazonaws.com/quickstart-git2s3/doc/git-to-amazon-s3-using-webhooks.pdf
Customer responsibility
After you deploy a Partner Solution, confirm that your resources and services are updated and configured—including any required patches—to meet your security and other needs. For more information, refer to the Shared Responsibility Model.
Feedback
To submit feature ideas and report bugs, use the Issues section of the GitHub repository for this Partner Solution. To submit code, refer to the Partner Solution Contributor’s Guide. To submit feedback on this deployment guide, use the following GitHub links:
Notices
This document is provided for informational purposes only. It represents current AWS product offerings and practices as of the date of issue of this document, which are subject to change without notice. Customers are responsible for making their own independent assessment of the information in this document and any use of AWS products or services, each of which is provided "as is" without warranty of any kind, whether expressed or implied. This document does not create any warranties, representations, contractual commitments, conditions, or assurances from AWS, its affiliates, suppliers, or licensors. The responsibilities and liabilities of AWS to its customers are controlled by AWS agreements, and this document is not part of, nor does it modify, any agreement between AWS and its customers.
The software included with this paper is licensed under the Apache License, version 2.0 (the "License"). You may not use this file except in compliance with the License. A copy of the License is located at https://aws.amazon.com/apache2.0/ or in the accompanying "license" file. This code is distributed on an "as is" basis, without warranties or conditions of any kind, either expressed or implied. Refer to the License for specific language governing permissions and limitations.