New Relic AWS Control Tower integration on AWS
Partner Solution Deployment Guide

August 2023
Rohit Kaul and Suruchi Saboo, New Relic
Welly Siauw, AWS Enterprise Support
Shivansh Singh, AWS Integration & Automation team

| Refer to the GitHub repository to view source files, report bugs, submit feature ideas, and post feedback about this Partner Solution. To comment on the documentation, refer to Feedback. |
This Partner Solution was created by New Relic in collaboration with Amazon Web Services (AWS). Partner Solutions are automated reference deployments that help people deploy popular technologies on AWS according to AWS best practices. If you’re unfamiliar with AWS Partner Solutions, refer to the AWS Partner Solution General Information Guide.
Overview
This guide covers the information you need to deploy the New Relic AWS Control Tower integration Partner Solution in the AWS Cloud.
This Partner Solution allows you to streamline the observability of your AWS Control Tower managed landing zone with New Relic using New Relic AWS integrations. Once you delpoy this Partner Solution, any new enrolled accounts in your AWS Control Tower managed organizations are automatically monitored with your New Relic account, from the moment they are launched. It also lets you link existing accounts with New Relic, in case you’ve already set up your landing zone. You can then manage all your AWS operational data and insights from one place, with no need to hop back and forth between multiple AWS accounts or other set of observability tools.
This Partner Solution is for developers, devops engineers, cloud administrators, and system integrators to fully automate observability of your AWS Control Tower landing zone with New Relic.
New Relic AWS Control Tower integration requires that you grant read permission to operational telemetry data from your AWS account. To do this, use an AWS Identity and Access Management (IAM) role that uses IAM cross-account access. To collect and stream your monitored telemetry data to New Relic, New Relic AWS Control Tower integration uses an Amazon CloudWatch metric stream and a Kinesis Firehose delivery stream. For more information, refer to Integrations and managed policies.
If you are new to New Relic, please refer to New Relic to learn about it.
Costs and licenses
There is no cost to use this Partner Solution, but you will be billed for any AWS services or resources that this Partner Solution deploys. For more information, refer to the AWS Partner Solution General Information Guide.
This Partner Solution requires that you have access to a New Relic account. You can create an account using the New Relic One pricing plan. Be sure to choose a Standard, Pro, or Enterprise tier for access to administrator features and support. If you don’t already have a New Relic account, you can sign up for a perpetually free access to New Relic from AWS Marketplace. The free tier includes 100 GB of data ingest every month, one full access user and unlimited basic users. With your New Relic One pay-as-you-go plan, you only pay for what you use beyond the free tier each month.
Architecture
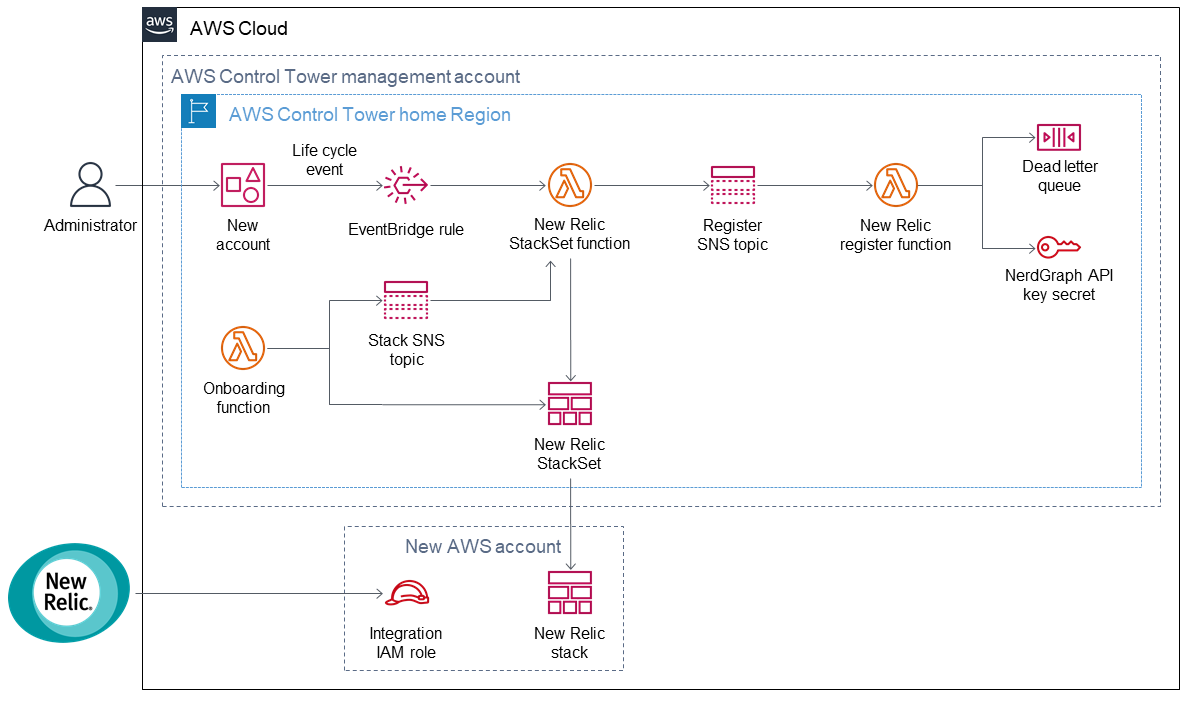
Deploying this Partner Solution with default parameters builds the following New Relic AWS Control Tower integration environment in the AWS Cloud.
-
An account administrator enrolls new or existing AWS accounts in AWS Control Tower, which generates a lifecycle event.
-
The lifecycle event invokes the New Relic StackSet Lambda function via an Amazon EventBridge rule.
-
The New Relic StackSet Lambda function invokes the New Relic register Lambda function via Amazon Simple Notification Service (Amazon SNS) and provides input for the New Relic StackSet.
-
A dead letter queue collects messages that the New Relic register Lambda function fails to process.
-
A NerdGraph API key secret is retrieved from AWS Secrets Manager (not shown). The New Relic register Lambda function calls the New Relic NerdGraph mutation endpoint to link your AWS account with your New Relic account.
-
A New Relic onboarding Lambda function invokes the stack SNS topic and provides input to the New Relic StackSet, which includes a cross-account IAM role.
-
The New Relic stack set creates an IAM cross-account role, an AWS CloudWatch metric stream, a Kinesis Data Firehose delivery stream and respective roles to deliver metrics to the New Relic platform.
-
The New Relic stack set also creates an Systems Manager - State Manager Association, Event Bridge rule, Event Bridge target API destination and connection associated with New Relic endpoint, an IAM role for Event Bridge to send events to API destination and Event Bridge target DLQ for automatic New Relic Infrastructure Agent installation in ec2 instances. Details of the template can be found here.
Deployment options
This Partner Solution provides the following deployment option:
| This Partner Solution enables all AWS integrations that are available in New Relic. For a list of integrations and data, see AWS integrations. |
Predeployment steps
Prepare your AWS Control Tower account
AWS Control Tower must be deployed before launching this Quick Start. For information about setting up an AWS Control Tower landing zone, see Getting Started with AWS Control Tower.
Prepare your New Relic account
When using the New Relic One pricing plan, you must have an active New Relic account that is subscribed to a standard or higher pricing tier. With a pay-as-you-go plan, you pay only for what you use beyond the free tier (100 GB) each month.
Prepare for the deployment
-
New Relic account ID
This Quick Start integrates your landing zone with a single New Relic account. Log in to your New Relic account and find the account ID. For more information, see Account ID.
-
New Relic NerdGraph User key
For all deployment options, use a New Relic User key, and enter it as parameter in the deployment. This Quick Start uses New Relic NerdGraph API for linking your AWS accounts with New Relic. For more information, see Introduction to New Relic NerdGraph, our GraphQL API.
Log in to your New Relic account. Create a User key, if you don’t have one already. For more information, see User key.
-
New Relic NerdGraph API endpoint
Determine if your New Relic account is in US or EU data center. For more information, see New Relic data centers. Use the default NerdGraph endpoint unless your New Relic account uses an EU data center. For more information, see NerdGraph endpoints
-
(Optional) Existing AWS account ID list
In case you’ve already set up your landing zone, and want to monitor existing AWS accounts enrolled in Control Tower managed organization with New Relic, supply the list of AWS account IDs (as comma separated string).
-
Log in to an AWS Control Tower management account.
-
For a list of managed accounts, navigate to AWS Control Tower.
-
Add your AWS account IDs.
-
-
New Relic license key
To export metrics to your New Relic account, you must have a license key. To generate a new key, refer to https://docs.newrelic.com/docs/apis/intro-apis/new-relic-api-keys [New Relic API keys^].
Deployment steps
-
Sign in to your AWS account, and launch this Partner Solution, as described under Deployment options. The AWS CloudFormation console opens with a prepopulated template.
-
Choose the correct AWS Region, and then choose Next.
-
On the Create stack page, keep the default setting for the template URL, and then choose Next.
-
On the Specify stack details page, change the stack name if needed. Review the parameters for the template. Provide values for the parameters that require input. For all other parameters, review the default settings and customize them as necessary. When you finish reviewing and customizing the parameters, choose Next.
Unless you’re customizing the Partner Solution templates or are instructed otherwise in this guide’s Predeployment section, don’t change the default settings for the following parameters: QSS3BucketName,QSS3BucketRegion, andQSS3KeyPrefix. Changing the values of these parameters will modify code references that point to the Amazon Simple Storage Service (Amazon S3) bucket name and key prefix. For more information, refer to the AWS Partner Solutions Contributor’s Guide. -
On the Configure stack options page, you can specify tags (key-value pairs) for resources in your stack and set advanced options. When you finish, choose Next.
-
On the Review page, review and confirm the template settings. Under Capabilities, select all of the check boxes to acknowledge that the template creates AWS Identity and Access Management (IAM) resources that might require the ability to automatically expand macros.
-
Choose Create stack. The stack takes about 5 minutes to deploy.
-
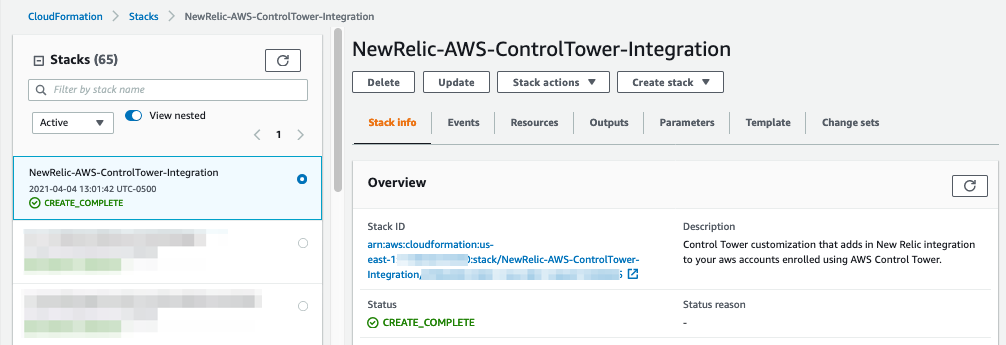
Monitor the stack’s status, and when the status is CREATE_COMPLETE, the New Relic AWS Control Tower integration deployment is ready.
-
To view the created resources, choose the Outputs tab.
Postdeployment steps
Test the deployment
When you enroll a new AWS Control Tower–managed account, the deployment sets up the IAM role, Metrics Streaming Resources and New Relic Infrastructure Agent installation resources for New Relic AWS Control Tower integration. You can then see the new account show up in the New Relic UI.
-
Log in to your New Relic account.
-
To view your AWS data, see Introduction to AWS integrations.
Cleanup
If you want to deploy this Quick Start for testing or demonstration purposes, and you don’t intend to use New Relic AWS integrations any longer, follow these steps to remove the AWS CloudFormation stack.
| Deleting the New Relic AWS Control Tower integration Quick Start stack and StackSets also deletes the New Relic IAM roles deployed in your AWS accounts, which removes cross-account trust with New Relic. This Quick Start does not, however, remove account links to New Relic. To remove an account from New Relic, see the subsequent section Uninstall the new Relic integration. |
Remove the AWS CloudFormation stack
The time to complete this step depends on how many AWS accounts are included in your New Relic AWS Control Tower integration deployment. If deleting the AWS CloudFormation stack times out, it’s safe to retry this step.
-
Sign in to the AWS CloudFormation console in your Control Tower management account.
-
To remove all of the deployed AWS resources, delete the New Relic AWS Control Tower integration stack. This also deletes all stack set instances, which include any IAM roles and Metrics Streaming Resources deployed for enrolled AWS accounts.
-
When the stack is deleted, navigate to AWS CloudFormation StackSet, and search for the New Relic stack set to confirm it was removed.
Uninstall the New Relic integration
After you confirm that the AWS CloudFormation stack was removed, remove all enrolled accounts from New Relic.
-
Log in to your New Relic account.
-
To uninstall the AWS integration from New Relic, see Uninstall infrastructure integrations.
Troubleshooting
For troubleshooting common Partner Solution issues, refer to the AWS Partner Solution General Information Guide and Troubleshooting CloudFormation.
Best practices for using New Relic AWS Control Tower integration on AWS
For a list of best practices for New Relic AWS Control Tower integration, see the Infrastructure monitoring best practices guide.
For more information, see Best practices guides.
Security
To enhance your security, see New Relic’s Intro to authentication (SAML SSO) for users on original user model. Modify the high-security mode settings, and review the account audit logs (NrAuditEvent). For more information, see Security and privacy.
Customer responsibility
After you deploy a Partner Solution, confirm that your resources and services are updated and configured—including any required patches—to meet your security and other needs. For more information, refer to the Shared Responsibility Model.
Feedback
To submit feature ideas and report bugs, use the Issues section of the GitHub repository for this Partner Solution. To submit code, refer to the Partner Solution Contributor’s Guide. To submit feedback on this deployment guide, use the following GitHub links:
Notices
This document is provided for informational purposes only. It represents current AWS product offerings and practices as of the date of issue of this document, which are subject to change without notice. Customers are responsible for making their own independent assessment of the information in this document and any use of AWS products or services, each of which is provided "as is" without warranty of any kind, whether expressed or implied. This document does not create any warranties, representations, contractual commitments, conditions, or assurances from AWS, its affiliates, suppliers, or licensors. The responsibilities and liabilities of AWS to its customers are controlled by AWS agreements, and this document is not part of, nor does it modify, any agreement between AWS and its customers.
The software included with this paper is licensed under the Apache License, version 2.0 (the "License"). You may not use this file except in compliance with the License. A copy of the License is located at https://aws.amazon.com/apache2.0/ or in the accompanying "license" file. This code is distributed on an "as is" basis, without warranties or conditions of any kind, either expressed or implied. Refer to the License for specific language governing permissions and limitations.