Darktrace vSensor on AWS
Partner Solution Deployment Guide

November 2023
Development Team Documentations at Darktrace
Tony Bulding, AWS Integration & Automation team

| Refer to the GitHub repository to view source files, report bugs, submit feature ideas, and post feedback about this Partner Solution. To comment on the documentation, refer to Feedback. |
This Partner Solution was created by Darktrace in collaboration with Amazon Web Services (AWS). Partner Solutions are automated reference deployments that help people deploy popular technologies on AWS according to AWS best practices. If you’re unfamiliar with AWS Partner Solutions, refer to the AWS Partner Solution General Information Guide.
Overview
This Quick Start deploys Darktrace vSensor virtual threat detection on the Amazon Web Services (AWS) Cloud. Instead of relying on flow logs, Darktrace probes analyze raw data from mirrored virtual private cloud (VPC) traffic to learn to identify threats. This guide covers the steps necessary to deploy this Quick Start.
Amazon Virtual Private Cloud (VPC) traffic mirroring copies traffic from Amazon Elastic Compute Cloud (Amazon EC2) instances you want to monitor. A Network Load Balancer distributes mirrored traffic to Darktrace vSensor probes in private subnets. The deployment also supports sending data to vSensors from Darktrace osSensors you configure on virtual machines, containerized applications, and legacy EC2 instance types that do not support traffic mirroring.
Darktrace vSensor extracts relevant metadata from mirrored traffic and stores it in an Amazon Simple Storage Service (Amazon S3) bucket. Your existing Darktrace deployment analyzes the metadata using Darktrace’s Enterprise Immune System to build metrics it uses to identify threats.
Darktrace vSensors support syslog to integrate with third-party security information and event management tools.
High Availability on AWS
If you choose to deploy more than one vSensor, they are deployed across multiple Availability Zones for high-availability. For more information, see Regions and Availability Zones.
This guide is for database administrators, enterprise architects, system administrators, and developers who want to run Darktrace vSensor probes in a highly-available Amazon Elastic Compute Cloud (Amazon EC2) environment.
Costs and licenses
This Quick Start requires a valid update key obtained from the Darktrace Customer Portal or a Darktrace representative. You must provide a valid update key during deployment in order for the Quick Start to launch successfully. A free 30-day trial is available. Contact your Darktrace representative or see Start your free 30-day trial today.
Architecture
Deploying this Quick Start with default parameters builds the following Darktrace vSensor environment in the AWS Cloud.
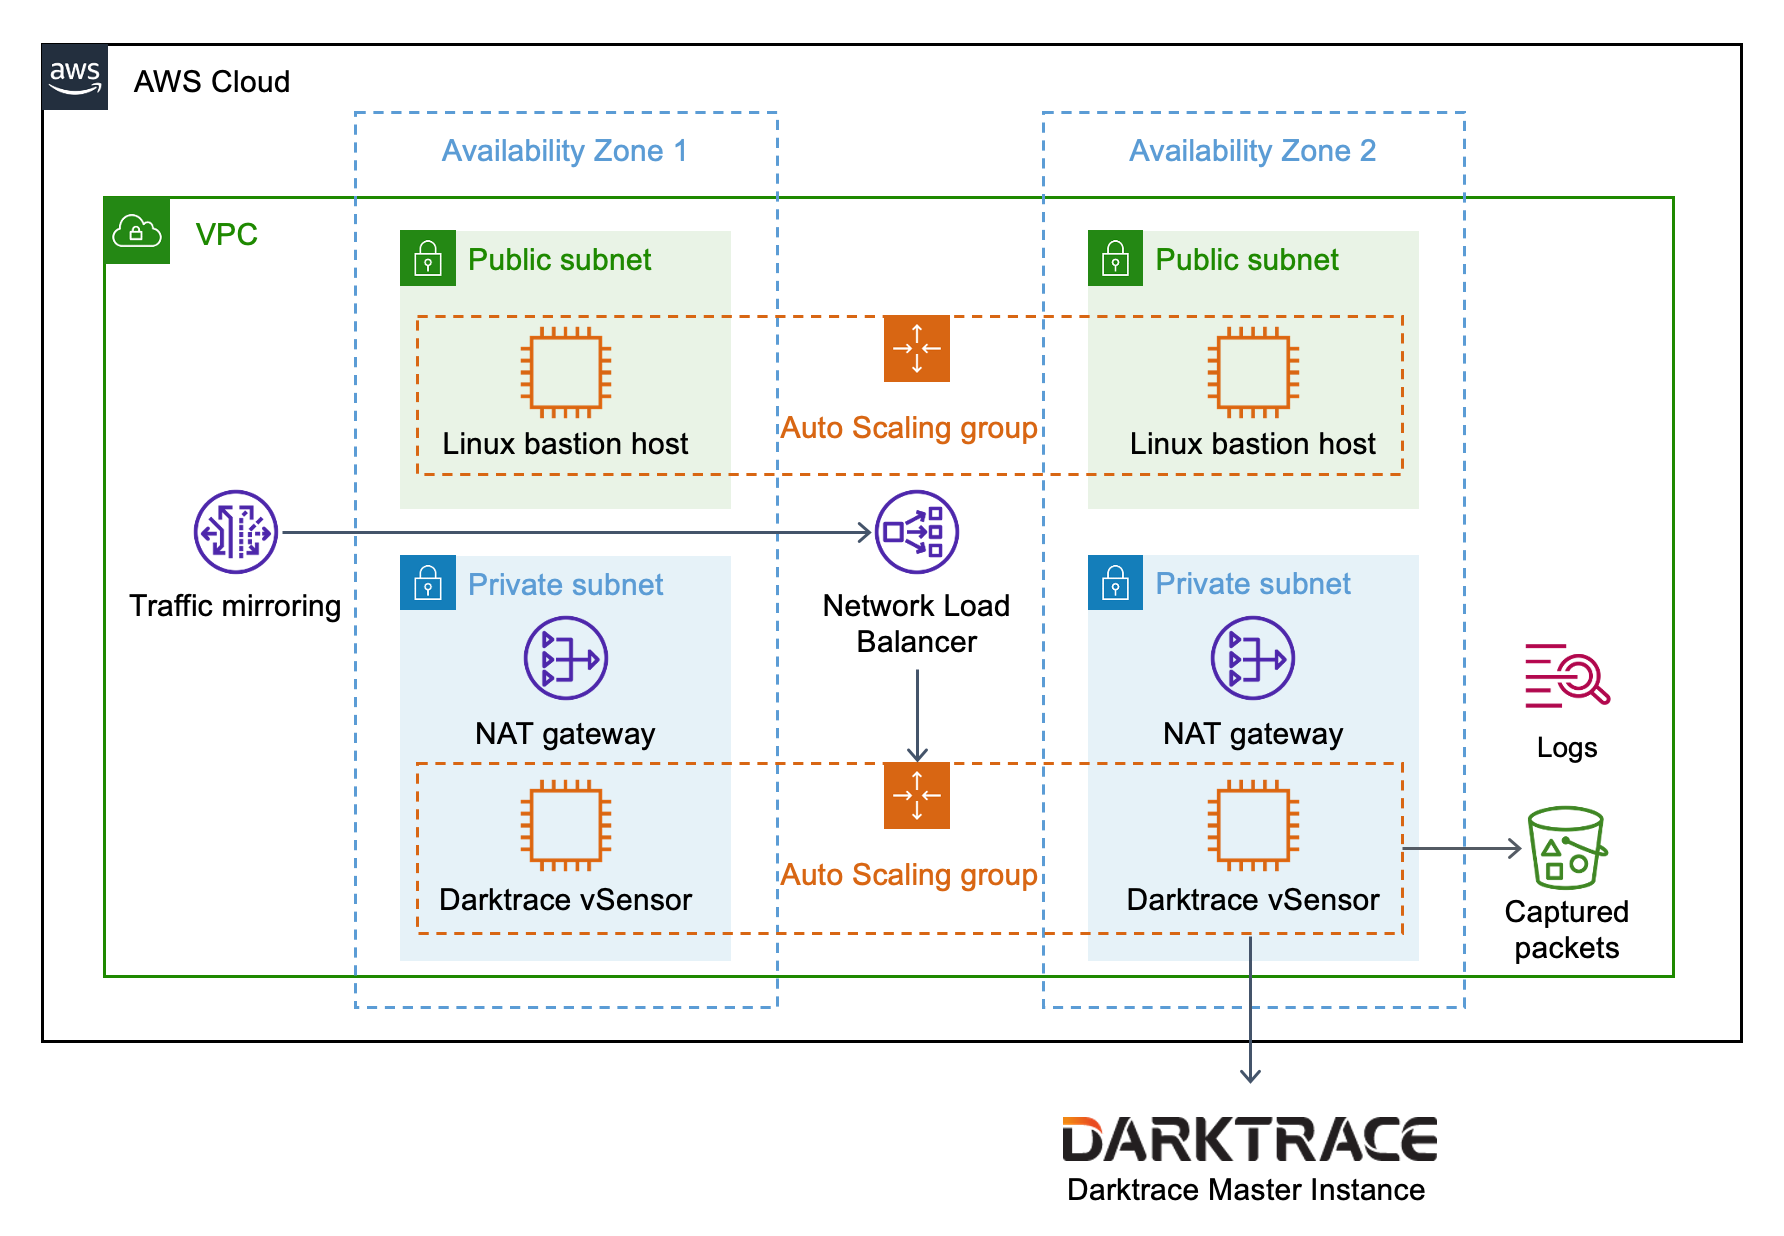
As shown in Figure 1, this Quick Start sets up the following:
-
A highly available architecture (when 2+ Availability Zones are used).
-
A virtual private network (VPC) configured with public and private subnets, according to AWS best practices, to provide you with your own virtual network on AWS.
-
In the public subnets:
-
Linux bastion hosts in an Auto Scaling group managing inbound Secure Shell (SSH) access to Darktrace vSensor instances in the private subnets.*
-
-
In the private subnets:
-
Managed network address translation (NAT) gateways to allow outbound internet access to Darktrace vSensor instances.
-
An Auto Scaling group of Darktrace vSensor probes hosted on Amazon EC2 instances.
-
-
VPC traffic mirroring to send mirrored traffic to a Network Load Balancer.
-
A Network Load Balancer to distribute monitored VPC traffic to Darktrace vSensor instances.
-
An Amazon S3 bucket to store packets captured by Darktrace vSensor.
-
Amazon CloudWatch to provide logs to collect metrics from Darktrace vSensor EC2 instances.
* The template that deploys this Quick Start into an existing VPC skips the components marked by asterisks and prompts you for your existing VPC configuration.
Deployment options
This Quick Start provides the following deployment options:
-
Deploy Darktrace vSensor into a new VPC. This option builds a new AWS environment that consists of the VPC, subnets, NAT gateways, security groups, bastion hosts, and other infrastructure components. It then deploys Darktrace vSensor into this new VPC.
-
Deploy Darktrace vSensor into an existing VPC. This option provisions Darktrace vSensor in your existing AWS infrastructure.
This Quick Start provides separate templates for these options. It also lets you configure Classless Inter-Domain Routing (CIDR) blocks, instance types, and Darktrace vSensor settings.
Predeployment steps
Generate AWS Systems Manager parameters
The Quick Start now uses AWS Systems Manager Parameter Store to hold the configuration and secrets for Darktrace vSensor. This is due to EC2 instance user data being unencrypted.
Create separate "Secure String" SSM Parameters in the expected AWS region for each of the following:
-
vSensor Update Key (e.g.
abcdefg:12345678) -
Darktrace Instance Hostname (e.g.
https://instancename.cloud.darktrace.com:443) -
Darktrace Instance Push Token (e.g.
vsensor-push-token:123456abcdefg) -
Darktrace Instance Proxy (e.g.
http://proxyname.example.com:3128,http://username@password:proxyname.example.com:3128ornoneto not use a proxy) -
osSensor HMAC (e.g.
ossensorhmac123456abcdefgornoneto disable osSensor support)
You will provide the parameter names to the CloudFormation template, for the vSensor to automatically decrypt these values on start up.
Using SSM parameters provides the benefit that configurations can be more easily cycled out using the Auto Scaling Group Instance Refresh features, without having to redeploy the Quick Start template.
| Please review ASG Instance Refresh Documentation. Refreshing all instances will cause an outage, since instances are terminated before new instances are created. |
Register a push token
Register a new push token to enable connection between vSensor probes and an existing Darktrace on-premise or cloud instance. All of the vSensor instances in this deployment share the same push token.
-
Log into the Darktrace console.
-
On the main menu, choose Admin > System Config.
-
In the Push Probe Tokens section, enter a label for the vSensor deployment.
-
Choose Add. A token is generated in the form of
[label:string]. -
Record the token, as it only displays once. You must enter the token in the Darktrace Instance push token parameter field during Quick Start deployment.
If your Darktrace Instance is behind a firewall, you must grant access to the instance from the IP addresses of your NAT Gateways after deployment. For more information, see Post deployment steps, later in this guide.
| Darktrace cloud instances are already configured to allow push token access, no firewall changes are necessary. |
Traffic Mirror Configuration Modes
It is important you must understand the different traffic mirroring options available before deploying.
A new option CrossZoneLBEnable has been provided to reduce bandwidth costs for traffic ingestion.
If "No" is set (the default), the load balancer will only send mirrored traffic to vSensors in the same Availability Zone as the mirror source. The same is true for osSensor traffic.
This option reduces costs by preventing mirror traffic from crossing zones, which can be substantial in large bandwidth environments.
| You must configure the number of vSensors deployed (minimum and desired) to meet or exceed the count of availability zones deployed to, otherwise traffic mirror sessions and osSensors in zones without vSensors will not be mirrored. |
If "Yes" is set, it is possible to reduce the vSensor count as low as 1 without loss of traffic mirroring, this may be suited to small traffic environments.
| Select at least 2 availability zones for highly available fault tolerance. |
Deployment steps
-
Sign in to your AWS account, and launch this Partner Solution, as described under Deployment options. The AWS CloudFormation console opens with a prepopulated template.
-
Choose the correct AWS Region, and then choose Next.
-
On the Create stack page, keep the default setting for the template URL, and then choose Next.
-
On the Specify stack details page, change the stack name if needed. Review the parameters for the template. Provide values for the parameters that require input. For all other parameters, review the default settings and customize them as necessary. When you finish reviewing and customizing the parameters, choose Next.
Unless you’re customizing the Partner Solution templates or are instructed otherwise in this guide’s Predeployment section, don’t change the default settings for the following parameters: QSS3BucketName,QSS3BucketRegion, andQSS3KeyPrefix. Changing the values of these parameters will modify code references that point to the Amazon Simple Storage Service (Amazon S3) bucket name and key prefix. For more information, refer to the AWS Partner Solutions Contributor’s Guide. -
On the Configure stack options page, you can specify tags (key-value pairs) for resources in your stack and set advanced options. When you finish, choose Next.
-
On the Review page, review and confirm the template settings. Under Capabilities, select all of the check boxes to acknowledge that the template creates AWS Identity and Access Management (IAM) resources that might require the ability to automatically expand macros.
-
Choose Create stack. The stack takes about 30 minutes / 1 hour to deploy.
-
Monitor the stack’s status, and when the status is CREATE_COMPLETE, the Darktrace vSensor deployment is ready.
-
To view the created resources, choose the Outputs tab.
Postdeployment steps
Configure networking
If your Darktrace instance is behind a firewall, you must grant access to the instance from the IP addresses of your NAT gateways. For a new VPC deployment, use the NatGatewayEIPs on the Outputs tab of the stack in the AWS CloudFormation console. For an existing VPC deployment, use the IP addresses of the existing NAT gateways.
Configure traffic mirroring
To add your existing EC2 instances to be mirrored and monitored, configure a traffic mirror session. For more information, see Traffic mirror sessions. When doing this, use the traffic mirror target and filter IDs on the Outputs tab of the stack in the AWS CloudFormation console. You can automate the process of adding your existing EC2 instances to this deployment. For more information, contact your Darktrace representative for scripts and guidance to do this.
VPC Traffic Mirroring is only supported on AWS Nitro-based EC2 instance types and some non-Nitro instance types. For more information, see Amazon VPC Traffic Mirroring is now supported on select non-Nitro instance types.
To monitor EC2 instance types that do not support VPC Traffic Mirroring, configure them with Darktrace osSensors. When doing this, use the DNS name of the Network Load Balancer on the Outputs tab of the stack in the CloudFormation console. For more information about configuring osSensors, visit the Darktrace Customer Portal.
| osSensor 6.0 and above is required to correctly mirror traffic for this Quick Start. Installation instructions are available on the Darktrace Customer Portal. |
Test the deployment
After deployment, verify that all vSensors are listed in the Probes section of the System Config screen in the Darktrace Threat Visualizer. After adding the Traffic Mirror Sessions of EC2 instances that you wish to monitor, or configured osSensors to communicate with the vSensors, verify that they display in the Threat Visualizer.
Network security
This deployment follows AWS security best practices for network security. The vSensor instances are deployed in private subnets. They are only accessible from the internet using SSH to connect to bastion hosts in the private subnets. For existing VPC deployments, it is important that security groups only allow SSH access from trusted sources. It is not recommended to allow direct SSH access to vSensors from the internet. For more information, see Best Practices for Security, Identity, & Compliance.
OS security
To gain root access to vSensor instances, use the ubuntu user name and the EC2 key pair parameter you entered during deployment as the private key path. Then sudo to root. The EC2 key pair is also required to access ec2-user of the bastion hosts. For more information, see Connect to your Linux instance using SSH.
The bastion hosts deployed by this Quick Start are set to update automatically. The deployed vSensors are configured to receive the latest security and product updates daily from Darktrace and Ubuntu package repositories.
Using AWS Sessions Manager
When connecting via the AWS Systems Manager Session Manager it is recommended to use the session/preferences document created by the template.
This will make sure that the session is encrypted and logged (in the same CloudWatch Log group as the vSensors logs). That is the same kms key that is used for encrypting log data in CloudWatch Logs.
For the Systems Manager Session Manager allowed users you can Enforce a session document permission check for the AWS CLI. The name of the session/preferences document is in the Outputs.
Example: aws ssm start-session --target <instance_id> --document-name <session_manager_preferences_name>.
In the Sessions Manager web console, each user must set their Session Manager Preferences to use the KMS Key ID and Log Group if encrypted sessions and logging are required.
Troubleshooting
For troubleshooting common Quick Start issues, refer to the AWS Quick Start General Information Guide and Troubleshooting CloudFormation.
Auto Scaling Group (ASG) Fails
In scenarios of invalid configuration parameters, upstream internet access blocked and other cases of the EC2 images failing to install and configure Darktrace vSensor, the ASG will fail to deploy.
Viewing the Auto Scaling Group "Instance Management" page via the CloudFormation resources page will show terminating or no instances in this situation.
In most situations, logging will be available from the vSensor start up in CloudWatch. View "Log Groups", find the group named [SHORTID]-vSensor-Logs and look for Log Streams ending in -userdata.
If the configuration provided by SSM Parameters is seen as invalid in these logs, edit the SSM parameters to rectify the problem. Then perform a "instance refresh" on the ASG to attempt again with the new configuration options.
If no userdata logging is provided, you may need to connect directly to the vSensor via SSH or AWS Systems Manager and retrieve /var/log/userdata.log directly. "Detach" the vSensor from the ASG to prevent it terminating during this procedure.
For situations where the error is not clear, contact Darktrace Customer Support via the Darktrace Customer Portal, provide CloudFormation stack errors and one of the above userdata logs if available.
Customer responsibility
After you deploy a Partner Solution, confirm that your resources and services are updated and configured—including any required patches—to meet your security and other needs. For more information, refer to the Shared Responsibility Model.
Feedback
To submit feature ideas and report bugs, use the Issues section of the GitHub repository for this Partner Solution. To submit code, refer to the Partner Solution Contributor’s Guide. To submit feedback on this deployment guide, use the following GitHub links:
Notices
This document is provided for informational purposes only. It represents current AWS product offerings and practices as of the date of issue of this document, which are subject to change without notice. Customers are responsible for making their own independent assessment of the information in this document and any use of AWS products or services, each of which is provided "as is" without warranty of any kind, whether expressed or implied. This document does not create any warranties, representations, contractual commitments, conditions, or assurances from AWS, its affiliates, suppliers, or licensors. The responsibilities and liabilities of AWS to its customers are controlled by AWS agreements, and this document is not part of, nor does it modify, any agreement between AWS and its customers.
The software included with this paper is licensed under the Apache License, version 2.0 (the "License"). You may not use this file except in compliance with the License. A copy of the License is located at https://aws.amazon.com/apache2.0/ or in the accompanying "license" file. This code is distributed on an "as is" basis, without warranties or conditions of any kind, either expressed or implied. Refer to the License for specific language governing permissions and limitations.