Illumina DRAGEN on AWS
Partner Solution Deployment Guide

July 2023
John Smith, Illumina
Will Quiles, Olivia Choudhury, Aaron Friedman, and Vinod Shukla, AWS

| Refer to the GitHub repository to view source files, report bugs, submit feature ideas, and post feedback about this Partner Solution. To comment on the documentation, refer to Feedback. |
This Partner Solution was created by Illumina in collaboration with Amazon Web Services (AWS). Partner Solutions are automated reference deployments that help people deploy popular technologies on AWS according to AWS best practices. If you’re unfamiliar with AWS Partner Solutions, refer to the AWS Partner Solution General Information Guide.
Overview
This guide covers the information you need to deploy the Illumina DRAGEN Partner Solution in the AWS Cloud.
This Partner Solution guide provides step-by-step instructions for deploying Dynamic Read Analysis for GENomics (DRAGEN) on the AWS Cloud. The Partner Solution is for users who would like to conduct bioinformatic analysis on next-generation sequencing data using DRAGEN on AWS.
This Partner Solution was created to get you up and running with DRAGEN Complete Suite (CS) on AWS. DRAGEN CS offerings enable ultra-rapid analysis of next-generation sequencing (NGS) data, and significantly reduce the time required to analyze genomic data while also improving accuracy.
DRAGEN CS includes many bioinformatics pipelines that harness the power of the DRAGEN platform and provide highly optimized algorithms for mapping, aligning, sorting, duplicate marking, and haplotype variant calling. These pipelines include DRAGEN Germline V2, DRAGEN Somatic V2 (Tumor and Tumor/Normal), DRAGEN Virtual Long Read Detection (VLRD), DRAGEN RNA Gene Fusion, DRAGEN Joint Genotyping, and GATK Best Practices. The DRAGEN Germline V2 and DRAGEN Somatic V2 pipelines have improved accuracy in calling single nucleotide polymorphisms (SNPs) and small insertions and deletions (INDELs) compared with industry standards. For performance results, see the PrecisionFDA Hidden Treasures – Warm Up challenge and the DRAGEN evaluation on the Inside DNAnexus blog.
Costs and licenses
There is no cost to use this Partner Solution, but you will be billed for any AWS services or resources that this Partner Solution deploys. For more information, refer to the AWS Partner Solution General Information Guide.
This Quick Start requires a subscription to the Amazon Machine Image (AMI) for DRAGEN Complete Suite, which is available with per-hour pricing from AWS Marketplace.
Architecture
Deploying this Partner Solution with default parameters builds the following DRAGEN environment in the AWS Cloud.

The Partner Solution sets up the following:
-
A highly available architecture that spans two Availability Zones.*
-
A virtual private cloud (VPC) configured with public and private subnets according to AWS best practices. This provides the network architecture for DRAGEN deployment.*
-
An internet gateway to provide access to the internet.*
-
In the public subnets, managed NAT gateways to allow outbound internet access for resources in the private subnets.*
-
An AWS CodePipeline pipeline that builds a Docker image and uploads it into an Amazon Elastic Container Registry (Amazon ECR) repository that interfaces with AWS Batch and runs in the DRAGEN AMI.
-
Two AWS Batch compute environments: one for Amazon Elastic Compute Cloud (Amazon EC2) Spot instances and the other for On-Demand instances. In the default setting, On-Demand instances have been prioritized over Spot instances. In order to reduce computation cost, you can prioritize Spot instances over On-Demand instances by updating the compute environment order under the Job Queue option of AWS Batch in the console.
-
An AWS Batch job queue that prioritizes submission to the compute environment for Spot Instances to optimize for cost.
-
An AWS Batch job definition to run DRAGEN.
-
AWS Identity and Access Management (IAM) roles and policies for the AWS Batch jobs to run.
* The template that deploys the Partner Solution into an existing VPC skips the tasks marked by asterisks and prompts you for your existing VPC configuration.
Deployment options
This Partner Solution provides the following deployment options:
-
Deploy DRAGEN into a new VPC. This option builds a new AWS environment that consists of the VPC, subnets, NAT gateways, security groups, bastion hosts, and other infrastructure components. It then deploys DRAGEN into this new VPC.
-
Deploy DRAGEN into an existing VPC. This option provisions DRAGEN in your existing AWS infrastructure.
This Partner Solution provides separate templates for these options. It also lets you configure Classless Inter-Domain Routing (CIDR) blocks, instance types, and DRAGEN settings.
Predeployment steps
Technical requirements
-
Limit increases for F1 instances. DRAGEN runs on Amazon EC2 F1 instances because it requires a field-programmable gate array (FPGA). This Partner Solution supports
f1.2xlarge,f1.4xlarge, andf1.16xlargeinstance types. You should request limit increases for F1 instances, to support the maximum number of simultaneous DRAGEN jobs that you expect to run. -
S3 bucket for genomic data. You must have an Amazon Simple Storage Service (Amazon S3) bucket in the AWS Region where you plan to deploy the Partner Solution. This S3 bucket should contain:
-
The genomic input datasets that you want to run in the Partner Solution environment
-
The DRAGEN-specific reference hash table directories that are provided by Illumina or that you create from FASTA files. For instructions on how to create reference hash table directories, refer to DRAGEN Bio-IT Platform User Guide
-
An output folder for DRAGEN job outputs such as the binary alignment map (BAM) and variant call format (VCF) files
You’ll be prompted for the bucket name when you deploy the Partner Solution. The appropriate roles and policies to read from, and write to, this S3 genomics bucket are created during the Partner Solution deployment.
-
Marketplace subscription
-
Open the page for the DRAGEN AMI in AWS Marketplace, and then choose Continue to Subscribe.
Deployment steps
-
Sign in to your AWS account, and launch this Partner Solution, as described under Deployment options. The AWS CloudFormation console opens with a prepopulated template.
-
Choose the correct AWS Region, and then choose Next.
-
On the Create stack page, keep the default setting for the template URL, and then choose Next.
-
On the Specify stack details page, change the stack name if needed. Review the parameters for the template. Provide values for the parameters that require input. For all other parameters, review the default settings and customize them as necessary. When you finish reviewing and customizing the parameters, choose Next.
Unless you’re customizing the Partner Solution templates or are instructed otherwise in this guide’s Predeployment section, don’t change the default settings for the following parameters: QSS3BucketName,QSS3BucketRegion, andQSS3KeyPrefix. Changing the values of these parameters will modify code references that point to the Amazon Simple Storage Service (Amazon S3) bucket name and key prefix. For more information, refer to the AWS Partner Solutions Contributor’s Guide. -
On the Configure stack options page, you can specify tags (key-value pairs) for resources in your stack and set advanced options. When you finish, choose Next.
-
On the Review page, review and confirm the template settings. Under Capabilities, select all of the check boxes to acknowledge that the template creates AWS Identity and Access Management (IAM) resources that might require the ability to automatically expand macros.
-
Choose Create stack. The stack takes about 15 minutes to deploy.
-
Monitor the stack’s status, and when the status is CREATE_COMPLETE, the Illumina DRAGEN deployment is ready.
-
To view the created resources, choose the Outputs tab.
Postdeployment steps
Test the deployment
When the deployment is complete, you can verify the environment by running a DRAGEN job. This job reads the input datasets and the reference hash table from the S3 genomics data bucket you specified when you deployed the Quick Start, and outputs the analysis results into the designated output location in the S3 bucket. Note that the input datasets and reference hash table must be located in the same S3 bucket, the one specified during deployment.
As a quick test, we recommend using an input dataset consisting of a smaller FASTQ pair, such as one of the following data samples:
Use AWS Batch to launch the job either through the AWS Command Line Interface (AWS CLI) or the console. Provide the DRAGEN job parameters as commands (in the command array within the containerOverrides field in the AWS CLI or the Command field in the console). For a full list of options, see the Illumina DRAGEN Getting Started Guide or Illumina DRAGEN Bio-IT Platform User Guide available on the Illumina DRAGEN Bio-IT Platform Support Resources website.
Most of the options function exactly as they are described in the guide. However, for options that refer to local files or directories, provide the full path to the S3 bucket that contains the genomics data.
In the following sections, we’ve provided instructions for running an end-to-end DRAGEN job using both methods (AWS CLI and console). In this example, the DRAGEN job handles mapping, aligning, sorting, deduplication, and variant calling. An input dataset with a paired FASTQ file is used to generate a variant call format (VCF) output file.
Option 1: Use the AWS CLI
The simplest way to run a DRAGEN job by using the AWS CLI is to create an input JSON file that describes the job. Here’s an example of a JSON input file named e2e-job.json:
{
    "jobName": "e2e-job",
    "jobQueue": "dragen-queue",
    "jobDefinition": "dragen",
    "containerOverrides": {
        "vcpus": 16,
        "memory": 120000,
        "command": [
            "-f", "-r", "s3://<bucket/path-to-ref-ht>",
            "-1", "s3://<bucket/path-to-file/file1_1.fastq.gz>",
            "-2", "s3://<bucket/path-to-file/file1_2.fastq.gz>",
            "--RGID", "1",
            "--RGSM", <RGSM>,
            "--enable-bam-indexing", "true",
            "--enable-map-align-output", "true",
            "--enable-sort", "true",
            "--output-file-prefix", <PREFIX>,
            "--enable-map-align", "true",
            "--output-format", "BAM",
            "--output-directory", "s3://<bucket/path-to-output/>",
            "--enable-variant-caller", "true"
        ]
    },
    "retryStrategy": {
        "attempts": 1
    }
}
You can then launch the job from the command line by using the submit-job command and specifying the e2e-job.json file as input:
aws batch submit-job --cli-input-json file://e2e-job.jsonYou can submit multiple Batch jobs from the CLI. Here is an example with two JSON input files named e2e-job1.json and e2e-job2.json.
{
    "jobName": "e2e-job1",
    "jobQueue": "dragen-queue",
    "jobDefinition": "dragen",
    "containerOverrides": {
        "vcpus": 16,
        "memory": 120000,
        "command": [
            "-f", "-r", "s3://<bucket/path-to-ref-ht>",
            "-1", "s3://<bucket/path-to-file/file1_1.fastq.gz>",
            "-2", "s3://<bucket/path-to-file/file1_2.fastq.gz>",
            "--RGID", "1",
            "--RGSM", <RGSM>,
            "--enable-bam-indexing", "true",
            "--enable-map-align-output", "true",
            "--enable-sort", "true",
            "--output-file-prefix", <PREFIX>,
            "--enable-map-align", "true",
            "--output-format", "BAM",
            "--output-directory", "s3://<bucket/path-to-output/>",
            "--enable-variant-caller", "true"
        ]
    },
    "retryStrategy": {
        "attempts": 1
    }
}
{
"jobName": "e2e-job2",
"jobQueue": "dragen-queue",
"jobDefinition": "dragen",
"containerOverrides": {
"vcpus": 16,
"memory": 120000,
"command": [
"-f", "-r", "s3://<bucket/path-to-ref-ht>",
"-1", "s3://<bucket/path-to-file/file1_1.fastq.gz>",
"-2", "s3://<bucket/path-to-file/file1_2.fastq.gz>",
"--RGID", "1",
"--RGSM", <RGSM>,
"--enable-bam-indexing", "true",
"--enable-map-align-output", "true",
"--enable-sort", "true",
"--output-file-prefix", <PREFIX>,
"--enable-map-align", "true",
"--output-format", "BAM",
"--output-directory", "s3://<bucket/path-to-output/>",
"--enable-variant-caller", "true"
]
},
"retryStrategy": {
"attempts": 1
}
}The following bash script can be used to submit the above two jobs.
#!/bin/bash
echo "Starting first job ..."
aws batch submit-job --cli-input-json e2e-job1.json > ./job-output-log
echo "Starting second job ..."
aws batch submit-job --cli-input-json e2e-job1.json >> ./job-output-log
echo "No more jobs pending!"
Option 2: Use the AWS Batch Console
To run the DRAGEN job from the console:.
-
Open the AWS Batch console at https://console.aws.amazon.com/batch/
-
From the navigation bar, choose the AWS Region you used for the Quick Start deployment.
-
In the navigation pane, choose Jobs, Submit new job.
-
Fill out these fields, as shown in Figure 2:
-
Job name: Enter a unique name for the job.
-
Job definition: Choose the DRAGEN job definition that was created by the Quick Start and displayed in the Outputs tab of the AWS CloudFormation console in step 3(9).
-
Job queue: Choose dragen-queue, which was created by the Quick Start.
-
Job type: Choose Single.
-
Command: Specify the DRAGEN-specific parameters shown in the JSON command array in option 1.
-
vCPUs, Memory, Job attempts, Execution timeout: Keep the defaults that are specified in the job definition.
For more information, see the AWS Batch documentation.
-
-
Choose Submit.
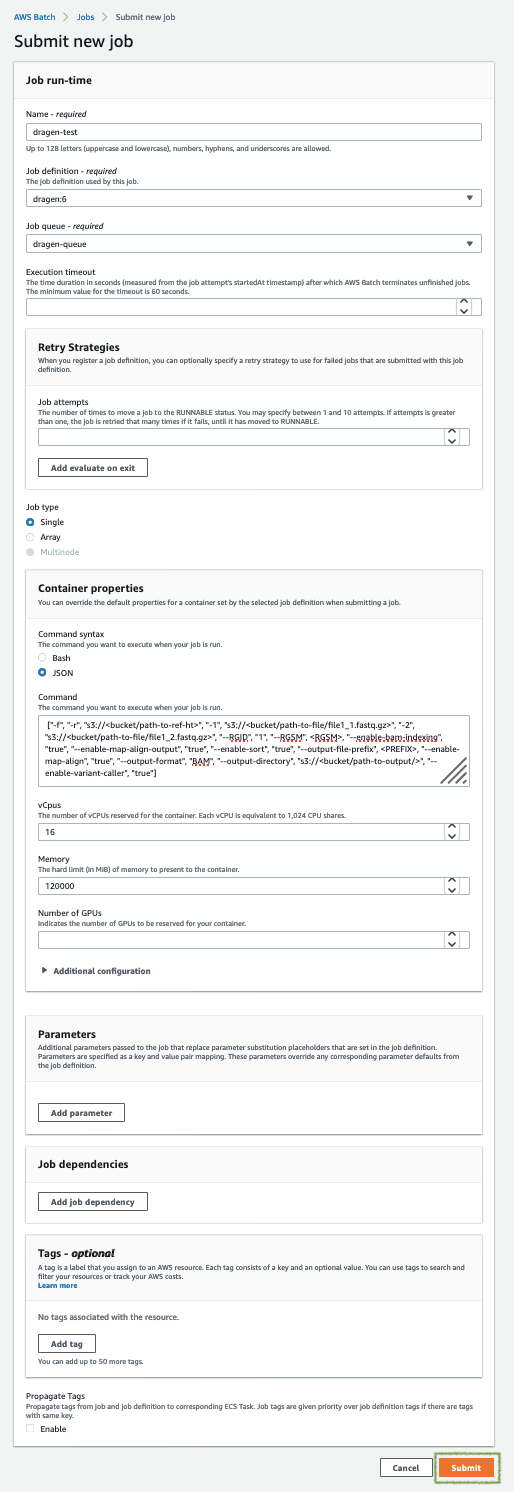 Figure 2. Running a DRAGEN job from the AWS Batch console
 -
Monitor the job status in the AWS Batch window to see if it succeeded or failed. For more information about job states and exit codes, see the AWS Batch documentation.

Best practices for using DRAGEN on AWS
For simplicity, we recommend that you create your S3 bucket in the AWS Region that you are deploying the Quick Start into. In some use cases, you might need to attach EBS volumes to instances. The DRAGEN guides are available as links from the DRAGEN Complete Suite webpage in AWS Marketplace (see the Usage Information section on that page).
Security
DRAGEN doesn’t enforce any specific security requirements. However, for security, this Quick Start deploys DRAGEN into private subnets that aren’t externally reachable from outside the VPC (they can access the internet only through NAT gateways). Please consult your IT and security teams for image hardening, encryption, and other security requirements.
Troubleshooting
For troubleshooting common Partner Solution issues, refer to the AWS Partner Solution General Information Guide and Troubleshooting CloudFormation.
FAQ
Q. How can I find out whether my DRAGEN job has completed?
A. When you submit a DRAGEN job by using the AWS CLI or the AWS Batch console, as described previously in Test the deployment section, you will get an AWS Batch job ID. You should monitor the job status to check for completion. When the job has completed successfully, its job state will be displayed as SUCCEEDED and the outputs will be uploaded into the output S3 bucket location that is specified in the job. For more information about job states, see the AWS Batch documentation.
Q. What should I do if the DRAGEN job fails?
A. If your DRAGEN job fails, more information will be available in Amazon CloudWatch Logs. You can access the log either from the CloudWatch console (see Figure 3) or through the Log stream name link in the AWS Batch job (see Figure 4).


When you run a DRAGEN job, you use the --output-directory parameter to specify an S3 output bucket, as described in Test the deployment section. If the DRAGEN job fails, more information about the failure is provided in the DRAGEN process output log, which is uploaded to the S3 bucket you specified. Look for the object in the S3 bucket that has the key name dragen_log_<timestamp>.txt for the output log.
Generally, DRAGEN process logs will give adequate information about failures, but if you need further help, please contact Illumina at techsupport@illumina.com.
Additional Resources
AWS services
-
Amazon EC2
https://aws.amazon.com/documentation/ec2/ -
Amazon VPC
https://aws.amazon.com/documentation/vpc/ -
AWS CloudFormation
https://aws.amazon.com/documentation/cloudformation/
DRAGEN documentation
-
Illumina DRAGEN Bio-IT Platform Support Resources
https://sapac.support.illumina.com/sequencing/sequencing_software/dragen-bio-it-platform.html -
Performance studies
Public genomic data
-
Reference hash table for DRAGEN v3.7.5
https://ilmn-dragen-giab-samples.s3.amazonaws.com/Hashtable/hg19-cnv-anchored.v8.tar -
Small data samples for testing
Customer responsibility
After you deploy a Partner Solution, confirm that your resources and services are updated and configured—including any required patches—to meet your security and other needs. For more information, refer to the Shared Responsibility Model.
Feedback
To submit feature ideas and report bugs, use the Issues section of the GitHub repository for this Partner Solution. To submit code, refer to the Partner Solution Contributor’s Guide. To submit feedback on this deployment guide, use the following GitHub links:
Notices
This document is provided for informational purposes only. It represents current AWS product offerings and practices as of the date of issue of this document, which are subject to change without notice. Customers are responsible for making their own independent assessment of the information in this document and any use of AWS products or services, each of which is provided "as is" without warranty of any kind, whether expressed or implied. This document does not create any warranties, representations, contractual commitments, conditions, or assurances from AWS, its affiliates, suppliers, or licensors. The responsibilities and liabilities of AWS to its customers are controlled by AWS agreements, and this document is not part of, nor does it modify, any agreement between AWS and its customers.
The software included with this paper is licensed under the Apache License, version 2.0 (the "License"). You may not use this file except in compliance with the License. A copy of the License is located at https://aws.amazon.com/apache2.0/ or in the accompanying "license" file. This code is distributed on an "as is" basis, without warranties or conditions of any kind, either expressed or implied. Refer to the License for specific language governing permissions and limitations.