JFrog Artifactory Enterprise and JFrog Xray on AWS
Partner Solution Deployment Guide

February 2022
Giridharan Ramasamy, JFrog Ltd.
Dylan Owen, AWS Integration & Automation team

| Refer to the GitHub repository to view source files, report bugs, submit feature ideas, and post feedback about this Partner Solution. To comment on the documentation, refer to Feedback. |
This Partner Solution was created by JFrog Ltd. in collaboration with Amazon Web Services (AWS). Partner Solutions are automated reference deployments that help people deploy popular technologies on AWS according to AWS best practices. If you’re unfamiliar with AWS Partner Solutions, refer to the AWS Partner Solution General Information Guide.
Overview
This Partner Solution deploys JFrog Artifactory—and, optionally, JFrog Xray—in the Amazon Web Services (AWS) Cloud. If you are unfamiliar with AWS Partner Solutions we recommend that you read the AWS Partner Solution General Content Guide.
This deployment guide covers the steps necessary to deploy the Partner Solution. For more advanced information on the product, troubleshooting, or additional functionality, see the Operational guide.
The default installation creates two Amazon EC2 Auto Scaling groups:
-
The first Auto Scaling group ensures that the
node.idfor high availability (HA) is set toprimaryand that there is always only one primary node. -
The second Auto Scaling group ensures that the
node.idfor the secondary nodes is unique and sets thisnode.idto the hostname. This Auto Scaling group scales up or down the number of secondary nodes to the amount specified by the administrator.
The optional JFrog Xray installation creates two additional Amazon EC2 Auto Scaling groups:
-
The first Auto Scaling group is responsible for the primary node. JFrog Xray is installed into the primary subnet.
-
The second Auto Scaling group installs JFrog Xray into the secondary subnet. This Auto Scaling group scales up or down the number of secondary nodes to the amount specified by the administrator.
The Network Load Balancer monitors the Auto Scaling groups and is configured with health checks that validate that the JFrog Artifactory service is up and running. If the endpoint returns an error response, a new node is recovered within 10 minutes.
Costs and licenses
This Partner Solution requires a subscription to the CentOS AMI and an Enterprise or Enterprise+ license for JFrog Artifactory. Subscribe to the CentOS AMI on the AWS CentOS Marketplace page. If you choose to install JFrog Xray, you must have an Enterprise+ license or an Enterprise license with the JFrog Xray add-on.
To use the Partner Solution in your production environment, sign up for a free trial JFrog license, which includes three JFrog Artifactory Enterprise licenses. Add the license keys to AWS Secrets Manager, as described in the Deployment steps section in this guide.
| JFrog Enterprise or Enterprise+ licenses are required to ensure high availability. Partner Solution deployment will fail if the license is not an Enterprise or Enterprise+ license, the license is invalid, or the license is not specified during deployment. Ensure that the number of secondary JFrog Artifactory servers is at most the amount licensed minus one, for the primary server. If you specify too many servers, see the FAQ section for instructions. |
If you start with a free trial JFrog license, contact JFrog to obtain a permanent license before the trial period ends. Otherwise, nodes become unresponsive after the free trial period ends.
There is no cost to use this Partner Solution, however you will be billed for the resources deployed. For more information see the AWS Partner Solution General Content Guide.
Architecture
Deploying this Partner Solution for a new virtual private cloud (VPC) with default parameters builds the following Artifactory and Xray environment in the AWS Cloud.
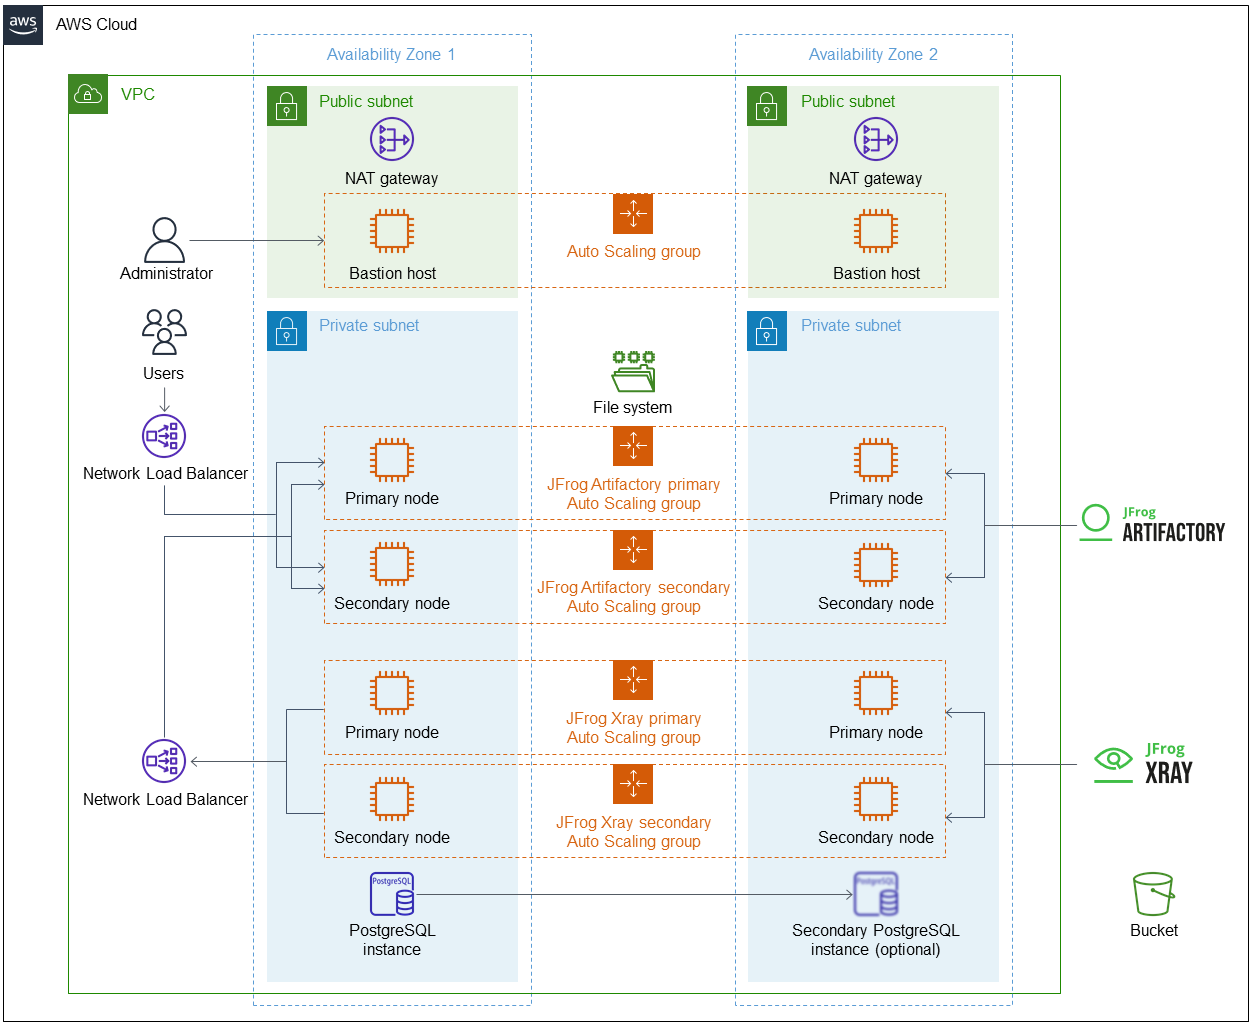
As shown in Figure 1, the Partner Solution sets up the following:
-
A highly available architecture that spans two Availability Zones.*
-
A VPC configured with public and private subnets according to AWS best practices, to provide you with your own virtual network on AWS.*
-
In the public subnets:
-
Managed network address translation (NAT) gateways to allow outbound internet access for resources in the private subnets.*
-
A Linux bastion host in an Auto Scaling group to allow inbound Secure Shell (SSH) access to Amazon EC2 instances in public and private subnets.*
-
-
In the private subnets:
-
Two Amazon EC2 Auto Scaling groups for JFrog Artifactory primary and secondary nodes.
-
If you deploy JFrog Xray, two Amazon EC2 Auto Scaling groups for JFrog Xray primary and secondary nodes.
-
A PostgreSQL instance on Amazon Relational Database Service (Amazon RDS) accessible from the private subnets. You can choose to deploy a secondary PostgreSQL instance.
-
-
Amazon Elastic File System (Amazon EFS) file system for the JFrog Artifactory primary and secondary nodes.
-
A Network Load Balancer to distribute traffic among JFrog Artifactory primary and secondary nodes.
-
If you deploy JFrog Xray, a Network Load Balancer for JFrog Xray to connect to JFrog Artifactory nodes.
-
A private and encrypted Amazon S3 bucket for repository storage.
* The template that deploys the Partner Solution into an existing VPC skips the components marked by asterisks and prompts you for your existing VPC configuration.
Auto Scaling groups
The Auto Scaling groups are designed to have one primary node and multiple secondary nodes. When an EC2 node or service fails, Auto Scaling groups automatically recreate the instances. For this reason, all configurations are made on boot and result in a loss of any data that are not stored in the Amazon RDS instance or S3 bucket. It is recommended that you do not modify the number of instances. For more information, see AWS Auto Scaling.
Ansible init script
Ansible is installed and configured to run only on initial boot. Ansible works with the Auto Scaling group to configure, install, and run JFrog Artifactory and JFrog Xray. As a part of the configuration, the nodes automatically join the high availability (HA) cluster.
|
Do not change the master key of the stack when updating the stack. Doing so results in an unsupported configuration that future nodes cannot join. To update an expired Secure Sockets Layer (SSL) certificate, change the CloudFormation stack certificate and certificate key inputs, and then redeploy the nodes (see Updating Artifactory). If you change the certificate and certificate key manually on the Amazon EC2 instances (instead of updating the CloudFormation stack), your manual changes are lost at the next update or reboot, which results in an unwanted configuration. |
Deployment options
This Partner Solution provides four deployment options:
-
Deploy Artifactory and Xray into a new VPC. This option builds a new AWS environment consisting of the VPC, subnets, NAT gateways, security groups, bastion hosts, and other infrastructure components. It then deploys Artifactory and Xray into this new VPC.
-
Deploy Artifactory and Xray into an existing VPC. This option provisions Artifactory and Xray in your existing AWS infrastructure.
-
Deploy Artifactory and Xray into a new VPC for AWS GovCloud (US). This option builds a new AWS environment consisting of the VPC, subnets, NAT gateways, security groups, bastion hosts, and other infrastructure components. It then deploys Artifactory and Xray into this new VPC.
-
Deploy Artifactory and Xray into an existing VPC for AWS GovCloud (US). This option provisions Artifactory and Xray in your existing AWS infrastructure.
The Partner Solution provides separate templates for these options. It also lets you configure Classless Inter-Domain Routing (CIDR) blocks, instance types, and Artifactory and Xray settings.
Predeployment steps
Add JFrog Artifactory license keys to AWS Secrets Manager
-
Open the AWS Secrets Manager console.
-
In the top toolbar, choose the AWS Region where you deploy the Partner Solution.
-
Choose Store a new secret.
-
On the Store a new secret page, choose Other type of secret.
-
In the Key/value pairs section, create a row for each JFrog Artifactory license. In the first column, enter
ArtifactoryLicense<n>, substituting a number for<n>(for example,ArtifactoryLicense1,ArtifactoryLicense2). In the second column, enter the license.

-
Choose Next.
-
Provide a secret name to use when deploying this Partner Solution.
-
Choose Next twice.
-
Choose Store.
Add certificate and certificate keys to Secrets Manager
-
Open the certificate in a text editor of your choice and copy the contents to the clipboard.
-
In the Secrets Manager console, choose Store a new secret.
-
On the Store a new secret page, choose Other type of secret.
-
In the Key/value pairs section, create three rows. In the first row, enter
Certificatein the first column. Paste the certificate into the second column. -
Open the certificate key in a text editor and copy the contents to the clipboard.
-
In the first column of the second row, enter
CertificateKey. In the second column, paste the certificate key. -
In the first column of the third row, enter
CertificateDomain. Enterlocalhostinto the second column.

| When you copy the certificate and certificate key from an editor, the contents are copied as a single line of text. This process converts carriage return and line feed (CRLF) or line feed (LF) characters to spaces. |
Subscribe to the CentOS AMI
This Partner Solution requires a subscription to the Amazon Machine Image (AMI) for CentOS in AWS Marketplace.
Perform the following steps:
-
Sign in to your AWS account.
-
Open the page for the CentOS AMI in AWS Marketplace, and then choose Continue to Subscribe.
-
Review the terms and conditions for software usage, and then choose Accept Terms.
A confirmation page loads, and an email confirmation is sent to the account owner. For detailed subscription instructions, see the AWS Marketplace documentation. -
When the subscription process is complete, exit out of AWS Marketplace without further action. Do not provision the software from AWS Marketplace — the Partner Solution deploys the AMI for you.
Deployment steps
-
Sign in to your AWS account, and launch this Partner Solution, as described under Deployment options. The AWS CloudFormation console opens with a prepopulated template.
-
Choose the correct AWS Region, and then choose Next.
-
On the Create stack page, keep the default setting for the template URL, and then choose Next.
-
On the Specify stack details page, change the stack name if needed. Review the parameters for the template. Provide values for the parameters that require input. For all other parameters, review the default settings and customize them as necessary. When you finish reviewing and customizing the parameters, choose Next.
Unless you’re customizing the Partner Solution templates or are instructed otherwise in this guide’s Predeployment section, don’t change the default settings for the following parameters: QSS3BucketName,QSS3BucketRegion, andQSS3KeyPrefix. Changing the values of these parameters will modify code references that point to the Amazon Simple Storage Service (Amazon S3) bucket name and key prefix. For more information, refer to the AWS Partner Solutions Contributor’s Guide. -
On the Configure stack options page, you can specify tags (key-value pairs) for resources in your stack and set advanced options. When you finish, choose Next.
-
On the Review page, review and confirm the template settings. Under Capabilities, select all of the check boxes to acknowledge that the template creates AWS Identity and Access Management (IAM) resources that might require the ability to automatically expand macros.
-
Choose Create stack. The stack takes about 45 minutes to deploy.
-
Monitor the stack’s status, and when the status is CREATE_COMPLETE, the JFrog Artifactory Enterprise and JFrog Xray deployment is ready.
-
To view the created resources, choose the Outputs tab.
Postdeployment steps
Get started with JFrog Artifactory
-
On the Outputs tab of the JFrog Artifactory stack in the AWS CloudFormation console, find
ArtifactoryURL. Connect to JFrog Artifactory usingArtifactoryURL.
| If you use a non-CA-signed certificate, you will see a certificate warning when you attempt to access the JFrog Artifactory URL. You can click through the warning to continue to the page. This warning displays when the certificate does not match the Elastic Load Balancer DNS (Domain Name System). As an option, you can configure Amazon Route 53 as the DNS service to avoid seeing this warning. |
-
On the JFrog Artifactory login page, enter the default credentials
admin/password. -
Choose Login.
| For more information, see Users and Groups. |
-
On the Welcome to the JFrog Platform page, choose Get Started. The Partner Solution handles JFrog license key configuration during the deployment, so you do not need to activate your license before getting started.
-
On the Reset Admin Password page, set a secure administrator password for your deployment. Then choose Next.
-
On the Set Base URL page, you can configure an optional base URL setting. Because this deployment uses a proxy, it’s highly recommended that you set the JFrog Artifactory base URL. For more information, see Configuring Artifactory.
-
On the Configure Platform Default Proxy page, you can configure optional proxy settings for remote resources.
-
On the Create Repositories page, select your desired package types. Then choose Next. (See Figure 4.)

-
On the Congratulations page, choose Finish.
-
Complete the following administrative tasks.
| Backups save to the local file system and do not persist if the EC2 instance is terminated. It is recommended to create snapshots of the primary instance. |
Troubleshooting
For troubleshooting common Partner Solution issues visit the AWS Partner Solution General Content Guide or the Troubleshooting CloudFormation page in the AWS documentation.
FAQ
Q. . I provisioned more secondary nodes than I have licenses, and I cannot access JFrog Artifactory. What do I do?
A. In the AWS CloudFormation console, choose Update stack, and reduce the number of secondary nodes to the number of licenses you purchased, minus one license for the master.
Q. My license ran out and JFrog Artifactory is unresponsive. How do I fix this?
A. Reduce the number of secondary nodes to zero, and contact JFrog for a new license.
Q. My certificate is out of date. How do I update it?
A. The certificate is handled via Ansible or Helm. In the AWS CloudFormation console, choose Update stack, change the certificate and certificate key values. Then, by rolling restart, update the master node first, and then, one at a time, the secondary nodes. This will rebuild each node with the correct certificate.
Customer responsibility
After you deploy a Partner Solution, confirm that your resources and services are updated and configured—including any required patches—to meet your security and other needs. For more information, refer to the Shared Responsibility Model.
Feedback
To submit feature ideas and report bugs, use the Issues section of the GitHub repository for this Partner Solution. To submit code, refer to the Partner Solution Contributor’s Guide. To submit feedback on this deployment guide, use the following GitHub links:
Notices
This document is provided for informational purposes only. It represents current AWS product offerings and practices as of the date of issue of this document, which are subject to change without notice. Customers are responsible for making their own independent assessment of the information in this document and any use of AWS products or services, each of which is provided "as is" without warranty of any kind, whether expressed or implied. This document does not create any warranties, representations, contractual commitments, conditions, or assurances from AWS, its affiliates, suppliers, or licensors. The responsibilities and liabilities of AWS to its customers are controlled by AWS agreements, and this document is not part of, nor does it modify, any agreement between AWS and its customers.
The software included with this paper is licensed under the Apache License, version 2.0 (the "License"). You may not use this file except in compliance with the License. A copy of the License is located at https://aws.amazon.com/apache2.0/ or in the accompanying "license" file. This code is distributed on an "as is" basis, without warranties or conditions of any kind, either expressed or implied. Refer to the License for specific language governing permissions and limitations.