Liquibase Pro on AWS
Partner Solution Deployment Guide

April 2022
Amy Smith and Mike Olivas, Liquibase Inc.
Dylan Owen, AWS Integration & Automation team

| Refer to the GitHub repository to view source files, report bugs, submit feature ideas, and post feedback about this Partner Solution. To comment on the documentation, refer to Feedback. |
This Partner Solution was created by Liquibase Inc. in collaboration with Amazon Web Services (AWS). Partner Solutions are automated reference deployments that help people deploy popular technologies on AWS according to AWS best practices. If you’re unfamiliar with AWS Partner Solutions, refer to the AWS Partner Solution General Information Guide.
Overview
This Quick Start deploys Liquibase Pro in the AWS Cloud. If you are unfamiliar with AWS Quick Starts, refer to the AWS Quick Start General Content Guide.
Liquibase Pro helps align database code changes with application code changes by using a version-based approach to update your database.
Costs and licenses
A Liquibase Pro License is required to use this Quick Start. For more information, refer to Get Started with Liquibase Pro.
You are responsible for the cost of the AWS services and any third-party licenses used while running this Quick Start reference deployment. There is no additional cost for using the Quick Start.
Architecture
Deploy this Quick Start for a new Liquibase Pro pipeline with deployments to three AWS RDS PostgreSQL databases. Choose between using an existing virtual private cloud (VPC) or creating a new VPC. The pipeline includes an AWS CodePipeline with AWS CodeBuild Stages and approval gates to deploy a series of scripts using Liquibase Pro.
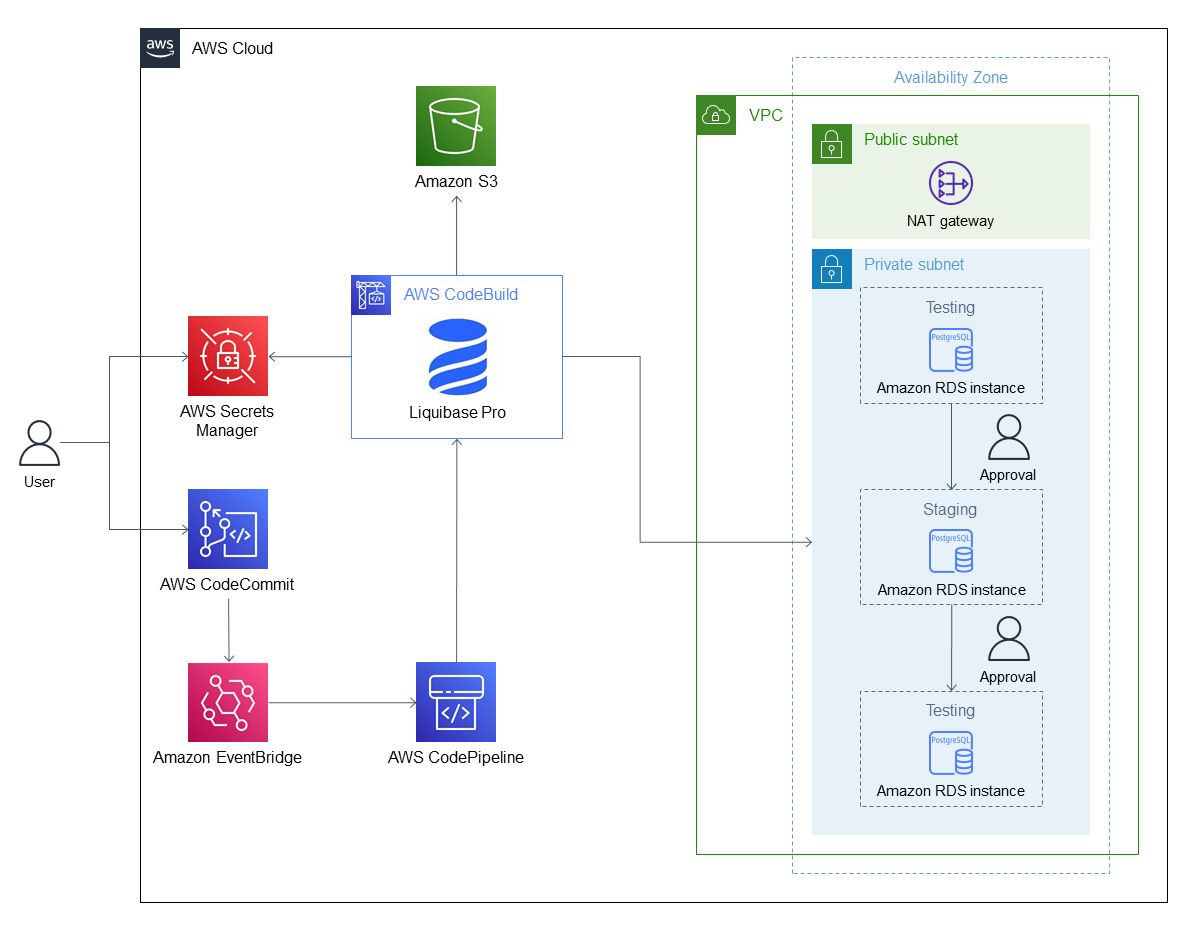
As shown in Figure 1, this Quick Start sets up the following:
-
AWS Secrets Manager to store sensitive information, such as database user names, passwords, and the Liquibase Pro license key.
-
AWS CodeCommit to store and manage database scripts.
-
Amazon EventBridge to invoke new builds when the main branch is updated in the AWS CodeCommit repository.
-
AWS CodePipeline to model, visualize, and automate the steps required to release your software.
-
AWS CodeBuild to compile source code, runs unit tests, and produces artifacts that are ready to deploy.
-
Amazon Simple Storage Service (Amazon S3) for storing artifacts and logs for auditing purposes.
-
A virtual private cloud (VPC) configured with public and private subnets, according to AWS best practices, to provide you with your own virtual network on AWS.*
-
Inside the VPC, three Amazon Relational Database Service (Amazon RDS) PostgreSQL databases for testing, staging, and production environments.
* The template that deploys the Quick Start into an existing VPC skips the components marked by asterisks and prompts you for your existing VPC configuration.
Deployment options
This Quick Start provides the following deployment options:
-
Deploy Liquibase Pro into a new VPC. This option deploys Liquibase Pro into a new AWS environment consisting of a VPC, subnets, NAT gateways, security groups, an AWS CodeCommit repository, AWS Secrets Manager secrets, AWS CodePipeline with AWS CodeBuild stages installed with Liquibase Pro, three Amazon RDS PostgreSQL databases, and other infrastructure components. All infrastructure components with private networking requirements are deployed within this new VPC.
-
Deploy Liquibase Pro into an existing VPC. This option deploys Liquibase Pro into an AWS environment consisting of an AWS CodeCommit repository, AWS Secrets Manager secrets, AWS CodePipeline with AWS CodeBuild stages installed with Liquibase Pro, three Amazon RDS PostgreSQL databases, and other infrastructure components. All infrastructure with private networking requirements are deployed within your existing VPC.
This Quick Start provides separate templates for these options. You can also configure the Amazon RDS PostgreSQL engine version, instance class, allocated storage, storage type, port, user names, passwords, and backup retention period for the databases used by the Liquibase Pro pipeline.
Predeployment steps
You must provide a Liquibase Pro license key. For more information, refer to Costs and licenses.
Deployment steps
-
Sign in to your AWS account, and launch this Partner Solution, as described under Deployment options. The AWS CloudFormation console opens with a prepopulated template.
-
Choose the correct AWS Region, and then choose Next.
-
On the Create stack page, keep the default setting for the template URL, and then choose Next.
-
On the Specify stack details page, change the stack name if needed. Review the parameters for the template. Provide values for the parameters that require input. For all other parameters, review the default settings and customize them as necessary. When you finish reviewing and customizing the parameters, choose Next.
Unless you’re customizing the Partner Solution templates or are instructed otherwise in this guide’s Predeployment section, don’t change the default settings for the following parameters: QSS3BucketName,QSS3BucketRegion, andQSS3KeyPrefix. Changing the values of these parameters will modify code references that point to the Amazon Simple Storage Service (Amazon S3) bucket name and key prefix. For more information, refer to the AWS Partner Solutions Contributor’s Guide. -
On the Configure stack options page, you can specify tags (key-value pairs) for resources in your stack and set advanced options. When you finish, choose Next.
-
On the Review page, review and confirm the template settings. Under Capabilities, select all of the check boxes to acknowledge that the template creates AWS Identity and Access Management (IAM) resources that might require the ability to automatically expand macros.
-
Choose Create stack. The stack takes about 15 minutes to deploy.
-
Monitor the stack’s status, and when the status is CREATE_COMPLETE, the Liquibase Pro deployment is ready.
-
To view the created resources, choose the Outputs tab.
Postdeployment steps
-
Validate that the Liquibase Pro pipeline works by navigating to the AWS CodePipeline image displayed in the
CodePipelineImageentry in the stack’s Outputs tab. -
Initial deployment builds the pipeline based on scripts in the AWS CodeCommit repository displayed in the
CodeCommitRepositoryentry in the stack’s Outputs tab.-
Initial deployment includes the first database in the pipeline, which is the test environment database.
-
Change approvals
After you successfully deploy this Quick Start, AWS CodePipeline automatically moves to the first approval stage:
-
Choose the Review button, and optionally add a brief message in the Comments box.
-
Choose Approve to invoke the deployment to the staging environment.
-
Navigate to the AWS CodeBuild image job displayed in the
CodeBuildImageJobentry in the stack’s Outputs tab, and ensure that the deployment runs as expected. -
When the staging deployment completes successfully, navigate to AWS CodePipeline to review and approve the deployment to the production environment.
Test your own changes
To add new scripts for deployment into the pipeline databases, follow these steps:
-
Navigate to
CodeCommitRepository. -
Locate the Liquibase changelog named
dvdrentalupdatedrb.xml. This changelog file includes anincludeAlltag ("<includeAll path="sqlfiles"/>"), which means any files added to thesqlfilesfolder are included. -
Navigate to the
sqlfilesfolder, and add a database script.
There is a testfile1.sql that you can copy and modify to create a new script (for example, testfile2.sql). Ensure that you use a unique table name when modifying the script. For more information about Liquibase SQL changesets, refer to Example Changelogs: SQL Format.
|
-
New commits to AWS CodeCommit will automatically invoke pipeline builds.
-
Navigate to AWS CodePipeline to confirm that a new build is running.
-
Repeat the steps in this section to deploy your changes to additional staging and production environments.
Troubleshooting
For troubleshooting common Quick Start issues, see the AWS Quick Start General Information Guide and the Troubleshooting CloudFormation. For more information about Liquibase Pro concepts, commands, and workflows, refer to Liquibase Pro Documentation.
If the AWS CloudFormation stack fails to delete the CodeBuildSecurityGroup resource when you no longer need the deployed resources, this is because the AWS CodeBuild elastic network interface (ENI) is still attached to the security group. The CodeBuild function uses this ENI to communicate with the Amazon RDS databases. This issue usually occurs if the AWS CloudFormation stack is deleted while an AWS CodePipeline job is incomplete (for example, you have an incomplete manual-approval step). If this occurs, follow these steps:
-
Navigate to the Network interfaces section of the Amazon Elastic Cloud Compute (Amazon EC2) console.
-
Enter the security group ID (for example,
sg-01234567) for theCodeBuildSecurityGroupresource in the Filter network interfaces field at the top of the page. -
Select the checkbox next to the ENI.
The filtered results should list only one ENI with this security group attached. -
Choose the Actions drop-down button at the top-right.
-
Choose Change security groups.
-
Choose Remove next to the security group that matches the
CodeBuildSecurityGroupresource ID. -
Choose Save at the bottom.
There should be only one attached security group for this ENI. -
Return to the AWS CloudFormation console and delete the CloudFormation stack again, which should successfully delete the
CodeBuildSecurityGroupresource. -
Return to the Amazon EC2 console and delete the ENI.
Customer responsibility
After you deploy a Partner Solution, confirm that your resources and services are updated and configured—including any required patches—to meet your security and other needs. For more information, refer to the Shared Responsibility Model.
Feedback
To submit feature ideas and report bugs, use the Issues section of the GitHub repository for this Partner Solution. To submit code, refer to the Partner Solution Contributor’s Guide. To submit feedback on this deployment guide, use the following GitHub links:
Notices
This document is provided for informational purposes only. It represents current AWS product offerings and practices as of the date of issue of this document, which are subject to change without notice. Customers are responsible for making their own independent assessment of the information in this document and any use of AWS products or services, each of which is provided "as is" without warranty of any kind, whether expressed or implied. This document does not create any warranties, representations, contractual commitments, conditions, or assurances from AWS, its affiliates, suppliers, or licensors. The responsibilities and liabilities of AWS to its customers are controlled by AWS agreements, and this document is not part of, nor does it modify, any agreement between AWS and its customers.
The software included with this paper is licensed under the Apache License, version 2.0 (the "License"). You may not use this file except in compliance with the License. A copy of the License is located at https://aws.amazon.com/apache2.0/ or in the accompanying "license" file. This code is distributed on an "as is" basis, without warranties or conditions of any kind, either expressed or implied. Refer to the License for specific language governing permissions and limitations.