Remote Desktop Gateway on AWS
Partner Solution Deployment Guide

July 2023
Dave May and Santiago Cardenas, AWS Integration & Automation team

| Refer to the GitHub repository to view source files, report bugs, submit feature ideas, and post feedback about this Partner Solution. To comment on the documentation, refer to Feedback. |
This Partner Solution was created by Microsoft in collaboration with Amazon Web Services (AWS). Partner Solutions are automated reference deployments that help people deploy popular technologies on AWS according to AWS best practices. If you’re unfamiliar with AWS Partner Solutions, refer to the AWS Partner Solution General Information Guide.
Overview
This guide covers the information you need to deploy the Remote Desktop Gateway Partner Solution in the AWS Cloud.
Costs and licenses
This product deploys one or more Amazon Elastic Compute Cloud (Amazon EC2) instances running Microsoft Windows Server. The Windows Server licenses are provided by Amazon.
There is no cost to use this Partner Solution, but you will be billed for any AWS services or resources that this Partner Solution deploys. For more information, refer to the AWS Partner Solution General Information Guide.
Architecture
Deploying this Partner Solution with default parameters builds the following RD Gateway environment in the AWS Cloud.
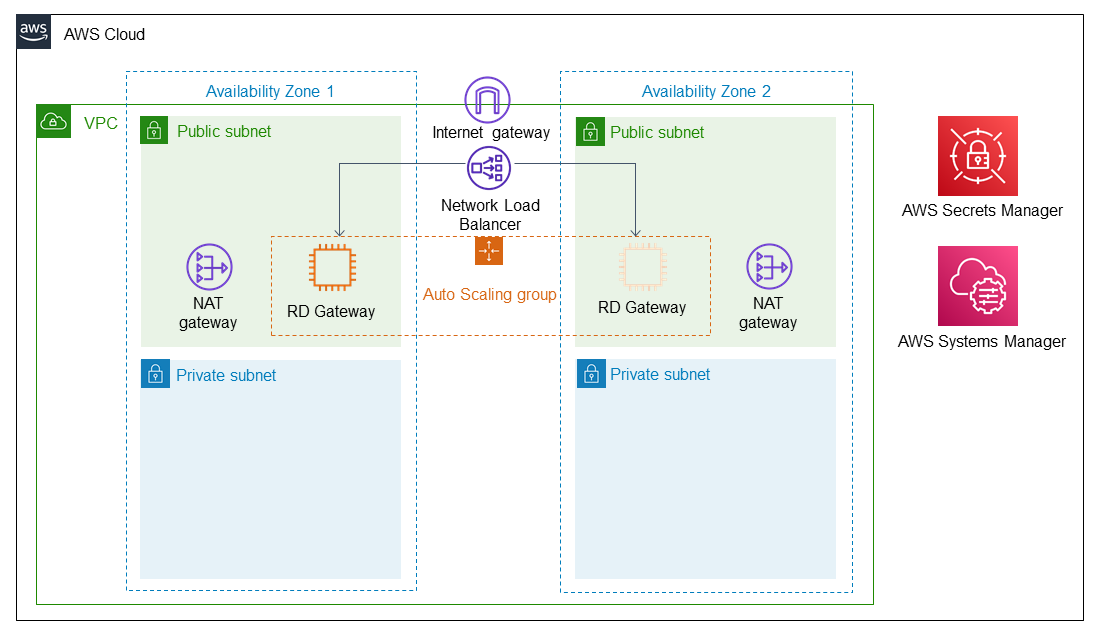
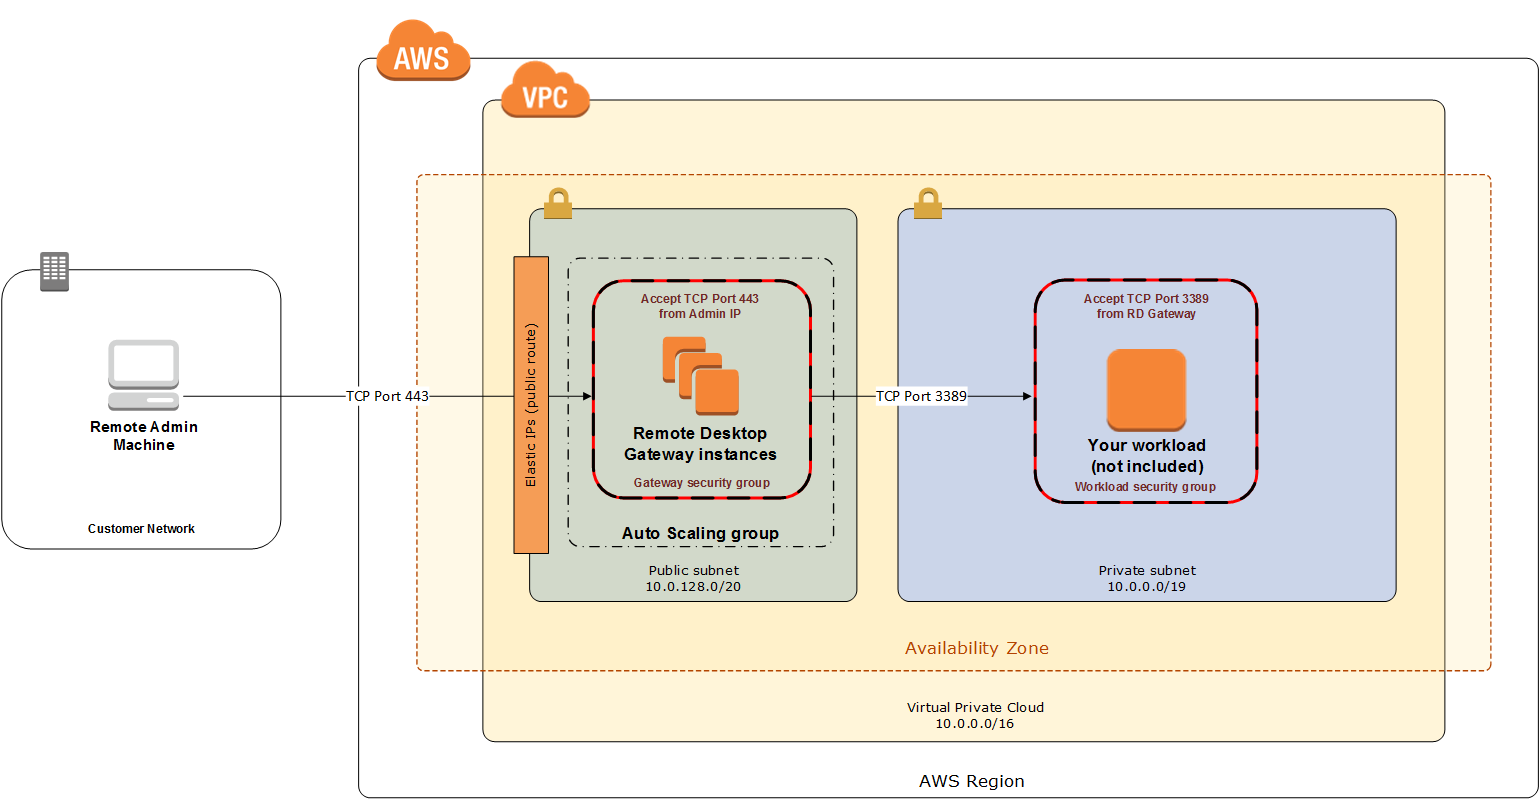
As shown in Figure 1, this Partner Solution sets up the following:
-
A highly available architecture that spans two Availability Zones.*
-
A virtual private cloud (VPC) configured with public and private subnets, according to AWS best practices, to provide you with your own virtual network on AWS.*
-
An internet gateway to allow access to the internet. This gateway is used by the RD Gateway instances to send and receive traffic.*
-
Managed network address translation (NAT) gateways to allow outbound internet access for resources in the private subnets.*
-
In the public subnets:
-
Up to four RD Gateway instances in an Auto Scaling group to provide secure remote access to instances in the private subnets. Each instance is assigned an Elastic IP address so it’s reachable directly from the internet.
-
-
A Network Load Balancer to provide RDP access to the RD Gateway instances.
-
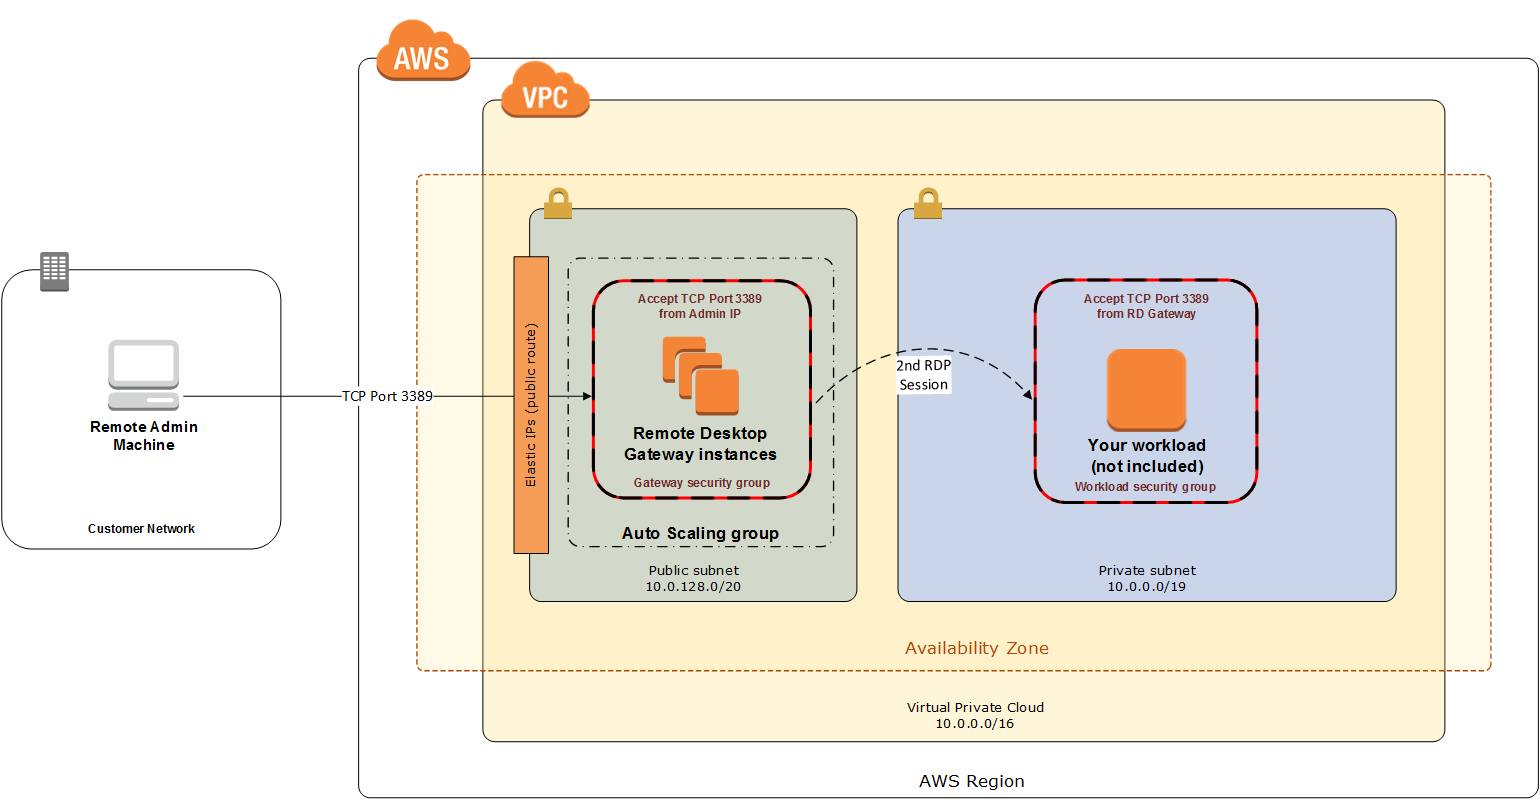
A security group for Windows-based instances that will host the RD Gateway role, with an ingress rule permitting TCP port 3389 from your administrator IP address. After deployment, you’ll modify the security group ingress rules to configure administrative access through TCP port 443 instead.
-
An empty application tier for instances in private subnets. If more tiers are required, you can create additional private subnets with unique CIDR ranges.
-
AWS Secrets Manager to securely store credentials used for accessing the RD Gateway instances.
-
AWS Systems Manager to automate the deployment of the RD Gateway Auto Scaling group.
* The template that deploys this Partner Solution into an existing VPC skips the components marked by asterisks and prompts you for your existing VPC configuration.
Deployment options
This Partner Solution provides the following deployment options:
-
Deploy RD Gateway into a new VPC. This option builds a new AWS environment that consists of the VPC, subnets, NAT gateways, security groups, bastion hosts, and other infrastructure components. It then deploys RD Gateway into this new VPC.
-
Deploy RD Gateway into an existing VPC. This option provisions RD Gateway in your existing AWS infrastructure.
-
Deploy domain-joined RD Gateway into an existing VPC. This is similar to the second option, except that it provides domain-joined RD Gateway instances in the existing VPC, and provides a few additional parameters for customizing this configuration.
This Partner Solution provides separate templates for these options. It also lets you configure Classless Inter-Domain Routing (CIDR) blocks, instance types, and RD Gateway settings.
Deployment steps
-
Sign in to your AWS account, and launch this Partner Solution, as described under Deployment options. The AWS CloudFormation console opens with a prepopulated template.
-
Choose the correct AWS Region, and then choose Next.
-
On the Create stack page, keep the default setting for the template URL, and then choose Next.
-
On the Specify stack details page, change the stack name if needed. Review the parameters for the template. Provide values for the parameters that require input. For all other parameters, review the default settings and customize them as necessary. When you finish reviewing and customizing the parameters, choose Next.
Unless you’re customizing the Partner Solution templates or are instructed otherwise in this guide’s Predeployment section, don’t change the default settings for the following parameters: QSS3BucketName,QSS3BucketRegion, andQSS3KeyPrefix. Changing the values of these parameters will modify code references that point to the Amazon Simple Storage Service (Amazon S3) bucket name and key prefix. For more information, refer to the AWS Partner Solutions Contributor’s Guide. -
On the Configure stack options page, you can specify tags (key-value pairs) for resources in your stack and set advanced options. When you finish, choose Next.
-
On the Review page, review and confirm the template settings. Under Capabilities, select all of the check boxes to acknowledge that the template creates AWS Identity and Access Management (IAM) resources that might require the ability to automatically expand macros.
-
Choose Create stack. The stack takes about 20 minutes to deploy.
-
Monitor the stack’s status, and when the status is CREATE_COMPLETE, the Remote Desktop Gateway deployment is ready.
-
To view the created resources, choose the Outputs tab.
Postdeployment steps
After you launch the AWS CloudFormation template for one of the non-domain scenarios in the previous sections and build the stack, follow these steps to complete the configuration of your AWS environment:
-
Create security groups for your Windows-based instances that will be located in private VPC subnets. Create an ingress rule permitting TCP port 3389 from the RD Gateway security group, CIDR range, or IP address. Associate these groups with instances as they are launched into the private subnets.
-
Make sure that your administrative clients can resolve the name for the RD Gateway endpoint (for example, win-1a2b3c4d5e6.example.com). You can create an A (Host) record in DNS that maps the FQDN to the RD Gateway’s Elastic IP or public IP address. For testing purposes, you can configure this mapping in the local host’s file on the machine.
-
Configure administrative clients with the proper configuration settings. This includes installing the root certificate from each RD Gateway server on the client machines (see the next section for instructions). When you use the AWS CloudFormation templates, the default location for the root certificate will be c:\<servername>.cer on each RD Gateway server.
-
Modify the RD Gateway security group. Remove the ingress rule permitting TCP port 3389. Create a new ingress rule permitting TCP port 443 from your administrator’s IP address.
-
Make sure that instances in private subnets are associated with a security group containing ingress rules permitting the RD Gateway server IP address to connect via TCP port 3389.
-
Configure the Remote Desktop connection for administrative clients, as described later in this section.
Steps for non-domain-joined deployment
The Partner Solution implements a self-signed certificate on the RD Gateway intances. After deployment, you must install the root certificate on your administrative clients before you configure the RDP client to connect to your RD Gateway instances. The root certificate will automatically be stored as c:\<servername>.cer.
To distribute this file to administrator workstations and install it, follow these steps:
-
Open a Command Prompt window using administrative credentials.
-
Type mmc and press Enter.
-
In the Console Root window, on the File menu, choose Add/Remove Snap In.
-
In the Add Standalone Snap-in dialog box, choose Certificates, and then choose Add.
-
In the Certificates snap-in dialog box, choose Computer account, and then choose Next.
-
In the Select Computer dialog box, choose Finish.
-
In the Add Standalone Snap-in dialog box, choose Close.
-
On the Add/Remove Snap-in dialog box, choose OK.
-
In the Console Root window, expand Certificates (Local Computer).
-
Under Certificates (Local Computer), expand Trusted Root Certification Authorities.
-
Open the context window (right-click) for Certificates, and choose All Tasks > Import.
-
Navigate to the root certificate (for example, RDGW1.cer) to complete the installation.
| The root certificate will be stored as c:\<servername>.cer on each RD Gateway when deploying servers using the CloudFormation templates. |
Steps for domain-joined deployment
To utilize the Remote Desktop Gateway functionality in an Active Directory environment, a trusted certificate through your private Certificate Authority or a public DNS registrar is required.
-
For secure connectivity through the deployed NLB, acquire a trusted certificate through your private Certificate Authority or a public DNS registrar.
-
Create a DNS CNAME record in your DNS zone with your preferred DNS endpoint name for RDGW connections and the NLB DNS endpoint as the value. Alternately, for testing, create an entry in you local HOSTS file pointing the DNS endpoint name to the NLB IP address.
-
Connect to each RD Gateway instance, copy the trusted certificate to a local path, and import into the computer’s personal certificate folder as follows.
-
Type mmc and press Enter.
-
In the Console Root window, on the File menu, choose Add/Remove Snap In.
-
In the Add Standalone Snap-in dialog box, choose Certificates, and then choose Add.
-
In the Certificates snap-in dialog box, choose Computer account, and then choose Next.
-
In the Select Computer dialog box, choose Finish.
-
In the Add Standalone Snap-in dialog box, choose Close.
-
On the Add/Remove Snap-in dialog box, choose OK.
-
In the Console Root window, expand Certificates (Local Computer).
-
Under Certificates (Local Computer), expand Personal.
-
Open the context window (right-click) for Certificates, and choose All Tasks > Import.
-
Navigate to the trusted certificate (for example, test.example.com.cer) to complete the installation.
-
-
On each RD Gateway instance, open the Remote Desktop Gateway Manager console, and then specify your trusted certificate for RD Gateway use.
Configure the Remote Desktop Connection client
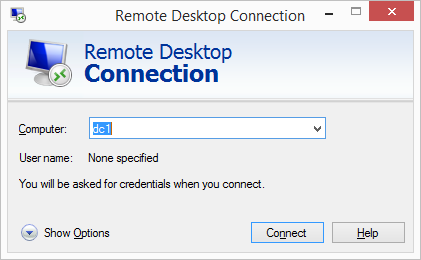
-
Start the Remote Desktop Connection client.
-
In the computer name field, type the name or IP address of the Windows instance you want to connect to. Keep in mind that this instance needs to be reachable only from the RD Gateway, not from the client machine.
-
Choose Show Options. On the Advanced tab, choose Settings.
-
Choose Use these RD Gateway server settings. For server name, specify the FQDN of the RD Gateway. If the RD Gateway and the server you want to connect to are in the same domain, choose Use my RD Gateway credentials for the remote computer, and then choose OK.
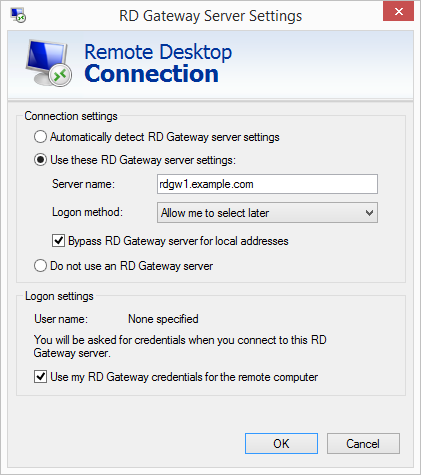
| The FQDN server name of the RD Gateway host must match the certificate and the DNS record (or local HOSTS file entry). Otherwise, the secure connection will generate warnings and might fail. |
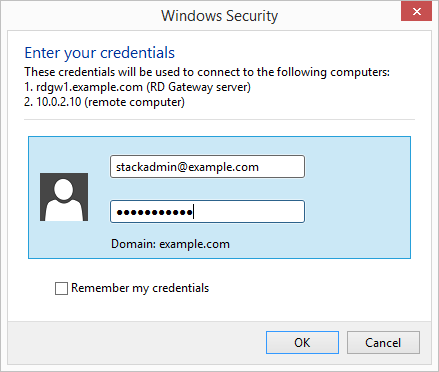
-
Enter your credentials, and then choose OK to connect to the server. You can supply the same set of credentials for the RD Gateway and the destination server, as shown. If your servers are not domain-joined, you will need to authenticate twice: once for the RD Gateway and once for the destination server. If your servers aren’t domain-joined, when prompted for the RD Gateway server credentials, provide the Admin User Name and Admin Password credentials you set in when you launched the Partner Solution. Check the Remember my credentials box. (Otherwise, if you’re connecting from a Windows computer, you’ll get prompted for your credentials repeatedly, and will be blocked from entering your remote computer credentials.)
Run Windows Updates
To ensure the deployed servers' operating systems and installed applications have the latest Microsoft updates, run Windows Update on each server.
-
Create an RDP session to the Remote Desktop Gateway server(s).
-
Open the Settings application.
-
Open Update & Security.
-
Choose Check for updates.
-
Install any updates and reboot if necessary.
Best practices for using RD Gateway on AWS
The Principle of Least Privilege
When considering remote administrative access to your environment, it is important to follow the principle of least privilege. This principle refers to users having the fewest possible permissions necessary to perform their job functions. This helps reduce the attack surface of your environment, making it much harder for an adversary to exploit. An attack surface can be defined as the set of exploitable vulnerabilities in your environment, including the network, software, and users who are involved in the ongoing operation of the system.
Following the principle of least privilege, we recommend reducing the attack surface of your environment by exposing the absolute minimal set of ports to the network while also restricting the source network or IP address that will have access to your EC2 instances.
In addition to the functionality that exists in the Microsoft platform, there are several AWS capabilities to help you implement the principle of least privilege, such as subnets, security groups, and trusted ingress CIDR blocks.
VPC configuration
Amazon VPC lets you provision a private, isolated section of the AWS Cloud where you can launch AWS resources in a virtual network that you define. With Amazon VPC, you can define a virtual network topology closely resembling a traditional network that you might operate on your own premises. You have complete control over your virtual networking environment, including selection of your own IP address range, creation of subnets, and configuration of route tables and network gateways.
When deploying a Windows-based architecture on the AWS Cloud, we recommend a VPC configuration that supports the following requirements:
-
Critical workloads should be placed in a minimum of two Availability Zones to provide high availability.
-
Instances should be placed into individual tiers. For example, in a Microsoft SharePoint deployment, you should have separate tiers for web servers, application servers, database servers, and domain controllers. Traffic between these groups can be controlled to adhere to the principle of least privilege.
-
Internal application servers and other non-internet facing servers should be placed in private subnets to prevent direct access to these instances from the internet.
-
RD Gateways should be deployed into public subnets in each Availability Zone for remote administration. Other components, such as reverse proxy servers, can also be placed into these public subnets if needed.
This Partner Solution supports these best practices, as illustrated earlier in this guide. For details on the VPC design used in this Partner Solution, see the Quick Start for building a modular and scalable virtual network architecture with Amazon VPC.
Network Access Control Lists
A network access control list (ACL) is a set of permissions that can be attached to any network subnet in a VPC to provide stateless filtering of traffic. Network ACLs can be used for inbound or outbound traffic and provide an effective way to blacklist a CIDR block or individual IP addresses. These ACLs can contain ordered rules to allow or deny traffic based on IP protocol, service port, or source or destination IP address. Figure 3 shows the default ACL configuration for a VPC subnet. This configuration is used for the subnets in the Partner Solution architecture.
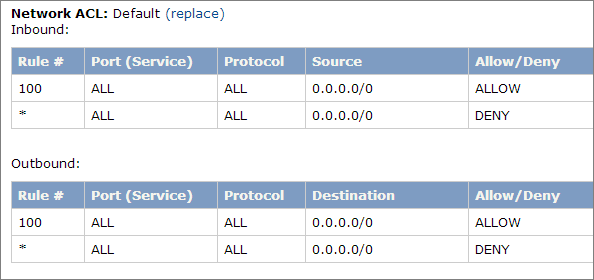
You may choose to keep the default network ACL configuration, or you may choose to lock it down with more specific rules to restrict traffic between subnets at the network level. For example, you could set a rule that would allow inbound administrative traffic on TCP port 3389 from a specific set of IP addresses. In either case, you’ll also need to implement security group rules to permit access from users connecting to RD Gateways and between tiered groups of EC2 instances.
Security groups
All EC2 instances are required to belong to one or more security groups. Security groups allow you to set policies to control open ports and provide isolation between application tiers. In a VPC, every instance runs behind a stateful firewall with all ports closed by default. The security group contains rules responsible for opening inbound and outbound ports on that firewall. While security groups act as an instance-level firewall, they can also be associated with multiple instances, providing isolation between application tiers in your environment. For example, you can create a security group for all your web servers that will allow traffic on TCP port 3389, but only from members of the security group containing your RD Gateway servers. This is illustrated in Figure 4.
Notice that inbound connections from the internet are only permitted over TCP port 443 to the RD gateways. The RD Gateways have an Elastic IP address assigned and have direct access to the internet. The remaining Windows instances are deployed into private subnets and are assigned private IP addresses only. Security group rules allow only the RD Gateways to initiate inbound connections for remote administration to TCP port 3389 for instances in the private subnets.
In this architecture, RDP connections are established over HTTPS to the RD Gateway and proxied to backend instances on the standard RDP TCP port 3389. This configuration helps you reduce the attack surface on your Windows-based instances while allowing administrators to establish connections to all your instances through a single gateway.
It’s possible to provide remote administrative access to all your Windows-based instances through one RD Gateway, but we recommend placing gateways in each Availability Zone for redundancy. The Partner Solution implements this best practice, as illustrated in Figure 5.
Initial Remote Administration Architecture
In an initial RD Gateway configuration, the servers in the public subnet will need an inbound security group rule permitting TCP port 3389 from the administrator’s source IP address or subnet. Windows instances sitting behind the RD Gateway in a private subnet will be in their own isolated tier. For example, a group of web server instances in a private subnet may be associated with their own web tier security group. This security group will need an inbound rule allowing connections from the RD Gateway on TCP port 3389.
Using this architecture, an administrator can use a traditional RDP connection to an RD Gateway to configure the local server. The RD Gateway can also be used as a jump box; that is, when an RDP connection is established to the desktop of the RD Gateway, an administrator can start a new RDP client session to initiate a connection to an instance in a private subnet, as illustrated in Figure 1.
Although this architecture works well for initial administration, it is not recommended for the long term. To further secure connections and reduce the number of RDP sessions required to administer the servers in the private subnets, the inbound rule should be changed to permit TCP port 443, and the RD Gateway service should be installed and configured with an SSL certificate, and connection and authorization policies.
The Partner Solution sets up a standard TCP port 3389 connection from the administrator’s IP address. You’ll need to follow the post-deployment steps to modify the security group for RD Gateway to use a single inbound rule permitting TCP port 443, as illustrated in Figure 2. This modification will allow a Transport Layer Security (TLS) encrypted RDP connection to be proxied through the gateway over TCP port 443 directly to one or more Windows-based instances in private subnets on TCP port 3389. This configuration increases the security of the connection and also prevents the need to initiate an RDP session to the desktop of the RD Gateway.
SSL Certificates
The RD Gateway role uses Transport Layer Security (TLS) to encrypt communications over the internet between administrators and gateway servers. To support TLS, a valid X.509 SSL certificate must be installed on each RD Gateway. Certificates can be acquired in a number of ways, including:
-
Your own PKI infrastructure, such as a Microsoft Enterprise Certificate Authority (CA)
-
Certificates issued by a public CA, such as Verisign or Digicert
-
Self-signed certificates
For smaller test environments, implementing a self-signed certificate is a straightforward process that helps you get up and running quickly. This Partner Solution automatically generates a self-signed certificate for RD Gateway.
However, if you have a large number of varying administrative devices that need to establish a connection to your gateways, we recommend using a public certificate.
For an RDP client to establish a secure connection with an RD Gateway, the following certificate and DNS requirements must be met:
-
The issuing CA of the certificate installed on the gateway must be trusted by the RDP client. For example, the root CA certificate must be installed in the client machine’s Trusted Root Certification Authorities store.
-
The subject name used on the certificate installed on the gateway must match the DNS name used by the client to connect to the server; for example, rdgw1.example.com.
-
The client must be able to resolve the host name (for example, rdgw1.example.com) to the Elastic IP address of the RD Gateway. This will require a Host (A) record in DNS.
There are various considerations when choosing the right CA to obtain an SSL certificate. For example, a public certificate may be ideal since the issuing CA will be widely trusted by the majority of client devices that need to connect to your gateways. On the other hand, you may choose to utilize your own PKI infrastructure to ensure that only the machines that are part of your organization will trust the issuing CA.
Connection and Resource Authorization Policies
Users must meet specific requirements to connect to RD Gateway instances:
-
Connection authorization policies – Remote Desktop connection authorization policies (RD CAPs) allow you to specify who can connect to an RD Gateway instance. For example, you can select a group of users from your domain, such as Domain Admins.
-
Resource authorization policies – Remote Desktop resource authorization policies (RD RAPs) allow you to specify the internal Windows-based instances that remote users can connect to through an RD Gateway instance. For example, you can choose specific domain-joined computers, which administrators can connect to through the RD Gateway.
This Partner Solution automatically sets up connection and resource authorization policies.
Troubleshooting
For troubleshooting common Partner Solution issues, refer to the AWS Partner Solution General Information Guide and Troubleshooting CloudFormation.
Customer responsibility
After you deploy a Partner Solution, confirm that your resources and services are updated and configured—including any required patches—to meet your security and other needs. For more information, refer to the Shared Responsibility Model.
Feedback
To submit feature ideas and report bugs, use the Issues section of the GitHub repository for this Partner Solution. To submit code, refer to the Partner Solution Contributor’s Guide. To submit feedback on this deployment guide, use the following GitHub links:
Notices
This document is provided for informational purposes only. It represents current AWS product offerings and practices as of the date of issue of this document, which are subject to change without notice. Customers are responsible for making their own independent assessment of the information in this document and any use of AWS products or services, each of which is provided "as is" without warranty of any kind, whether expressed or implied. This document does not create any warranties, representations, contractual commitments, conditions, or assurances from AWS, its affiliates, suppliers, or licensors. The responsibilities and liabilities of AWS to its customers are controlled by AWS agreements, and this document is not part of, nor does it modify, any agreement between AWS and its customers.
The software included with this paper is licensed under the Apache License, version 2.0 (the "License"). You may not use this file except in compliance with the License. A copy of the License is located at https://aws.amazon.com/apache2.0/ or in the accompanying "license" file. This code is distributed on an "as is" basis, without warranties or conditions of any kind, either expressed or implied. Refer to the License for specific language governing permissions and limitations.