Web Application Proxy and AD FS on AWS
Partner Solution Deployment Guide

July 2022
Dave May, AWS Integration & Automation team

| Refer to the GitHub repository to view source files, report bugs, submit feature ideas, and post feedback about this Partner Solution. To comment on the documentation, refer to Feedback. |
This Partner Solution was created by Amazon Web Services (AWS). Partner Solutions are automated reference deployments that help people deploy popular technologies on AWS according to AWS best practices. If you’re unfamiliar with AWS Partner Solutions, refer to the AWS Partner Solution General Information Guide.
Overview
This Quick Start deploys Web Application Proxy and AD FS on the AWS Cloud. If you are unfamiliar with AWS Quick Starts, refer to the AWS Quick Start General Information Guide.
Costs and licenses
There is no cost to use this Quick Start, but you will be billed for any AWS services or resources that this Quick Start deploys. For more information, refer to the AWS Quick Start General Information Guide.
Architecture
Deploying this Quick Start for a new virtual private cloud (VPC) with default parameters builds the following Web Application Proxy and AD FS environment in the AWS Cloud.

As shown in Figure 1, this Quick Start deploys the following:
-
A highly available architecture that spans two Availability Zones.*
-
A virtual private cloud (VPC) configured with public and private subnets, according to AWS best practices, to provide you with your own virtual network on AWS.*
-
An internet gateway to provide access to the internet.*
-
In the public subnets:
-
Managed network address translation (NAT) gateways to allow outbound internet access for resources in the private subnets.*
-
Microsoft Remote Desktop Gateway (RD Gateway) instances in an Auto Scaling group to provide inbound remote administrative access.*
-
WAP servers to provide secure inbound connectivity to web applications.
-
-
In the private subnets:
-
Two Active Directory domain controllers in a security group. These act as enterprise certificate authorities (CAs) to issue required SSL certificates to the AD FS infrastructure.*
-
Two Active Directory Federation Services (AD FS) servers in a security group running on Windows Server 2022.
-
* The template that deploys the Quick Start into an existing VPC skips the components marked by asterisks and prompts you for your existing VPC configuration.
Deployment options
This Quick Start provides the following deployment options:
-
Deploy WAP and AD FS into a new VPC. This option builds a new AWS environment that consists of the VPC, subnets, NAT gateways, security groups, bastion hosts, and other infrastructure components. It then deploys WAP and AD FS into this new VPC.
-
Deploy WAP and AD FS into an existing VPC. This option provisions WAP and AD FS in your existing AWS infrastructure.
This Quick Start provides separate templates for these options. It also lets you configure Classless Inter-Domain Routing (CIDR) blocks, instance types, and WAP and AD FS settings.
Predeployment steps
If you are deploying the WAP ADFS Quick Start into an existing VPC, ensure that your Active Directory environment includes at least one certificate authority (CA). If you are using AWS Managed Microsoft Active Directory this will require you to have at least one domain-joined server that can be configured as the CA, since AWS Managed Microsoft Active Directory does not act natively as a CA. To promote a domain-joined server to a CA, run the following PowerShell code from an elevated command prompt:
Add-WindowsFeature Adcs-Cert-Authority -IncludeManagementTools
Install-AdcsCertificationAuthority -CAType EnterpriseRootCA
Deployment steps
-
Sign in to your AWS account, and launch this Partner Solution, as described under Deployment options. The AWS CloudFormation console opens with a prepopulated template.
-
Choose the correct AWS Region, and then choose Next.
-
On the Create stack page, keep the default setting for the template URL, and then choose Next.
-
On the Specify stack details page, change the stack name if needed. Review the parameters for the template. Provide values for the parameters that require input. For all other parameters, review the default settings and customize them as necessary. When you finish reviewing and customizing the parameters, choose Next.
Unless you’re customizing the Partner Solution templates or are instructed otherwise in this guide’s Predeployment section, don’t change the default settings for the following parameters: QSS3BucketName,QSS3BucketRegion, andQSS3KeyPrefix. Changing the values of these parameters will modify code references that point to the Amazon Simple Storage Service (Amazon S3) bucket name and key prefix. For more information, refer to the AWS Partner Solutions Contributor’s Guide. -
On the Configure stack options page, you can specify tags (key-value pairs) for resources in your stack and set advanced options. When you finish, choose Next.
-
On the Review page, review and confirm the template settings. Under Capabilities, select all of the check boxes to acknowledge that the template creates AWS Identity and Access Management (IAM) resources that might require the ability to automatically expand macros.
-
Choose Create stack. The stack takes about 1 hour and 30 minutes to deploy.
-
Monitor the stack’s status, and when the status is CREATE_COMPLETE, the Web Application Proxy and AD FS deployment is ready.
-
To view the created resources, choose the Outputs tab.
Postdeployment steps
Run windows updates
In order to ensure the deployed servers' operating systems and installed applications have the latest Microsoft updates, run Windows Update on each server.
-
Create an RDP session from the Remote Desktop Gateway server to each deployed server.
-
Open the Settings application.
-
Open Update & Security.
-
Click Check for updates.
-
Install any updates and reboot if necessary.
Design considerations
Although this Quick Start is designed for to support 1,000 to 15,000 users, there are a number of options. The following recommendations can help determine the minimum number of servers to deploy for your scenario. These recommendations are based on a hardware profile that supports 8 CPU cores, 4 GiB of RAM, and a 1 gigabit network connection.
-
Fewer than 1,000 users – A small environment can use existing infrastructure instead of running dedicated AD FS servers. If you need to support fewer than 1,000 users, you can install AD FS on at least two of your domain controllers. Ideally, these domain controllers should be in two separate Availability Zones.
-
1,000 to 15,000 users – In this scenario, Microsoft recommends using a dedicated AD FS and WAP server infrastructure. The AD FS database can run using a Windows Internal Database (WID), so you’ll need four servers (two WAP and two AD FS).
-
15,000 to 60,000 users – For large environments, Microsoft recommends using three to five dedicated AD FS servers, and at least two dedicated WAP servers. Note that if you’re scaling beyond five dedicated AD FS servers, you’ll need a dedicated SQL Server instance instead of running a WID.
Selecting an instance type
AD FS is considered a processor-bound workload, meaning that CPU resources are the highest in demand. This Quick Start uses C4 compute-optimized instances by default.
Specifically, the c4.2xlarge instance type is used to provide 8 vCPUs and 15 GiB of memory to meet or exceed requirements, based on the recommendations in the previous section. Additionally, the c4.2xlarge instance type supports Amazon EBS optimization, enhanced networking, and high network performance, which results in higher packets per second, lower latency, and lower jitter. Although c4.2xlarge provides more memory than required, it’s a great candidate for workloads running in a production environment.
Database options
The recommended topology for AD FS is to create a federation server farm that includes at least two AD FS servers. When you install AD FS on the first server, the federation server farm is created. You can join the next server to the farm, and then load-balance those servers.
An AD FS federation server farm uses a database to hold configuration data. For farms with five or fewer servers, you can use a Windows Internal Database (WID). The primary AD FS server will have a read/write copy of this database. The secondary AD FS servers in the farm receive updates from the primary server to a read-only copy of the WID. If the primary AD FS server fails, the secondary server can still process authentication requests, but you cannot make configuration changes until either the primary server is brought back online or the secondary server is converted to primary.
For federation server farms that have more than five AD FS servers, you’ll need to use a SQL Server database for the configuration database. When you use SQL Server for your AD FS database, all members in the federation server farm have write access to the configuration data.
Microsoft recommends that you use WID until you scale past five AD FS servers. This Quick Start utilizes WID with AD FS by default.
Load balancing
For production deployments, you should implement load balancing to make your WAP and AD FS services highly available. You can use Elastic Load Balancing or a third-party virtual load balancer appliance.
Both the WAP and AD FS layers can be load balanced individually with Elastic Load Balancing. You can deploy an Internet-facing load balancer for the WAP layer that will service users accessing published web applications over the Internet. In addition, you can configure an internal load balancer for the AD FS servers. You would then configure the WAP layer to point to the load-balanced DNS name (for example, sts.example.com) that resolves to the internal load balancer.
To take advantage of header inspection, it is recommended that Application Load Balancers (rather than Network Load Balancers or Classic Load Balancers) be deployed. You should configure the internet-facing load balancer for the WAP layer to accept HTTPS requests on port 443 and to forward requests to the WAP servers. You must assign a certificate obtained from a trusted third-party CA to the listener for the internet-facing load balancer. For listener of the internal load balancer, also configured to accept HTTPS requests on port 443, you can assign an internally-signed certificate.
For detailed load-balancing and health-check requirements, refer to AD FS Requirements.
Certificates
Certificates are required to install both the WAP and AD FS components. This Quick Start automates the deployment and installation of these components by using certificates issued from an internal enterprise CA, which runs on the domain controller infrastructure. You can replace these certificates in your own production deployments. The requirements and recommendations for both the WAP and AD FS layers are discussed in the next two sections.
Web Application proxy certificates
-
Issuing CA – Typically, the WAP infrastructure will use certificates issued from a commercial or public CA, such as DigiCert or Verisign, which should be installed in the computer’s personal certificate store. Using a public CA generally prevents you from having to install root certificates on your client devices. You can use your own public key infrastructure (PKI) to issue the WAP certificates. If you do, ensure that the client devices trust the issuing CA. To do this, install the root certificate on the devices and configure the URL of your certificate-revocation list to be externally accessible.
-
Certificate FQDNs – You can explicitly set the certificate subject and subject alternative name (SAN) fields, or you can choose to use a wildcard certificate (for example,
*.example.com). For explicit naming, set the subject field to the AD FS federation service name (for example,sts.example.com). If you plan to use the workplace join feature, you’ll also need two SAN entries: one for the federation service name (for example,sts.example.com) and one for enterprise registration in the formatenterpriseregistration.yourdomain.com. Additionally, you’ll want SAN entries for any fully qualified domain name (FQDN) that you will be publishing, such as externally facing SharePoint sites or Outlook on the web (OWA).
AD FS certificates
-
Issuing CA – Typically, the AD FS infrastructure will use certificates issued from an internal PKI, such as an enterprise Active Directory CA. This is because the servers in the infrastructure are not internet-facing. This is especially useful in an Active Directory domain environment where all domain-joined machines will trust the issuing CA by default. If you choose not to join your WAP servers, you can install the CA root certificate on those servers in the computer’s trusted root CA store. If you do not have an existing PKI implementation, it’s probably easiest to use the same public certificate on both the WAP and AD FS servers.
-
Certificate FQDNs – The AD FS certificate requires the federation service name to be set on the subject field (for example,
sts.example.com). Or, you can use a wildcard certificate.
Domain-joined proxies
As your WAP servers are deployed to public subnets, you may choose not to join them to a domain. This is a typical practice for server workloads running in a perimeter zone. However, if the web application you want to publish must support Integrated Windows authentication, you should join the WAP servers.
This Quick Start automatically joins the WAP servers to the Active Directory Domain Services environment. For help publishing a web application that uses Integrated Windows authentication, refer to Publish Outlook on the web with AD FS preauthentication, later in this guide.
Authentication Scenarios
Publishing web applications with WAP supports three authentication scenarios:
-
AD FS preauthentication – In this scenario, users authenticate against AD FS before gaining access to the published web application. This requires that you add an AD FS relying party trust to the federation service. For detailed coverage on AD FS preauthentication flow, see Publish Applications using AD FS Preauthentication in the Microsoft TechNet Library.
-
Client certificate preauthentication – In this scenario, one or more external servers connect to an on-premises web application through the WAP infrastructure using a certificate for authentication. Despite the name, this scenario should not be used for client devices that connect to a published web application. For more information, see Publish Applications using Client Certificate Preauthentication.
-
Pass-through preauthentication – In this scenario, access to the web application is proxied directly to the backend server without preauthentication against AD FS. This is the option you would use to make AD FS externally accessible. Subsequently published applications that use AD FS preauthentication access AD FS via pass-through preauthentication.
For an example that covers both AD FS and pass-through preauthentication, refer to Publish Outlook on the web with AD FS preauthentication, later in this guide.
Security
When you build systems on the AWS infrastructure, security responsibilities are shared between you and AWS. This shared model can reduce your operational burden as AWS operates, manages, and controls the components from the host operating system and virtualization layer down to the physical security of the facilities in which the services operate. In turn, you assume responsibility and management of the guest operating system (including updates and security patches), other associated applications, as well as the configuration of the AWS-provided security group firewall. For more information about security on AWS, visit the AWS Security Center.
Operating System Security
All the Windows Servers deployed by this Quick Start are domain-joined. You can authenticate to these instances by using the stackadmin@example.com domain administrator account. You can specify the password for this account as you launch the stack. You can retrieve the local administrator password for domain-joined instances by using the KeyPairName parameter specified during the launch. Operating system patches are your responsibility and should be performed on a periodic basis.
Security Groups
A security group acts as a firewall that controls the traffic for one or more instances. When you launch an instance, you associate one or more security groups with the instance. You add rules to each security group that allow traffic to or from its associated instances. You can modify the rules for a security group at any time. The new rules are automatically applied to all instances that are associated with the security group.
The security groups created and assigned to the individual instances as part of this solution are restricted as much as possible while allowing access to the various functions needed by AD FS and WAP. After deployment, review security groups and further restrict access as needed.
Publish Outlook on the web with AD FS preauthentication
In this section, you’ll learn how to deploy WAP and AD FS infrastructure on top of the Microsoft Exchange on the AWS Cloud Quick Start and publish OWA to the internet using WAP and AD FS.
| The template for WAP and AD FS provided with this guide is built to work with existing VPCs that have two public and two private subnets, and an existing Active Directory Domain Services implementation. More specifically, it is designed to work with the existing Microsoft-based AWS Quick Starts, such as Exchange Server, SharePoint Server, and Lync Server. |
| In this section, the process of publishing OWA uses Integrated Windows authentication. You can follow the same general process for Exchange Server 2010, or other web applications you want to publish with Integrated Windows authentication. It is also possible to publish OWA with claims-based authentication using Exchange Server 2013 SP1 or newer, but that scenario is beyond the scope of this guide. |
Deploy Quick Start templates
-
Deploy the Microsoft Exchange on the AWS Cloud Quick Start.
-
Deploy the Web Application Proxy and AD FS template. During deployment, specify the
KeyPairNamefor your chosen AWS Region and the IDs for your existing VPC and public and private subnets.
Connect to a RD Gateway instance
-
Initiate a Remote Desktop Protocol (RDP) connection to one of the deployed RD Gateway instances. You can retrieve the Elastic IP address (EIP) of the RD Gateway servers from the Amazon EC2 console. Use RDP to connect to the first Exchange server (
exch1). -
On the first Exchange server (
exch1), navigate to the Exchange Admin Center in a web browser. Sign in using thestackadminuser account and password you specified when deploying the Microsoft Exchange on AWS stack. Figure 2. Logging into the Exchange Admin Center

-
In the left navigation pane, under Servers, choose Virtual directories.
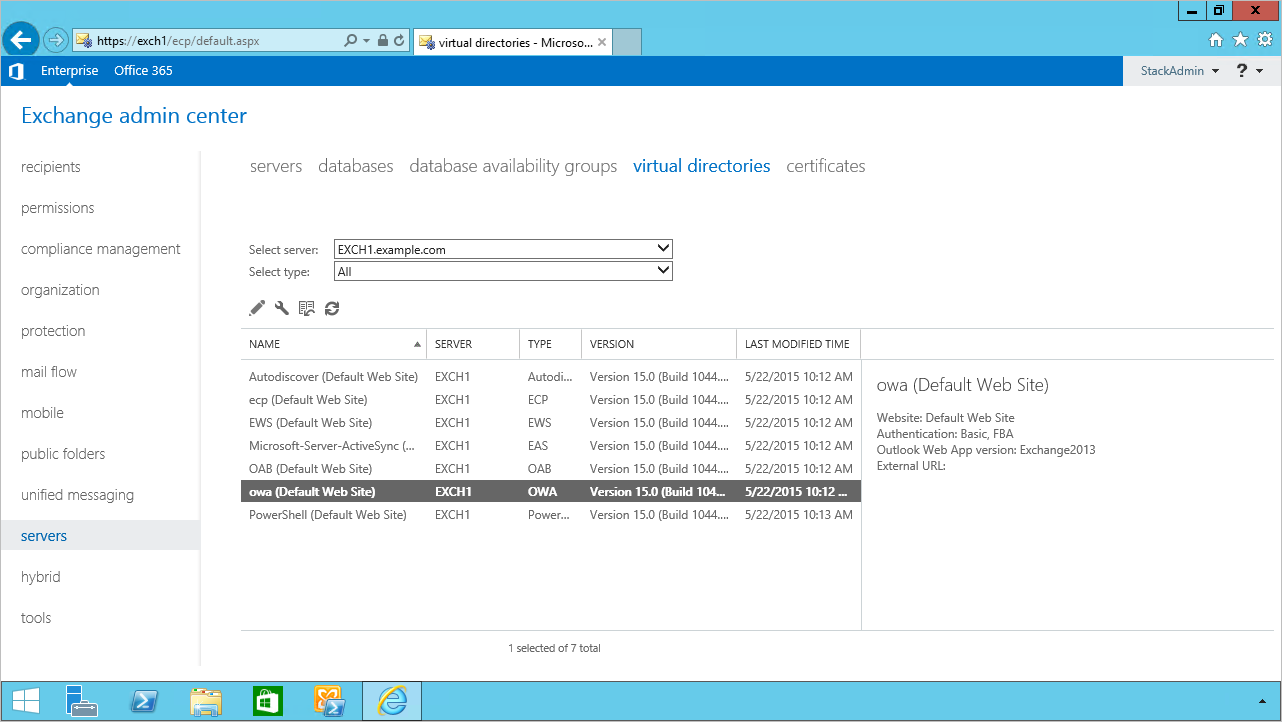 Figure 3. Viewing the virtual directories on EXCH1

-
Choose owa (Default Web Site) on the EXCH1 server. Choose Authentication, Integrated Windows authentication, and then choose Save. You should also change the corresponding setting on the ECP virtual directory on EXCH1.
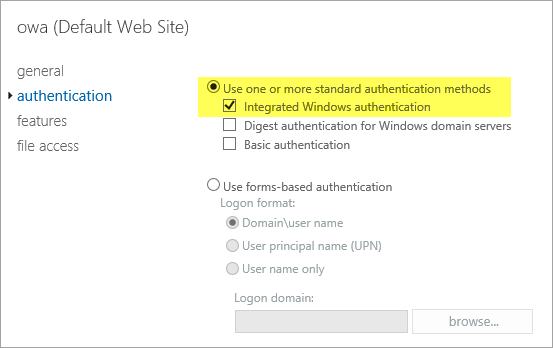 Figure 4. Setting OWA authentication to Integrated Windows

| In a load-balanced production environment, modify this setting on each Exchange server that is running the Client Access role. |
Connect to the ADFS1 server
-
Establish an RDP connection to the ADFS1 server. In Control Panel, choose Administrative Tools, and then launch the ADFS Management snap-in.
-
Start the wizard. Open the context (right-click) menu for Trust Relationships, and then choose Add Non-Claims-Aware Relying Party Trust.
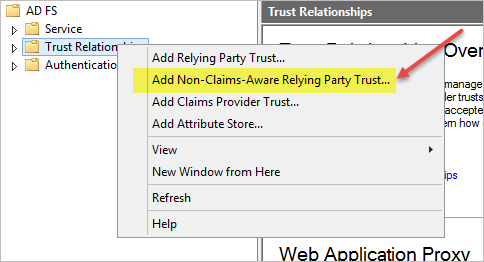 Figure 5. Adding a non-claims-aware relying party trust

-
Choose Start. Enter a display name such as
OWA. Provide a unique identifier string for the non-claims-aware relying party trust. Use the default service name created by the Quick Start (for example,http://sts.example.com/adfs/services/trust) for the URL. -
Indicate that you do not want to configure multifactor authentication, and then choose Next.
-
Go through the remaining screens without making changes. On the final screen, select Open the Edit Issuance Authorization Rules and then choose Close.
-
On the Edit Claim Rules screen, choose Add Rule, Permit Access to All Users, and then choose Finish.
Connect to the WAP1 server
Establish an RDP connection to the WAP1 server. In Control Panel, choose Administrative Tools, and then launch the Remote Access Management snap-in.

Publish OWA
To publish OWA to the internet, you’ll need to create two rules. The first rule will be a pass-through authentication rule to the AD FS server. This will allow users to pre-authenticate before being connected to OWA.
-
Under Tasks, choose Publish.
-
On the Welcome screen, choose Next. On the Preauthentication tab, choose Pass-through.
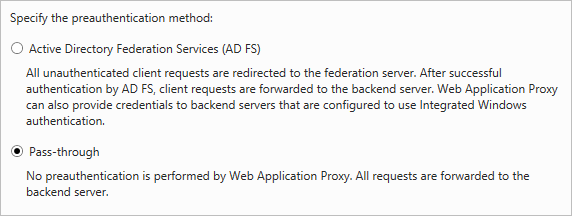 Figure 7. Selecting the pass-through pre-authentication method

-
Provide a name for the rule (for example,
ADFS). Specify the external URL, the external certificate, and the backend server URL as shown in Figure 8. Figure 8. Configuring the publishing rule
Note If you’ve implemented internal load balancing for the AD FS tier, you can set the backend server URL to a load-balanced endpoint instead of an individual server name.

-
Choose Publish, and then Close to exit the wizard.
-
Choose Publish again to create a new rule for OWA. This time, set the preauthentication method to Active Directory Federation Services (AD FS), and then choose Next.
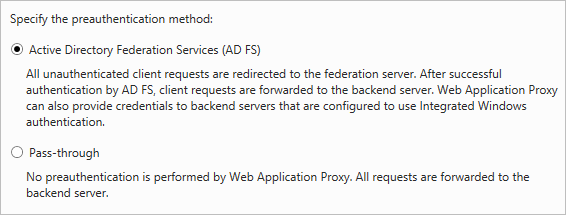 Figure 9. Selecting the AD FS pre-authentication method

-
For the relying party for the application, select the relying party trust you created on the AD FS server, and then choose Next.
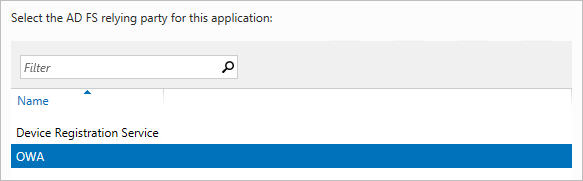 Figure 10. Selecting the relying party

-
Provide a name such as OWA for the rule. Specify the external URL, external certificate, backend URL, and service principal name (SPN) for the backend server, as shown in Figure 11.
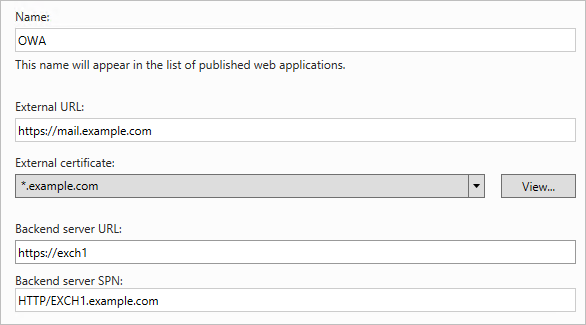 Figure 11. Configuring rule details

| If you’ve implemented internal load balancing for the Exchange client access tier, you can set the backend server URL and SPN to a load-balanced endpoint instead of an individual server name. |
-
Choose Publish and close the wizard.
-
Establish an RDP connection to DC1. In Control Panel, choose Administrative Tools, and then launch the Active Directory Users and Computers snap-in.
-
Navigate to the Computers container, right-click the WAP1 computer, and then choose Properties. On the Delegation tab, choose Trust this computer for delegation to specified services only. Check the option to use any authentication protocol, and add the HTTP service type on the EXCH1 computer to the list, as shown in Figure 15. Choose Apply, and then choose OK.
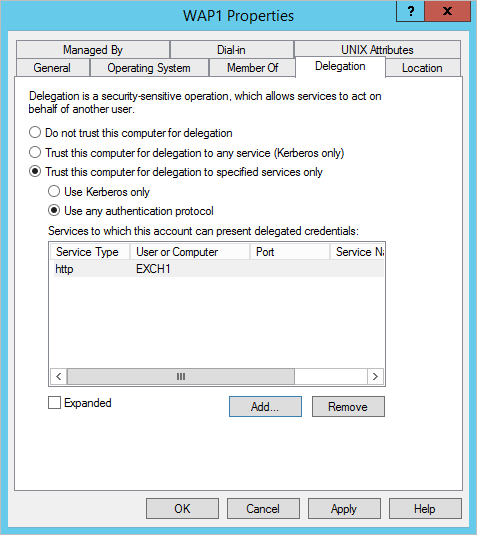 Figure 12. Configuring Kerberos constrained delegation

Test OWA access
Now you are ready to test accessing OWA from an external workstation or server over the internet.
-
If you did not use your own domain name, you’ll need to edit the hosts file on your machine to allow your computer to resolve the endpoints at
example.com. Add a mapping forsts.example.comandmail.example.comto your local hosts file. Ensure that both hosts resolve to the public EIP of the WAP1 server. -
Open a web browser from your external workstation or server. Navigate to
mail.example.com. Sign in using thestackadminuser name and password.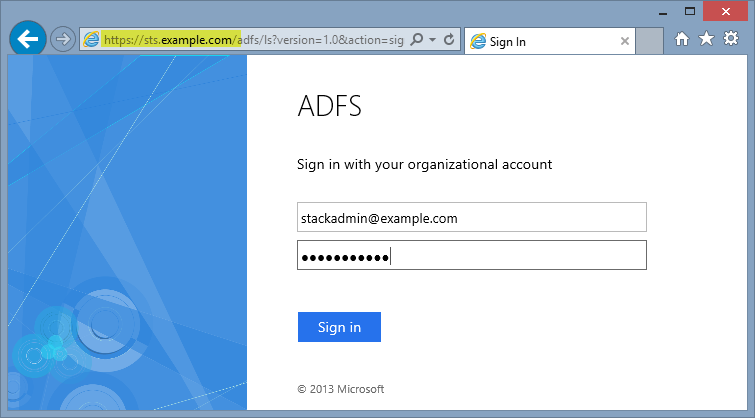 Figure 13. Pre-authenticating to AD FS
If the authentication is successful, the connection should be proxied to the EXCH1 server through WAP, as shown in Figure 14.
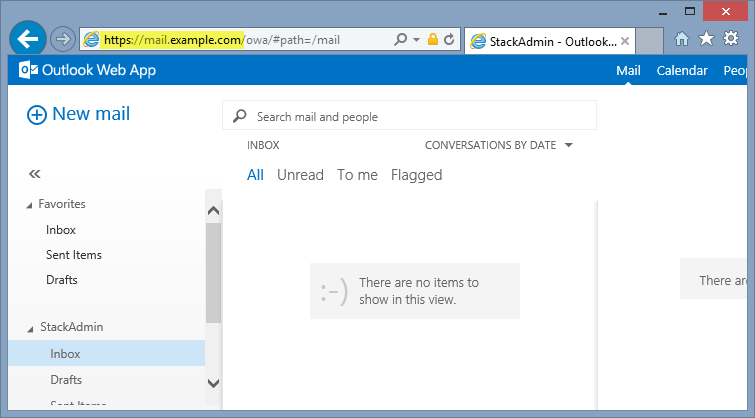 Figure 14. Connected to the published application


Additional resources
AWS services
Microsoft Web Application Proxy and AD FS
Deploying Microsoft software on AWS
Tools
Associated Quick Start reference deployments
Troubleshooting
For troubleshooting common Quick Start issues, refer to the AWS Quick Start General Information Guide and Troubleshooting CloudFormation.
Customer responsibility
After you deploy a Partner Solution, confirm that your resources and services are updated and configured—including any required patches—to meet your security and other needs. For more information, refer to the Shared Responsibility Model.
Feedback
To submit feature ideas and report bugs, use the Issues section of the GitHub repository for this Partner Solution. To submit code, refer to the Partner Solution Contributor’s Guide. To submit feedback on this deployment guide, use the following GitHub links:
Notices
This document is provided for informational purposes only. It represents current AWS product offerings and practices as of the date of issue of this document, which are subject to change without notice. Customers are responsible for making their own independent assessment of the information in this document and any use of AWS products or services, each of which is provided "as is" without warranty of any kind, whether expressed or implied. This document does not create any warranties, representations, contractual commitments, conditions, or assurances from AWS, its affiliates, suppliers, or licensors. The responsibilities and liabilities of AWS to its customers are controlled by AWS agreements, and this document is not part of, nor does it modify, any agreement between AWS and its customers.
The software included with this paper is licensed under the Apache License, version 2.0 (the "License"). You may not use this file except in compliance with the License. A copy of the License is located at https://aws.amazon.com/apache2.0/ or in the accompanying "license" file. This code is distributed on an "as is" basis, without warranties or conditions of any kind, either expressed or implied. Refer to the License for specific language governing permissions and limitations.