Okta Advanced Server Access on AWS
Partner Solution Deployment Guide

August 2023
Ivan Dwyer, Frederico Hakamine, and Adam Arkon, Okta
Roy Rodan, AWS ISV Partner Management team
Dave May, AWS Integration & Automation team

| Refer to the GitHub repository to view source files, report bugs, submit feature ideas, and post feedback about this Partner Solution. To comment on the documentation, refer to Feedback. |
This Partner Solution was created by Okta in collaboration with Amazon Web Services (AWS). Partner Solutions are automated reference deployments that help people deploy popular technologies on AWS according to AWS best practices. If you’re unfamiliar with AWS Partner Solutions, refer to the AWS Partner Solution General Information Guide.
Overview
This guide provides instructions for deploying the Okta Advanced Server Access (Okta ASA) Partner Solution reference architecture on the AWS Cloud.
This Partner Solution is for systems administrators who deploy and manage Amazon Elastic Compute Cloud (Amazon EC2) instances. It helps you secure remote access and control local accounts and permissions using Okta software.
After you deploy this Partner Solution, access to EC2 instances is authenticated and authorized through an Okta single-sign-on workflow. This workflow, which can provide contextual multi-factor authentication, mitigates the risk of credential theft and misuse. It also reduces the need to wrap additional controls and management layers around secrets.
Specifically, the Okta ASA Partner Solution provides a mechanism for managing the lifecycle of local EC2-instance user and group accounts and their machine-level permissions. These things are sourced directly from the Okta Identity Cloud. When you use Okta ASA as your authentication mechanism to EC2 instances, you don’t rely on static credentials to log in. Instead, Okta uses a dynamic, ephemeral, one-time access token that ties directly to the user’s least-privileged access profile in the central Okta identity database.
You can access Linux EC2 instances using Secure Shell (SSH) or Windows EC2 instances using Remote Desktop Protocol (RDP). By default, this Partner Solution sets up SSH access to Linux EC2 instances. An EC2 security group is created with TCP port 22 traffic allowed from the bastion security group. If you want to use RDP and Windows, deploy an EC2 instance running Windows into one of the public subnets. Then, add the instance to the bastion security group, and update the target security group to allow port 3389 traffic from the bastion security group.
Costs and licenses
There is no cost to use this Partner Solution, but you will be billed for any AWS services or resources that this Partner Solution deploys. For more information, refer to the AWS Partner Solution General Information Guide.
This Partner Solution requires a license for Okta Advanced Server Access. This product is backed by the Okta Identity Cloud for user and group management, account-lifecycle management, single sign-on, and multi-factor authentication.
To use the Partner Solution in your production environment, sign up for Okta ASA. Follow the instructions to create an Okta ASA tenant backed by a new or existing Okta tenant. You don’t need a license file to deploy the software on the AWS Cloud.
Architecture
Deploying this Partner Solution with default parameters builds the following Okta ASA environment in the AWS Cloud.
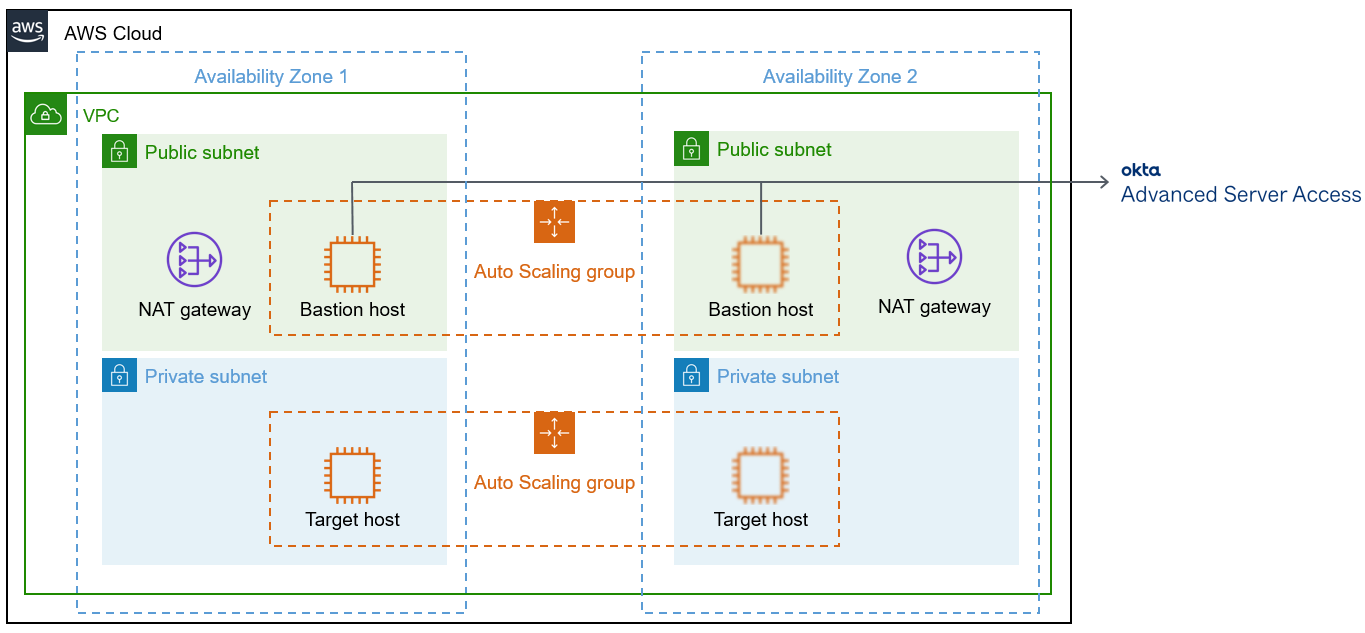
As shown in Figure 1, this Partner Solution sets up the following:
-
A highly available architecture that spans two Availability Zones.*
-
A VPC configured with public and private subnets, according to AWS best practices, to provide you with your own virtual network on AWS.*
-
In the public subnets:
-
Managed network address translation (NAT) gateways to allow outbound internet access for resources in the private subnets.*
-
A Linux bastion host in an Auto Scaling group. This host has the Okta server agent installed. It shares a configuration to act as the bastion for SSH access to EC2 instances in the private subnets.
-
-
In the private subnets, a Linux EC2 instance (target host) in an Auto Scaling group. This target host has the Okta server agent installed and is configured to be accessible only through the Linux bastion host in the public subnet.*
* The template that deploys this Partner Solution into an existing VPC skips the components marked by asterisks and prompts you for your existing VPC configuration.
Deployment options
This Partner Solution provides the following deployment options:
-
Deploy Okta ASA into a new VPC. This option builds a new AWS environment that consists of the VPC, subnets, NAT gateways, security groups, bastion hosts, and other infrastructure components. It then deploys Okta ASA into this new VPC.
-
Deploy Okta ASA into an existing VPC. This option provisions Okta ASA in your existing AWS infrastructure.
This Partner Solution provides separate templates for these options. It also lets you configure Classless Inter-Domain Routing (CIDR) blocks, instance types, and Okta ASA settings.
Predeployment steps
Okta account
To use this Partner Solution, you must be an Okta Org administrator. If you don’t already have an Okta account, sign up for a free trial. Okta Advanced Server Access is an integrated application with an existing Okta Org. To create an Okta ASA team, visit the sign-up page, and follow the instructions.
Set up Okta ASA
Sign in to your Okta ASA team
Sign in to your Okta ASA team at https://app.scaleft.com with your Okta credentials. If you do not have an Okta ASA team, see Planning the deployment earlier in this guide for instructions on how to create a tenant.
Create a project
Create an Okta ASA project, which represents the authorization scope for a set of EC2 instances. Users and groups are explicitly assigned to projects, where role-based access and entitlements are specified. Okta manages and provisions accounts and entitlements to the downstream EC2 instances.

Configure instance enrollment
In Okta ASA, EC2 instances are enrolled with a specific project using enrollment tokens or automatic enrollment. This Partner Solution supports server enrollment using enrollment tokens.
-
Go to the project detail page, and choose the Enrollment tab.
-
Choose Create Enrollment Token.
-
Name your token, and choose Submit.
-
Copy the token value in the next screen for future reference.
Deployment steps
-
Sign in to your AWS account, and launch this Partner Solution, as described under Deployment options. The AWS CloudFormation console opens with a prepopulated template.
-
Choose the correct AWS Region, and then choose Next.
-
On the Create stack page, keep the default setting for the template URL, and then choose Next.
-
On the Specify stack details page, change the stack name if needed. Review the parameters for the template. Provide values for the parameters that require input. For all other parameters, review the default settings and customize them as necessary. When you finish reviewing and customizing the parameters, choose Next.
Unless you’re customizing the Partner Solution templates or are instructed otherwise in this guide’s Predeployment section, don’t change the default settings for the following parameters: QSS3BucketName,QSS3BucketRegion, andQSS3KeyPrefix. Changing the values of these parameters will modify code references that point to the Amazon Simple Storage Service (Amazon S3) bucket name and key prefix. For more information, refer to the AWS Partner Solutions Contributor’s Guide. -
On the Configure stack options page, you can specify tags (key-value pairs) for resources in your stack and set advanced options. When you finish, choose Next.
-
On the Review page, review and confirm the template settings. Under Capabilities, select all of the check boxes to acknowledge that the template creates AWS Identity and Access Management (IAM) resources that might require the ability to automatically expand macros.
-
Choose Create stack. The stack takes about 30 minutes to deploy.
-
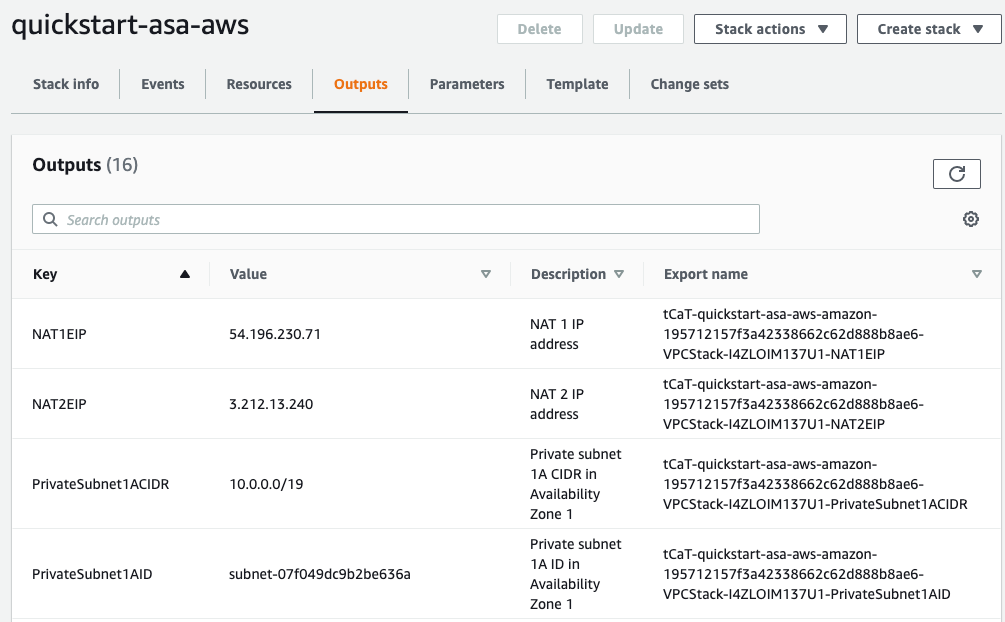
Monitor the stack’s status, and when the status is CREATE_COMPLETE, the Okta Advanced Server Access deployment is ready.
-
To view the created resources, choose the Outputs tab.
Postdeployment steps
Test the deployment
After the AWS CloudFormation stack is complete, you can test the deployment by checking whether the instances were properly enrolled with your Okta ASA project.
-
Visit the Okta Advanced Server Access dashboard.
-
Sign in to your team, and then choose the project that you created for this Partner Solution.
-
Choose the Servers tab. The bastion host and target host deployed in the stack appear in the server inventory list. If they don’t, the enrollment process did not work. Confirm that the enrollment token was copied over in full as a stack parameter.
-
Choose any target instance, and copy the value for Name from the detail view. Open your local terminal and run the following command, replacing the bracketed text with your hostname:
$ sft ssh <hostname>If you receive an error while trying to log in, make sure that you completed all the prerequisite steps, that you have the client application installed, and that you have assigned your user account to the project that the servers belong to.
-
After the SSH connection is established, verify that the installation process was successful and that the server agent is running. To do this, run the following command:
$ ps -aux | grep sftd
Add target hosts
After the Partner Solution is deployed in your environment, you can use the template okta-asa-target.template.yaml to deploy additional target-host Auto Scaling groups. To do this, upload the template to an S3 bucket, and use the S3 path in the CloudFormation console.
Create projects for each environment: A best practice
Configuring projects is an exercise in organizational structure and permissions modeling. There are an infinite number of possible combinations. Considering that a server can belong to only one project, getting projects right early on is like laying a strong foundation for your house. The most effective way to determine project structure is to think in terms of environments.
Balance coarse-grained and fine-grained environments. For example, a coarse-grained environment might be a single AWS Region, while a fine-grained environment might be EC2 instances tagged as App1-Prod. A balance helps you grant access to the right people in a clear manner without overburdening yourself as an administrator.
When creating projects, also consider local account lifecycle management, a key feature of Okta ASA. This is especially important if you plan to deploy across existing (brownfield) server deployments. In these cases, the installed server agent creates and manages the local user and group accounts on the machine. Avoid performing this in a manner that could delete or reconfigure the existing local server accounts.
When you create an Okta ASA project, you determine a starting point for user ID (UID) and group ID (GID). These numbers increment with every user that is explicitly added. The default starting point is 60001 for UID and 63001 for GID. This starting point is configurable at the project level (see Set project-level user and group attributes in Advanced Server Access). The default numbers are high to avoid potential conflicts with existing user accounts on the machine. If there’s a conflict, the server agent takes over management of the account. This takeover could break any existing local configurations or mounted file sharing.
Before installing the server agent on servers with existing user accounts, perform a brief discovery exercise that outputs the existing accounts with their respective attributes, such as UID and GID. As an added benefit, this exercise inventories the existing credentials on the server, management of which you can reduce by using Okta ASA.
Security: Client-certificate authentication
Each Okta ASA project is associated with its own programmable certificate authority (CA). It’s not a traditional CA as you may be used to with web public key infrastructure. It mints certificates with as limited a scope and as short a time to live (TTL) as possible so there’s no need to maintain certificate-revocation lists (CRLs) or use the Online Certificate Status Protocol (OCSP).
Each time a customer creates a project within a team, a new CA is spun up. The private key that backs the project CA is stored in AWS Key Management Service (AWS KMS), and an internal security policy is associated with it.
When a server is enrolled with a project and the server agent is installed, the server is configured to trust client certificates signed by that project’s programmable CA. The project’s CA is what mints each client certificate upon the authentication and authorization of a request. The project uses OpenSSH certificates for Linux and X.509 certificates for Windows. The user and device info are injected as metadata with a TTL of three minutes. The three minutes account for clock drift on the target machines.
The CA mints the client certificate and sends it to the client application. The client application then uses the certificate in memory to initiate a secure session with the target server. To limit the scope, the client uses only certificates of the Okta session plus device metadata, and the server accepts only client certificates signed by that project’s CA. Because each project has a role-based access control (RBAC) scope, a specific user would have access to the enrolled servers. When the certificate expires, it is rendered useless.
Troubleshooting
For troubleshooting common Partner Solution issues, refer to the AWS Partner Solution General Information Guide and Troubleshooting CloudFormation.
Okta ASA documentation
Customer responsibility
After you deploy a Partner Solution, confirm that your resources and services are updated and configured—including any required patches—to meet your security and other needs. For more information, refer to the Shared Responsibility Model.
Feedback
To submit feature ideas and report bugs, use the Issues section of the GitHub repository for this Partner Solution. To submit code, refer to the Partner Solution Contributor’s Guide. To submit feedback on this deployment guide, use the following GitHub links:
Notices
This document is provided for informational purposes only. It represents current AWS product offerings and practices as of the date of issue of this document, which are subject to change without notice. Customers are responsible for making their own independent assessment of the information in this document and any use of AWS products or services, each of which is provided "as is" without warranty of any kind, whether expressed or implied. This document does not create any warranties, representations, contractual commitments, conditions, or assurances from AWS, its affiliates, suppliers, or licensors. The responsibilities and liabilities of AWS to its customers are controlled by AWS agreements, and this document is not part of, nor does it modify, any agreement between AWS and its customers.
The software included with this paper is licensed under the Apache License, version 2.0 (the "License"). You may not use this file except in compliance with the License. A copy of the License is located at https://aws.amazon.com/apache2.0/ or in the accompanying "license" file. This code is distributed on an "as is" basis, without warranties or conditions of any kind, either expressed or implied. Refer to the License for specific language governing permissions and limitations.