QingCloud KubeSphere on AWS
Partner Solution Deployment Guide

November 2020
Xiaosi Zhou, Pengfei Zhou, Shuang Yu, and Sherlock Xu, QingCloud
Troy Ameigh, AWS Integration & Automation team

| Refer to the GitHub repository to view source files, report bugs, submit feature ideas, and post feedback about this Partner Solution. To comment on the documentation, refer to Feedback. |
This Partner Solution was created by QingCloud in collaboration with Amazon Web Services (AWS). Partner Solutions are automated reference deployments that help people deploy popular technologies on AWS according to AWS best practices. If you’re unfamiliar with AWS Partner Solutions, refer to the AWS Partner Solution General Information Guide.
Overview
This guide covers the information you need to deploy the QingCloud KubeSphere Partner Solution in the AWS Cloud.
This Amazon Web Services (AWS) Partner Solution deploys KubeSphere with Amazon EKS on the AWS Cloud. It is for AWS Identity and Access Management (IAM) users of Amazon EKS who are looking for a web console to manage daily Kubernetes workloads.
Costs and licenses
KubeSphere is open source and doesn’t require a license. It is free for all Amazon EKS users. For any KubeSphere issues, see the KubeSphere GitHub community and raise an issue. Alternatively, contact KubeSphere through the Slack community or its mailing list.
For KubeSphere users with production environments who want technical support, you must have a support subscription. To get started, contact your account executive or fill out KubeSphere’s Commercial Support form.
QingCloud is an AWS Partner, and is the KubeSphere project sponsor and maintainer, which means they can provide technical KubeSphere support.
There is no cost to use this Partner Solution, but you will be billed for any AWS services or resources that this Partner Solution deploys. For more information, refer to the AWS Partner Solution General Information Guide.
Architecture
Deploying this Partner Solution with default parameters builds the following KubeSphere environment in the AWS Cloud.
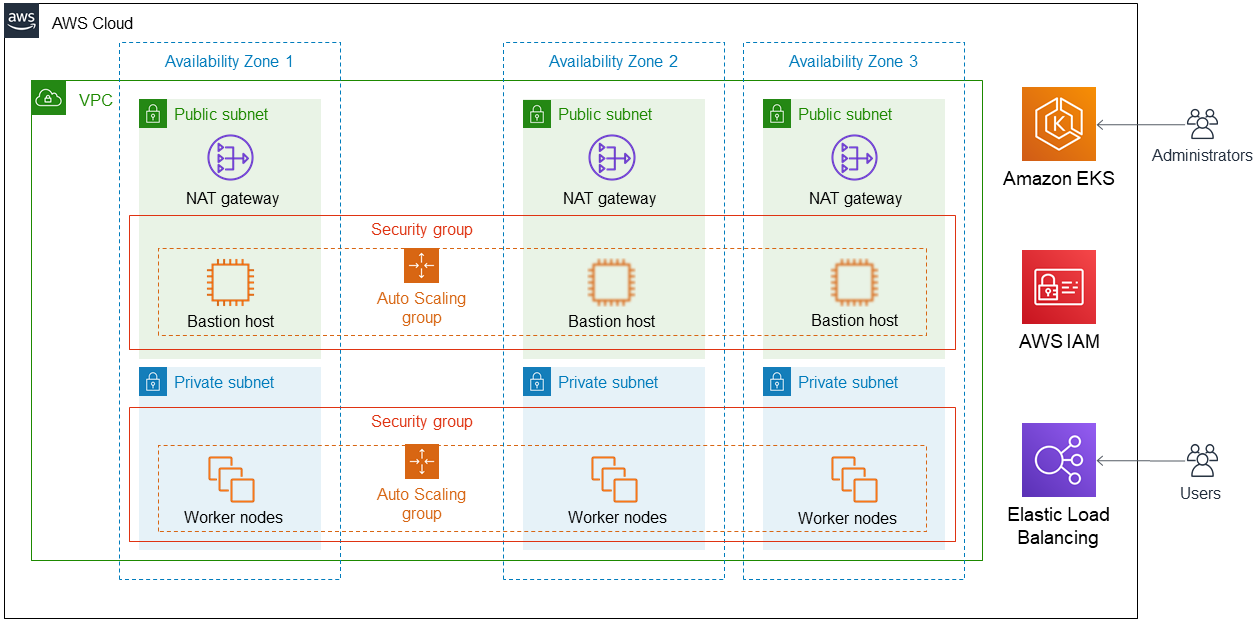
As shown in Figure 1, this Partner Solution sets up the following:
-
A highly available architecture that spans two Availability Zones.*
-
A virtual private cloud (VPC) configured with public and private subnets, according to AWS best practices, to provide you with your own virtual network on AWS.*
-
In the public subnets:
-
Managed network address translation (NAT) gateways to allow outbound internet access for resources in the private subnets.*
-
Linux bastion hosts in an Auto Scaling group to allow inbound Secure Shell (SSH) access to administer the KubeSphere platform and Amazon EKS environment.*
-
-
In the private subnets:
-
Amazon Elastic Compute Cloud (Amazon EC2) instances in an Auto Scaling group. KubeSphere core components and your applications run on worker nodes.
-
-
An Amazon EKS cluster, which provides the Kubernetes control plane.
-
AWS IAM roles to help you securely control access to AWS resources.
-
Elastic Load Balancing to distribute incoming application or network traffic across multiple targets.
* The template that deploys this Partner Solution into an existing VPC skips the components marked by asterisks and prompts you for your existing VPC configuration.
Deployment options
This Partner Solution provides the following deployment options:
-
Deploy KubeSphere into a new VPC. This option builds a new AWS environment that consists of the VPC, subnets, NAT gateways, security groups, bastion hosts, and other infrastructure components. It then deploys KubeSphere into this new VPC.
-
Deploy KubeSphere into an existing VPC. This option provisions KubeSphere in your existing AWS infrastructure.
-
Deploy KubeSphere into a new VPC on AWS into CN-North-1 Region
-
Deploy KubeSphere into an existing VPC on AWS into CN-Northwest-1 Region
This Partner Solution provides separate templates for these options. It also lets you configure Classless Inter-Domain Routing (CIDR) blocks, instance types, and KubeSphere settings.
Deployment steps
-
Sign in to your AWS account, and launch this Partner Solution, as described under Deployment options. The AWS CloudFormation console opens with a prepopulated template.
-
Choose the correct AWS Region, and then choose Next.
-
On the Create stack page, keep the default setting for the template URL, and then choose Next.
-
On the Specify stack details page, change the stack name if needed. Review the parameters for the template. Provide values for the parameters that require input. For all other parameters, review the default settings and customize them as necessary. When you finish reviewing and customizing the parameters, choose Next.
Unless you’re customizing the Partner Solution templates or are instructed otherwise in this guide’s Predeployment section, don’t change the default settings for the following parameters: QSS3BucketName,QSS3BucketRegion, andQSS3KeyPrefix. Changing the values of these parameters will modify code references that point to the Amazon Simple Storage Service (Amazon S3) bucket name and key prefix. For more information, refer to the AWS Partner Solutions Contributor’s Guide. -
On the Configure stack options page, you can specify tags (key-value pairs) for resources in your stack and set advanced options. When you finish, choose Next.
-
On the Review page, review and confirm the template settings. Under Capabilities, select all of the check boxes to acknowledge that the template creates AWS Identity and Access Management (IAM) resources that might require the ability to automatically expand macros.
-
Choose Create stack. The stack takes about 40-50 minutes to deploy.
-
Monitor the stack’s status, and when the status is CREATE_COMPLETE, the QingCloud KubeSphere deployment is ready.
-
To view the created resources, choose the Outputs tab.
Postdeployment steps
Test the deployment
-
Log in to the bastion host using your configured key pair and the user name
ec2-user. You can get the IP address of the bastion host from the Outputs tab of the AWS CloudFormation console.ssh -i "~/.ssh/cap.pem" ec2-user@12.23.34.45
-
Verify that the client software was installed through the bastion host:
-
Kubectl version:
$ kubectl version
-
Helm version:
$ helm version
-
AWS CLI version:
$ aws -version
-
Cf version:
$ cf -version
-
Git version
$ git version
-
-
Verify the health of the Amazon EKS cluster through the bastion host. Use the installed
kubectlandhelmcommands to verify access to the environment and the running state of the cluster and packages. The installation was successful if you see the welcome-information outputs in the log.$ kubectl cluster-info
$ kubectl get nodes
$ kubectl logs -n kubesphere-system $(kubectl get pod -n kubesphere-system -l app=ks-install -o jsonpath='\{.items[0].metadata.name}') -f
-
Retrieve the generated URL of the KubeSphere console from the outputs list. Access it in your browser, and log in to the KubeSphere console using the administrator account and password defined by
KubeSphereConsolePassword.


Best practices for using KubeSphere on AWS
KubeSphere has 11 pluggable components, which can be enabled individually. If you don’t enable them, KubeSphere starts with a minimal installation by default. Ensure that you have the necessary CPU and memory requirements in your cluster. For more information, see the KubeSphere Overview.
The optimal configuration for running KubeSphere Container Platform on an Amazon EKS cluster requires a minimum of one worker node that has at least 16 GiB RAM and 4 CPUs. We recommended that you enable these pluggable components to discover the full-stack features and capabilities provided by KubeSphere. If you already have a minimal KubeSphere setup, you can still enable the pluggable components by editing the cluster’s configuration as follows:
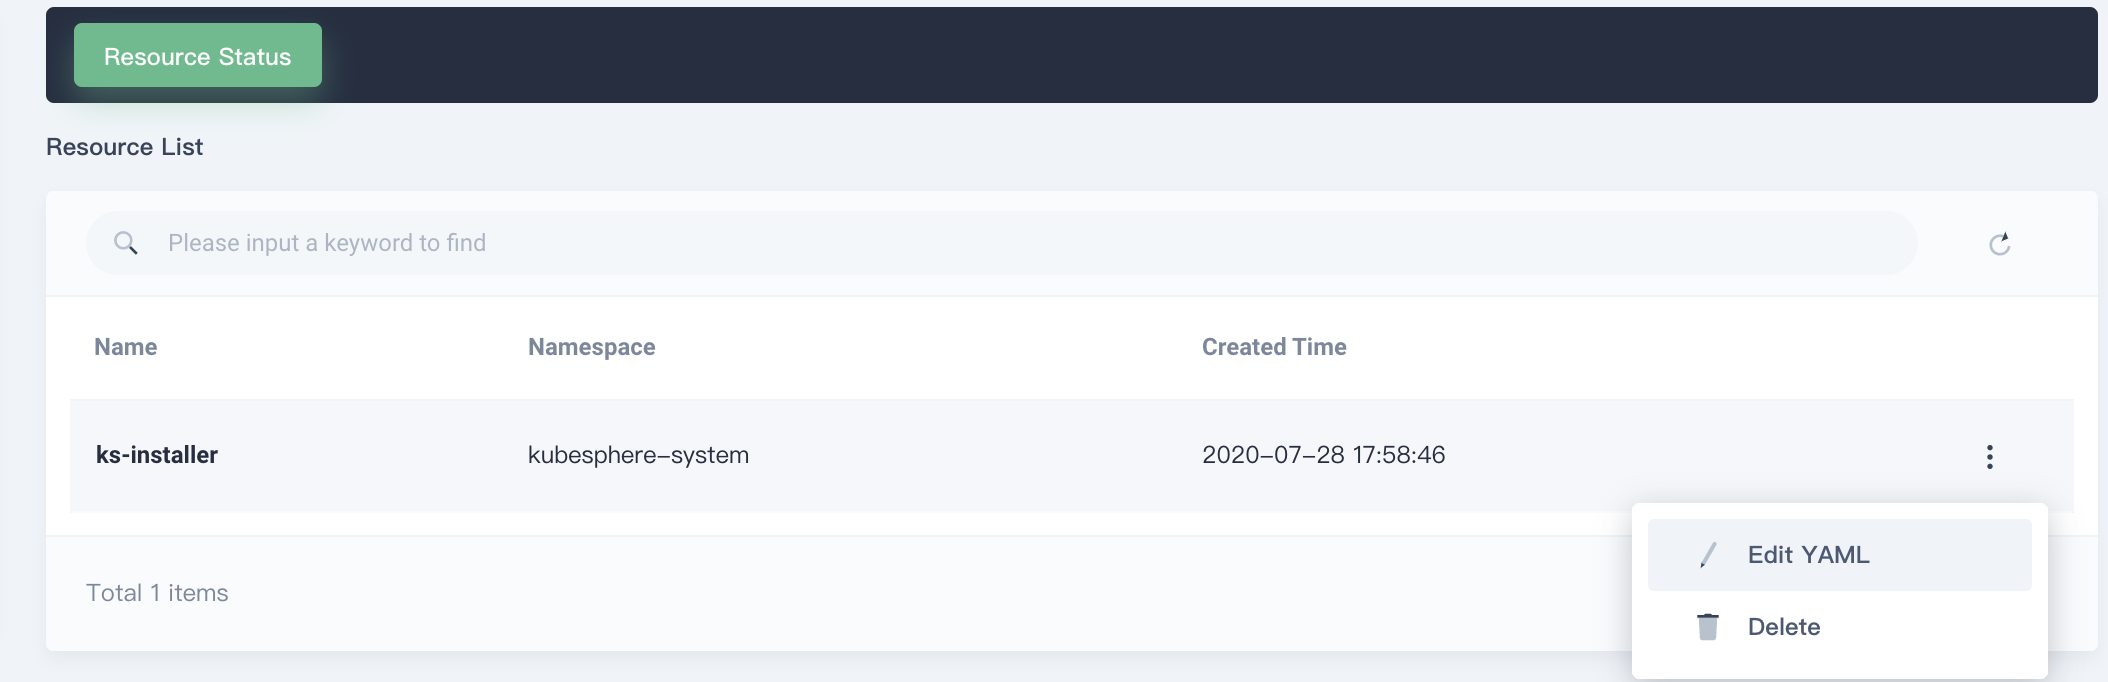
Use an administrative account to access Cluster Management. Choose the EKS cluster, and select CRDs from the left-hand menu. Search for ClusterConfiguration.

Choose the ClusterConfiguration resource page. Choose ··· from the list, and select Edit YAML.
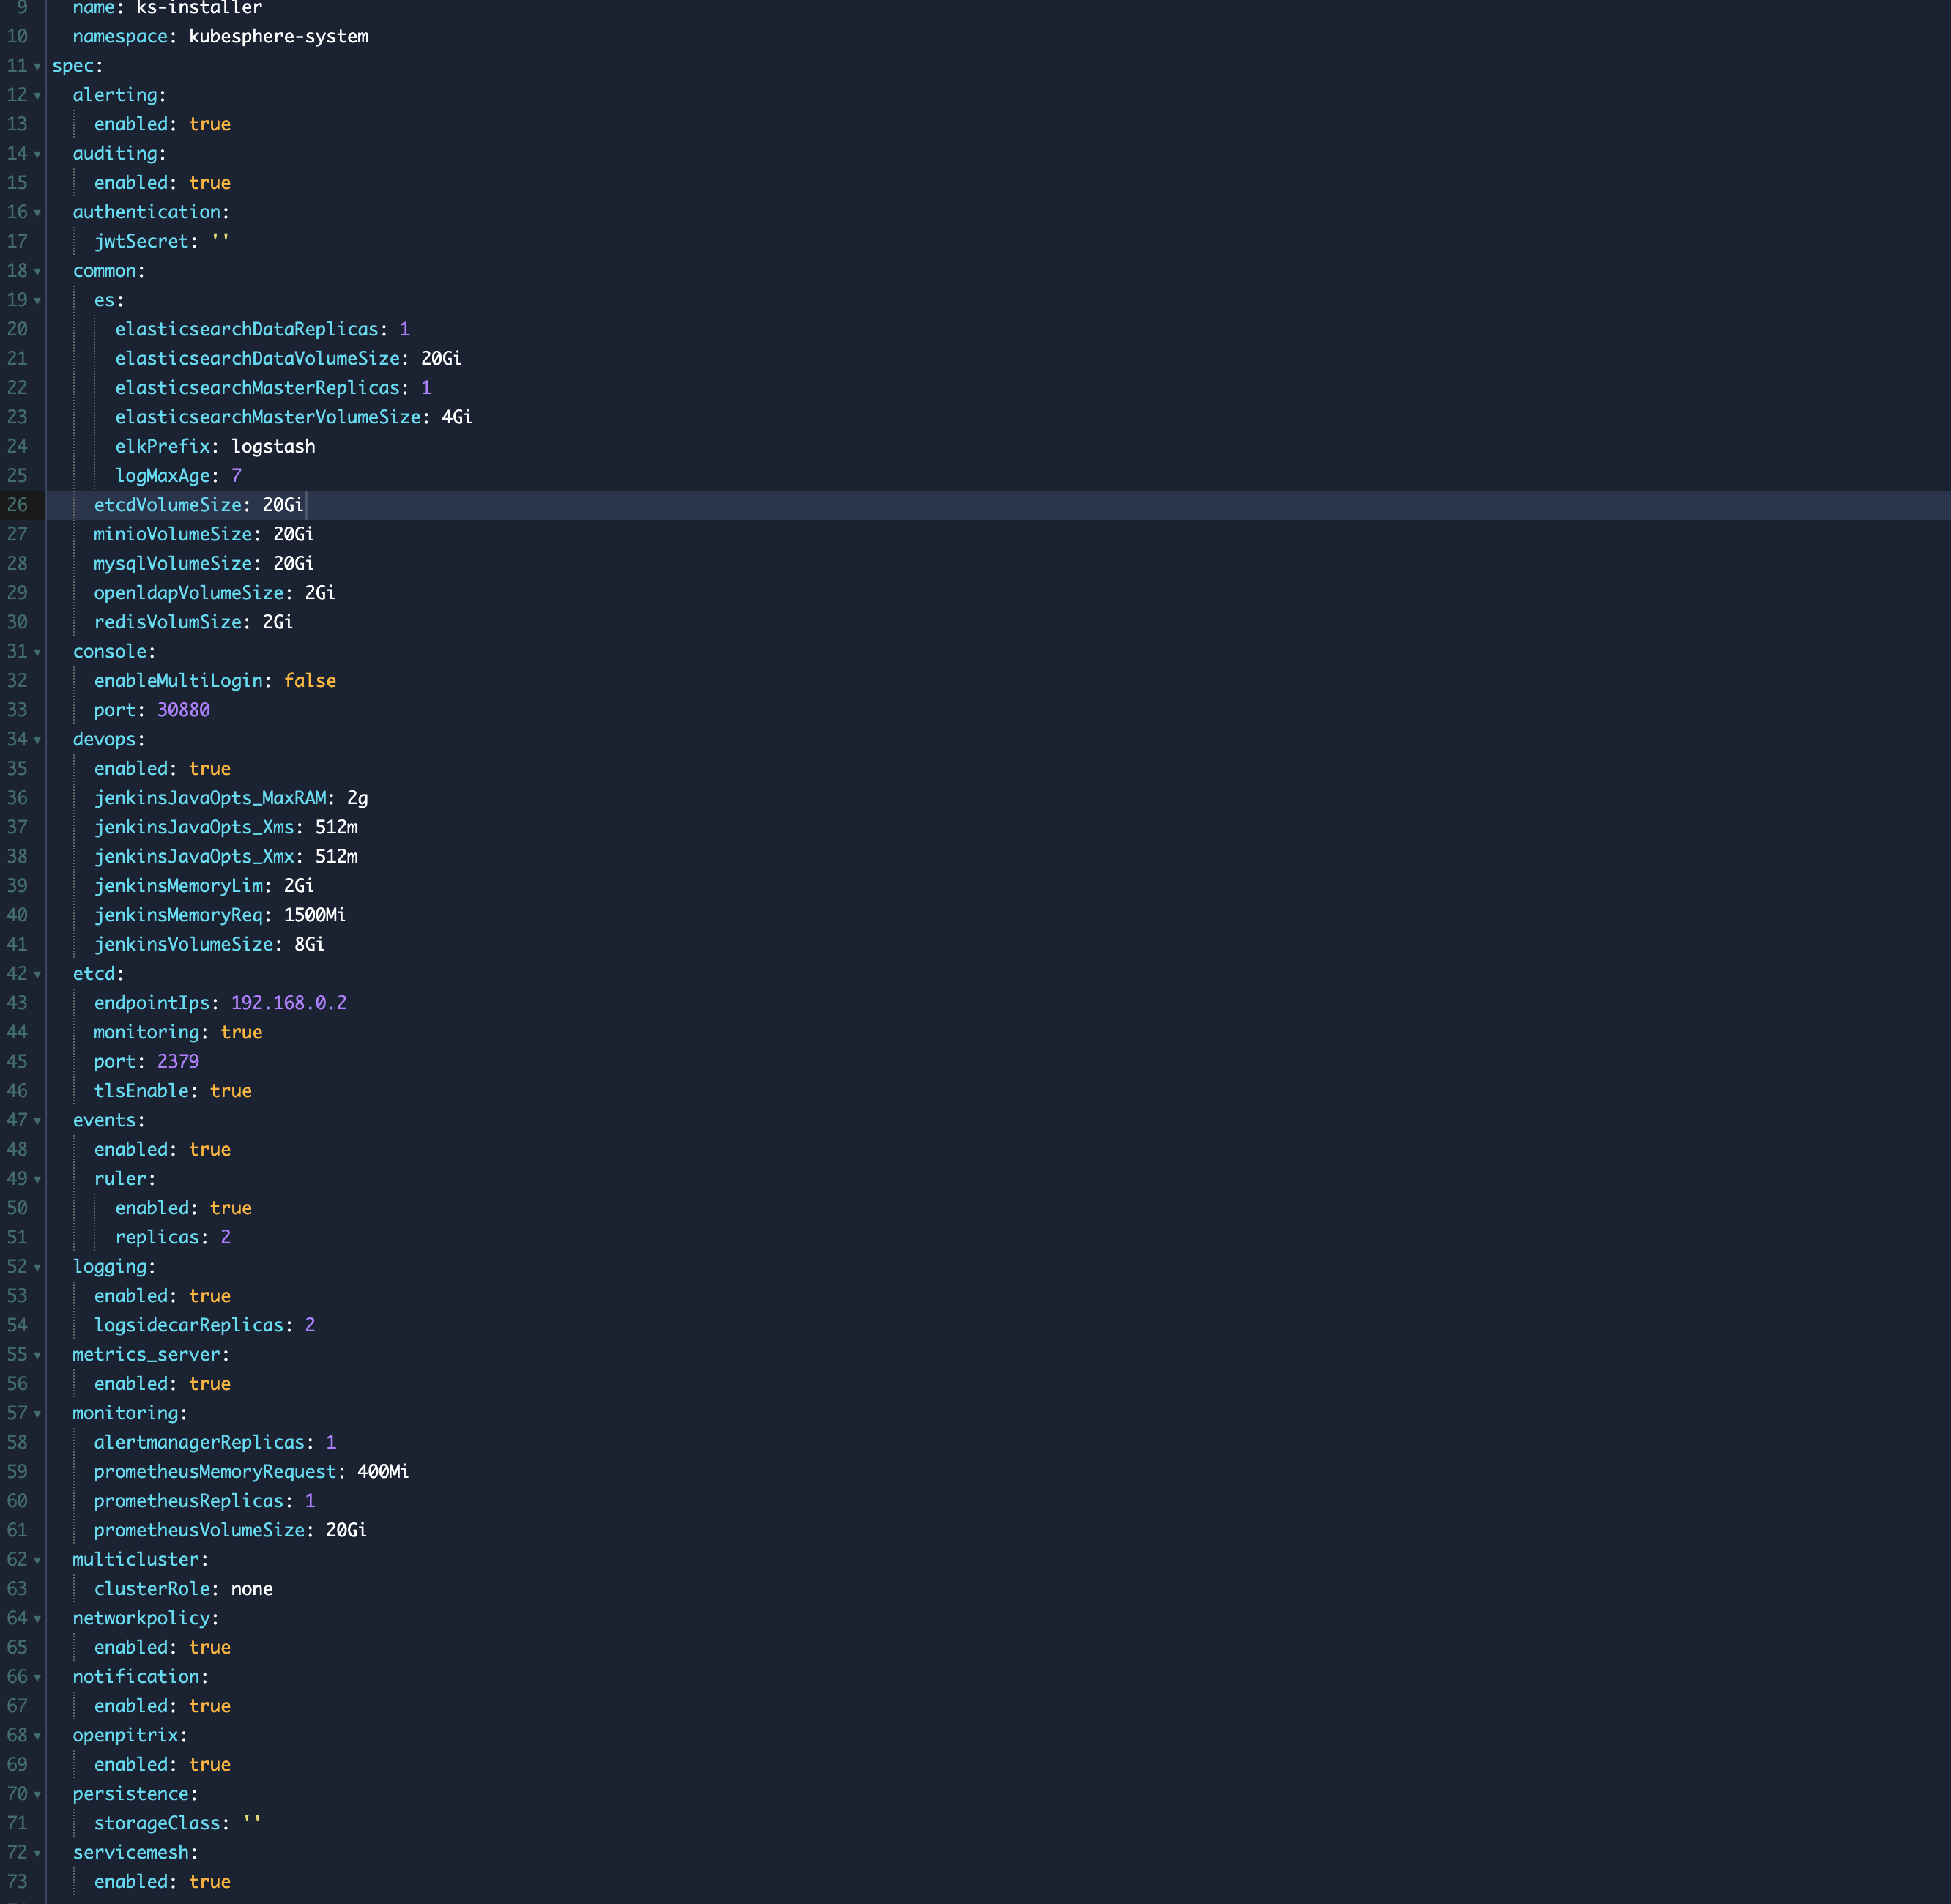
Scroll down to the spec section, and change the pluggable components from false to true for the features you want. Finally, choose Update to save your changes. The installation automatically starts at the backend.
Open the Web kubectl from Toolbox (bottom right), and inspect the installation logs:
$ kubectl logs -n kubesphere-system $(kubectl get pod -n kubesphere-system -l app=ks-install -o jsonpath='\{.items[0].metadata.name}') -f
When you see welcome information in the output logs, the pluggable components are ready to use.
Security
Set up the TLS: This Partner Solution automatically sets up Elastic Load Balancing (ELB) to support the critical services of a KubeSphere container platform cluster. We recommend that you set up the TLS for you Network Load Balancer to establish a secure connection between the client and server. This helps to ensure that all data passed between the client and your load balancer is private.
Keep the secret private: KubeSphere supports multicluster management in a unified control plane. Save the secrets used to connect to the external cluster. For more information, see Direct Connection.
Create proper multitenant management policies: KubeSphere is a multitenant platform. Multitenancy in KubeSphere refers to one or more clusters that are shared between tenants. Ensure that you set the proper roles, permissions, and projects for tenants. For more information, see Create Workspace, Project, Account and Role.
Create proper network policies: KubeSphere allows administrators to set network policies for different projects (namespaces) and workspaces. To control network communication between pods in each cluster’s projects and workspaces, create network policies based on your tenants' requirements. We recommend that you block traffic among projects that host different tenant applications. Also, deny all incoming traffic to avoid pods from one project mistakenly sending traffic to another project’s services or databases.
Get started with KubeSphere
When you finish deploying this Partner Solution, refer to the KubeSphere Getting Started Guide. It has hands-on labs and tutorials that can help you get started with KubeSphere.
Central control plane for multicloud and multicluster management
If you want to build a hybrid cloud for multicloud and multicluster management, enable Kubernetes federation to set up a central control plane using KubeSphere. KubeSphere supports application distribution across multiple clusters and cloud providers. It also provides disaster recovery and cross-cluster observability.
Troubleshooting
For troubleshooting common Partner Solution issues, refer to the AWS Partner Solution General Information Guide and Troubleshooting CloudFormation.
Resources
Customer responsibility
After you deploy a Partner Solution, confirm that your resources and services are updated and configured—including any required patches—to meet your security and other needs. For more information, refer to the Shared Responsibility Model.
Feedback
To submit feature ideas and report bugs, use the Issues section of the GitHub repository for this Partner Solution. To submit code, refer to the Partner Solution Contributor’s Guide. To submit feedback on this deployment guide, use the following GitHub links:
Notices
This document is provided for informational purposes only. It represents current AWS product offerings and practices as of the date of issue of this document, which are subject to change without notice. Customers are responsible for making their own independent assessment of the information in this document and any use of AWS products or services, each of which is provided "as is" without warranty of any kind, whether expressed or implied. This document does not create any warranties, representations, contractual commitments, conditions, or assurances from AWS, its affiliates, suppliers, or licensors. The responsibilities and liabilities of AWS to its customers are controlled by AWS agreements, and this document is not part of, nor does it modify, any agreement between AWS and its customers.
The software included with this paper is licensed under the Apache License, version 2.0 (the "License"). You may not use this file except in compliance with the License. A copy of the License is located at https://aws.amazon.com/apache2.0/ or in the accompanying "license" file. This code is distributed on an "as is" basis, without warranties or conditions of any kind, either expressed or implied. Refer to the License for specific language governing permissions and limitations.