Qumulo Cloud Q on AWS
Partner Solution Deployment Guide

August 2023
Dack Busch and Gokul Kuppuraj, Qumulo
Dave May, AWS Integration & Automation team

| Refer to the GitHub repository to view source files, report bugs, submit feature ideas, and post feedback about this Partner Solution. To comment on the documentation, refer to Feedback. |
This Partner Solution was created by Qumulo in collaboration with Amazon Web Services (AWS). Partner Solutions are automated reference deployments that help people deploy popular technologies on AWS according to AWS best practices. If you’re unfamiliar with AWS Partner Solutions, refer to the AWS Partner Solution General Information Guide.
Overview
This guide covers the information you need to deploy the Qumulo Cloud Q Partner Solution in the AWS Cloud.
The Qumulo Cloud Q Partner Solution provisions a 1-TB to 6-PB cluster of Qumulo file-storage nodes in the AWS Cloud. The Qumulo multiprotocol file data platform delivers enterprise scale and performance for compute-intensive workloads, accelerating the monetization of your unstructured data.
For more information, see the Qumulo knowledge base.
Costs and licenses
There is no cost to use this Partner Solution, but you will be billed for any AWS services or resources that this Partner Solution deploys. For more information, refer to the AWS Partner Solution General Information Guide.
Before you deploy the Cloud Q Partner Solution, subscribe to a Qumulo Amazon Machine Image (AMI) in the AWS Marketplace. See the Subscribe to a Qumulo Marketplace AMI section in this guide.
Architecture
Deploying this Partner Solution with default parameters builds the following Cloud Q environment in the AWS Cloud.
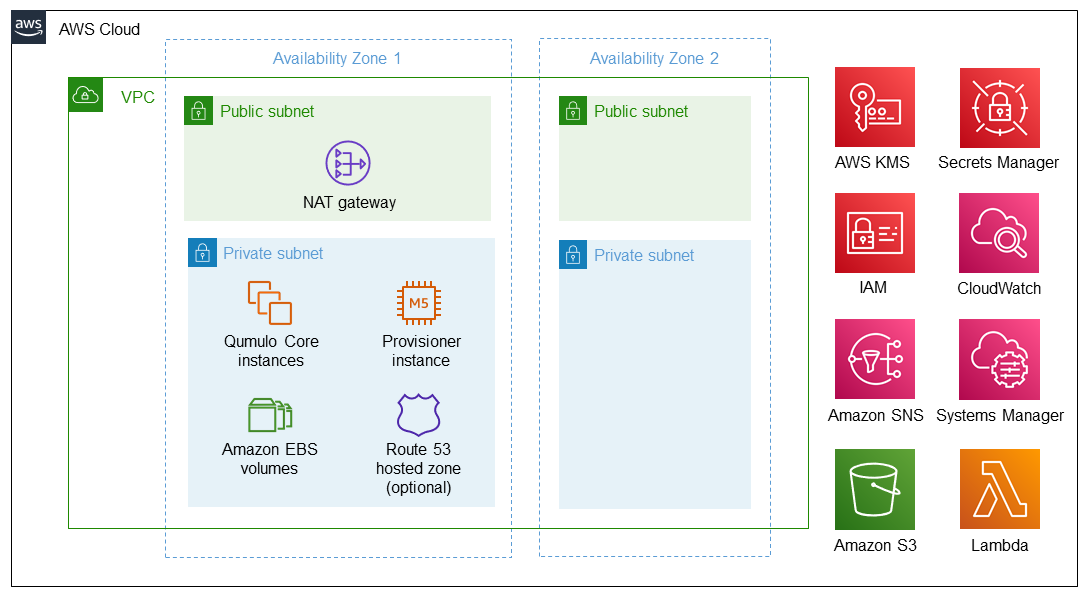
As shown in Figure 1, the Partner Solution sets up the following:
-
Two Availability Zones: one for the Qumulo cluster and another that you could use for a disaster recovery Qumulo cluster.*
-
A VPC configured with public and private subnets, according to AWS best practices, to provide you with your own virtual network on AWS.*
-
In the public subnet, a managed network address translation (NAT) gateway to allow outbound internet access for resources in the private subnet.
-
In the private subnet:
-
A cluster of Amazon Elastic Compute Cloud (Amazon EC2) instances that run the Qumulo Core software. (Qumulo uses the term node instead of instance.)
-
Amazon Elastic Block Store (Amazon EBS) volumes, which store the files for the Qumulo cluster.
-
A provisioner EC2 instance (node), which automatically stops running after provisioning the Qumulo cluster. It automatically restarts during stack updates.
-
(Optional) An Amazon Route 53 hosted zone to configure DNS A records for the cluster.
-
-
AWS Key Management Service (AWS KMS) to use a customer managed key for encryption of EBS volumes.
-
AWS Secrets Manager to store credentials.
-
AWS Identity and Access Management (IAM) to manage roles.
-
Amazon CloudWatch to log metrics for the Qumulo cluster and access a CloudWatch dashboard for the cluster.
-
Amazon Simple Notification Service (Amazon SNS) to send alerts for EBS volume anomalies and EC2-instance recovery events.
-
AWS Systems Manager for monitoring and storing the Qumulo cluster’s provisioning state.
-
Amazon S3 for populating content on the Qumulo cluster.
-
AWS Lambda to collect metrics for the Qumulo cluster and monitor EBS volume health. (Qumulo refers to Lambda as Sidecar.)
Deployment options
This Partner Solution provides the following deployment options:
This Partner Solution provides separate templates for these options. It also lets you configure Classless Inter-Domain Routing (CIDR) blocks, instance types, and Cloud Q settings.
Predeployment steps
Subscribe to a Qumulo Marketplace AMI
This Partner Solution supports all Qumulo AWS Marketplace offerings. The 1-TB and 12-TB offerings are free for 30 days.
-
Go to the AWS Marketplace.
-
In the search bar, enter
Qumulo. -
Choose the offering with the appropriate capacity for your configuration and deployment Region.
-
Choose Continue to Subscribe on the upper right. The subscription processes within a few minutes.
-
If you have a private offer, accept the offer by clicking the link you receive in an email. For example, the Qumulo Customizable File Storage Node offering (unless you choose 320 TiB per EC2 instance) requires a private offer.
Deployment steps
-
Sign in to your AWS account, and launch this Partner Solution, as described under Deployment options. The AWS CloudFormation console opens with a prepopulated template.
-
Choose the correct AWS Region, and then choose Next.
-
On the Create stack page, keep the default setting for the template URL, and then choose Next.
-
On the Specify stack details page, change the stack name if needed. Review the parameters for the template. Provide values for the parameters that require input. For all other parameters, review the default settings and customize them as necessary. When you finish reviewing and customizing the parameters, choose Next.
Unless you’re customizing the Partner Solution templates or are instructed otherwise in this guide’s Predeployment section, don’t change the default settings for the following parameters: QSS3BucketName,QSS3BucketRegion, andQSS3KeyPrefix. Changing the values of these parameters will modify code references that point to the Amazon Simple Storage Service (Amazon S3) bucket name and key prefix. For more information, refer to the AWS Partner Solutions Contributor’s Guide. -
On the Configure stack options page, you can specify tags (key-value pairs) for resources in your stack and set advanced options. When you finish, choose Next.
-
On the Review page, review and confirm the template settings. Under Capabilities, select all of the check boxes to acknowledge that the template creates AWS Identity and Access Management (IAM) resources that might require the ability to automatically expand macros.
-
Choose Create stack. The stack takes about 15 minutes to deploy.
-
Monitor the stack’s status, and when the status is CREATE_COMPLETE, the Qumulo Cloud Q deployment is ready.
-
To view the created resources, choose the Outputs tab.
Postdeployment steps
Test the deployment
Check the EC2 instances
Follow these steps to confirm that all the cluster instances are running and that the provisioner instance has stopped running.
-
Open the EC2 console.
-
Choose the stack name.
-
Clear the Instance state = running filter.
-
Verify that all the cluster instances are running.
-
Verify that the provisioner instance (
…Qumulo Provisioning Node) has stopped running. If it’s still running, wait. It takes up to 15 minutes after stack creation for this instance to finish initializing. If it hasn’t stopped running after 15 minutes, see the troubleshooting section The provisioner instance is still running.
Check cluster quorum formation and data protection
Follow these steps to confirm that the cluster formed quorum, that you have the expected number of instances in the cluster, and that your data is protected.
-
Open the CloudFormation console.
-
Choose the top-level stack name.
-
Choose Outputs. A list of URLs appears.
-
Copy the appropriate URL from the Value column, and paste it into your browser as follows:
-
If connecting by the public internet, copy the QumuloPublicIP URL, and open a page from your local machine.
-
If connecting from within your VPC, copy the QumuloPrivateIP URL, and paste it into the browser of an EC2 instance running Chrome.
-
-
Log in to the Qumulo user interface with the user name 'admin' and administrator password you provided during deployment. When you see the Qumulo dashboard, shown in Figure 2, you know that your cluster formed quorum.
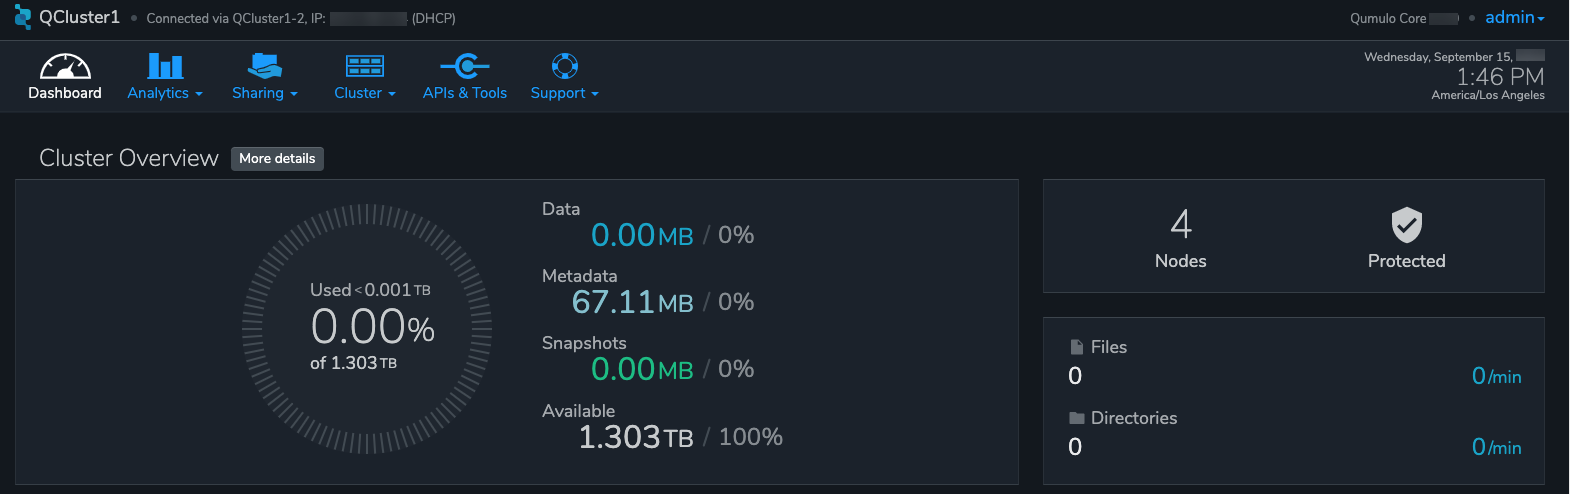 Figure 2. Qumulo dashboard
If, instead of a prompt for user name and password, you see the End User Agreement screen, the cluster failed to form quorum. See the troubleshooting section Qumulo doesn’t prompt me for user name and password.
-
Choose More details. Verify the following, as shown in Figure 3.
-
The number of instances (nodes) listed matches the number you expect.
-
Each instance has a green checkmark in the Status column.
-
This message appears: "Data is protected from 2 drive failures or 1 node failure at a time. The cluster is in balance."
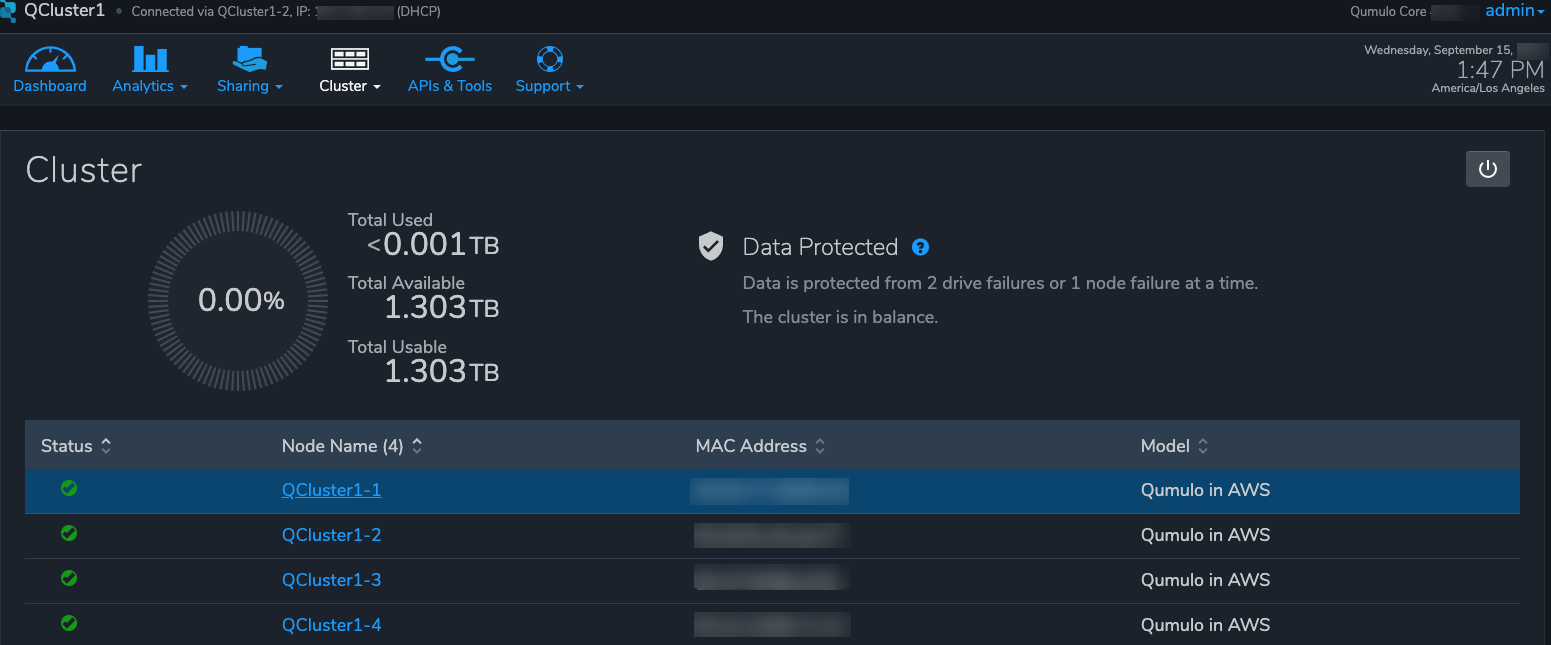 Figure 3. Qumulo dashboard details
-
(Optional) Set up disaster recovery - Qumulo Recover Q
For disaster recovery and business continuity, you can deploy one or more Qumulo Recover Q clusters in other Availability Zones or AWS Regions. For more information, see Cloud Q Partner Solution: Deploy a Recover Q Cluster.
(Optional) Copy data into your cluster from an S3 bucket
If you’re using Qumulo Core version 4.3.0 or newer, you can populate data on your Qumulo cluster by copying data from an Amazon S3 bucket using Qumulo Shift for Amazon S3. To create a Shift job, follow these steps:
-
Log in to the Qumulo UI.
-
Choose Cluster, Copy to/from S3.
-
Fill in the parameters.
For more information on the Qumulo Shift feature set, user interface, and command line interface, see the following:
Additional information
To learn how to use the stack to maintain the Qumulo cluster through its lifecycle and view metrics in CloudWatch, see the following:
| Documentation | Description |
|---|---|
Cloud Q Partner Solution: Supported CloudFormation Stack Updates |
Details on CloudFormation stack update options and examples, including adding instances (nodes) to the cluster and upgrading the Qumulo Sidecar. |
Details on termination protection and on cleaning up an AWS KMS customer managed key policy. |
|
Cloud Q Partner Solution: Using the Custom CloudWatch Dashboard |
Details on viewing the CloudWatch dashboard and resource groups that are created for the Qumulo cluster. |
Details on the functions of the provisioner instance. |
|
Details on updating to the advanced parameters if you originally deployed the Qumulo Cloud Q Partner Solution using the template with standard parameters. |
Troubleshooting
For troubleshooting common Partner Solution issues, refer to the AWS Partner Solution General Information Guide and Troubleshooting CloudFormation.
I need to find the UUID for the cluster
You may need to know your cluster’s universally unique identifier (UUID) for troubleshooting. The provisioner instance stores a copy of the UUID in Parameter Store, which is a capability of AWS Systems Manager.
To find the UUID, follow these steps:
-
Open the Systems Manager console.
-
Choose Parameter Store.
-
Look for /qumulo/<my stack>/<uuid> (where the text in brackets represents your stack name). The value associated with the name is the UUID for the cluster.
I don’t remember the cluster administrator password
To retrieve the cluster administrator password, follow these steps:
-
Open the Secrets Manager console.
-
Choose Secrets.
-
Choose the top-level stack name.
-
Under ClusterSecrets, choose Retrieve secret value.
The stack failed when provisioning the nested stack AWSVPCSTACK or CloudQStack
To determine and remedy the cause of the failure, follow these steps:
-
Open the CloudFormation console.
-
Ensure that the View nested slider is set so that you can view nested stacks.
-
Choose the failed stack.
-
Under the Events tab, find the failure message.
-
Take appropriate action. For example, if message indicates that the S3 bucket, S3 key prefix, or object URL parameter values are incorrect (a common reason that these stacks fail), delete the stack and relaunch with the correct parameter values.
The stack failed when provisioning the nested stack QSTACK
To determine and remedy the cause of the failure, follow these steps:
-
Open the CloudFormation console.
-
Ensure that the View nested slider is set so that you can view nested stacks.
-
Select the failed stack.
-
Under the Events tab, find the failure message.
-
Take appropriate action.
Common causes of QSTACK failing Actions An AWS Marketplace offer has not been accepted that matches the
QMarketPlaceTypeparameter value you entered.Open AWS Marketplace, search for the correct Qumulo Marketplace offering, and subscribe.
The EBS volumes configuration doesn’t match the requirements for the
QAmiIDparameter value you entered in the template.Check the EBS volume configuration selected in the template, and relaunch the stack with EBS parameter values supported by the AMI.
The cluster failed to place in the placement group.
Deploy the cluster into a different Availability Zone, or use a different private subnet ID within the VPC to find more available resources.
The message "Service limit exceeded" indicates that the QSTACK failed because AWS service quotas (formerly referred to as limits) were not planned.
Either delete resources to free available capacity or contact AWS Support and request an increase in service quotas.
Qumulo doesn’t prompt me for user name and password
When you open the Qumulo software, if you see the End User Agreement screen instead of a prompt for your user name and password, the cluster didn’t form quorum.
| Common causes of the cluster not forming quorum | Actions |
|---|---|
The software version specified in the template doesn’t exist or is older than the AMI software version. |
Ensure that the software version specified for the cluster is equal to or newer than the version that the Marketplace offer lists. |
The VPC doesn’t have public internet access. |
Either add a NAT gateway to your existing VPC or, if you want to deploy without internet access, follow these instructions: Cloud Q Quick Start: Deploying in a VPC with no internet access. |
| Do not form quorum manually, or the provisioner instance won’t be able to complete the secondary provisioning of the cluster and AWS infrastructure. |
The provisioner instance is still running
The provisioner instance usually stops running within five minutes of the stack completing deployment. It can take longer if your AMI ID has an older software version. This is because each quarterly software upgrade takes about four minutes, and the upgrades happen one at a time until the instance reaches the desired version. (Cluster instances are upgraded in parallel, so instance count has a minimal impact on the time this takes.) If the provisioner instance hasn’t stopped running after 15 minutes, there’s probably an issue.
| Common causes of the provisioner instance continuing to run | Actions |
|---|---|
The VPC doesn’t have access to the public internet. Without access to public infrastructure, the provisioner instance can’t talk to AWS services (such as Secrets Manager, AWS KMS, and Systems Manager) and can’t download the desired version of Qumulo Core software. |
Review the public and private subnets, their route tables, and the NAT gateway. Make any needed corrections. Then reboot the provisioner instance as follows: Open the EC2 console. Select the provisioner instance. Choose Instance state, Reboot Instance. (If deploying without internet access, see Cloud Q Quick Start: Deploying in a VPC with no internet access.) |
A customer managed key ID was entered in the |
Go to AWS KMS and correct the key policy for the key you specified. Then reboot the provisioner instance as follows: Open the EC2 console. Select the provisioner instance. Choose Instance state, Reboot Instance. (To learn more on KMS key policies and cleanup see Deleting the CloudFormation Stack.) |
A stack update was executed to add cluster instances. The stack update succeeded, but the instances were not added to the cluster. The cluster’s administrator password was probably changed after deployment. |
Open the Secrets Manager console, and choose the top-level stack name. Under ClusterSecrets, choose Retrieve secret value, Edit. Update the administrator password, and save the secret. Then reboot the provisioner instance as follows: Open the EC2 console. Select the provisioner instance. Choose Instance state, Reboot Instance. |
My problem is not described in this guide
If the earlier troubleshooting steps don’t rectify your problem, review the AWS Parameter Store history. This history, as shown in Figure 4, often helps you discover where the provisioner instance is failing. To see this history, open the Parameter Store with the name /qumulo/<my stack>/last-run-status (where the text in brackets represents your stack name).

Finally, review the provisioning-instance log, which often shows an error that points you to the resolution. You can review the log in the console or download it to collaborate with Qumulo Care.
To retrieve the log follow these steps:
-
Open the EC2 console.
-
Select the provisioner instance.
-
Choose Actions on the upper right.
-
Choose Monitor & troubleshoot, Get system log.
-
(Optional) Download the log by choosing Download on the upper right.
Customer responsibility
After you deploy a Partner Solution, confirm that your resources and services are updated and configured—including any required patches—to meet your security and other needs. For more information, refer to the Shared Responsibility Model.
Feedback
To submit feature ideas and report bugs, use the Issues section of the GitHub repository for this Partner Solution. To submit code, refer to the Partner Solution Contributor’s Guide. To submit feedback on this deployment guide, use the following GitHub links:
Notices
This document is provided for informational purposes only. It represents current AWS product offerings and practices as of the date of issue of this document, which are subject to change without notice. Customers are responsible for making their own independent assessment of the information in this document and any use of AWS products or services, each of which is provided "as is" without warranty of any kind, whether expressed or implied. This document does not create any warranties, representations, contractual commitments, conditions, or assurances from AWS, its affiliates, suppliers, or licensors. The responsibilities and liabilities of AWS to its customers are controlled by AWS agreements, and this document is not part of, nor does it modify, any agreement between AWS and its customers.
The software included with this paper is licensed under the Apache License, version 2.0 (the "License"). You may not use this file except in compliance with the License. A copy of the License is located at https://aws.amazon.com/apache2.0/ or in the accompanying "license" file. This code is distributed on an "as is" basis, without warranties or conditions of any kind, either expressed or implied. Refer to the License for specific language governing permissions and limitations.