Salesforce Connect Adapter for GraphQL on AWS
Partner Solution Deployment Guide

June 2023
Ross Belmont and Georgia Liu, Salesforce Inc.
Kishore Dhamodaran and Shitij Agarwal, AWS Strategic Accounts team
Vinod Shukla, AWS Integration & Automation team

| Refer to the GitHub repository to view source files, report bugs, submit feature ideas, and post feedback about this Partner Solution. To comment on the documentation, refer to Feedback. |
This Partner Solution was created by Salesforce Inc. in collaboration with Amazon Web Services (AWS). Partner Solutions are automated reference deployments that help people deploy popular technologies on AWS according to AWS best practices. If you’re unfamiliar with AWS Partner Solutions, refer to the AWS Partner Solution General Information Guide.
Overview
This guide covers the information you need to deploy the Salesforce Connect Adapter for GraphQL Partner Solution in the AWS Cloud.
Costs and licenses
This solution requires a subscription to a Salesforce edition and one or more Salesforce Connect add-ons. Contact a Salesforce account executive for more information about purchasing add-ons. For more information about Salesforce editions, refer to Sales Cloud Pricing. You can sign up for a developer edition at https://developer.salesforce.com/signup or Trailhead, the Salesforce learning platform.
There is no AWS cost to use this Partner Solution, but you will be billed for any AWS services or resources that this Partner Solution deploys. For more information, refer to the AWS Partner Solution General Information Guide.
Architecture
Deploying this Partner Solution with default parameters builds the following Salesforce Connect Adapter for GraphQL environment in the AWS Cloud.
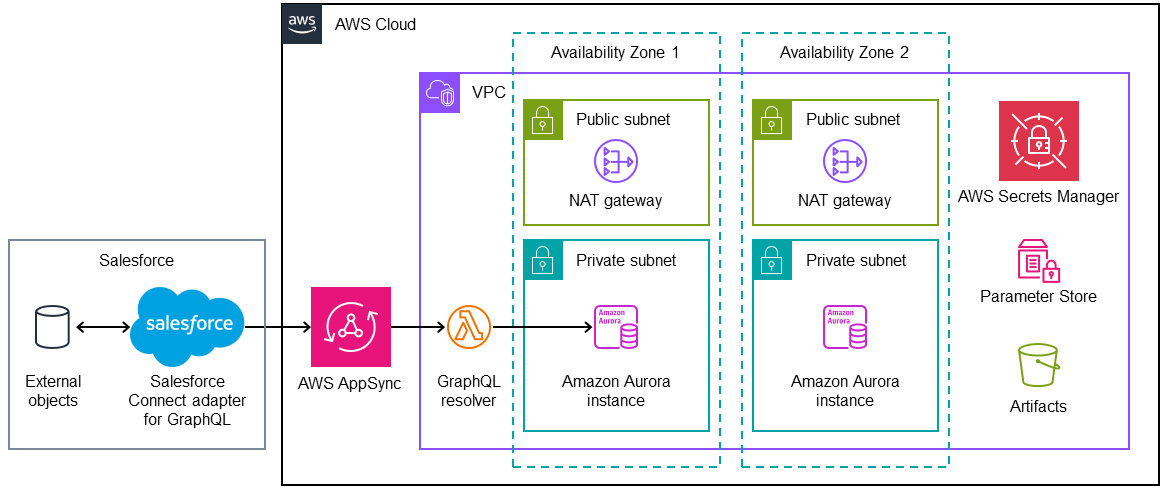
As shown in Figure 1, this Partner Solution sets up the following:
-
A highly available architecture that spans two Availability Zones.*
-
A virtual private cloud (VPC) configured with public and private subnets, according to AWS best practices, to provide you with your own virtual network on AWS.*
-
AWS AppSync to host a public GraphQL API endpoint. To access Aurora data from Salesforce, the solution uses the Salesforce external objects subsystem to invoke the GraphQL connect adapter. The adapter translates requests into GraphQL queries, which it sends to the GraphQL API endpoint hosted on AWS AppSync.
-
An AWS Lambda function to serve as a GraphQL resolver. It converts GraphQL requests to SQL queries and runs the queries on the Amazon Aurora database.
-
In the public subnets, managed NAT gateways to allow outbound internet access for resources in the private subnets.*
-
In the private subnets, Amazon Aurora database instances. During deployment, you choose Aurora PostgreSQL-Compatible or Aurora Serverless v1 editions.
-
AWS Secrets Manager to store credentials for the Aurora database.
-
Parameter Store, a capability of AWS Systems Manager, to store parameters.
-
An Amazon Simple Storage Service (Amazon S3) bucket to store deployment artifacts.
* The template that deploys this Partner Solution into an existing VPC skips the components marked by asterisks and prompts you for your existing VPC configuration.
Deployment options
This Partner Solution provides the following deployment options:
-
Deploy Salesforce Connect Adapter for GraphQL into a new VPC. This option builds a new AWS environment that consists of the VPC, subnets, NAT gateways, security groups, bastion hosts, and other infrastructure components. It then deploys Salesforce Connect Adapter for GraphQL into this new VPC.
-
Deploy Salesforce Connect Adapter for GraphQL into an existing VPC. This option provisions Salesforce Connect Adapter for GraphQL in your existing AWS infrastructure.
This Partner Solution provides separate templates for these options. It also lets you configure Classless Inter-Domain Routing (CIDR) blocks, instance types, and Salesforce Connect Adapter for GraphQL settings.
Deployment steps
-
Sign in to your AWS account, and launch this Partner Solution, as described under Deployment options. The AWS CloudFormation console opens with a prepopulated template.
-
Choose the correct AWS Region, and then choose Next.
-
On the Create stack page, keep the default setting for the template URL, and then choose Next.
-
On the Specify stack details page, change the stack name if needed. Review the parameters for the template. Provide values for the parameters that require input. For all other parameters, review the default settings and customize them as necessary. When you finish reviewing and customizing the parameters, choose Next.
Unless you’re customizing the Partner Solution templates or are instructed otherwise in this guide’s Predeployment section, don’t change the default settings for the following parameters: QSS3BucketName,QSS3BucketRegion, andQSS3KeyPrefix. Changing the values of these parameters will modify code references that point to the Amazon Simple Storage Service (Amazon S3) bucket name and key prefix. For more information, refer to the AWS Partner Solutions Contributor’s Guide. -
On the Configure stack options page, you can specify tags (key-value pairs) for resources in your stack and set advanced options. When you finish, choose Next.
-
On the Review page, review and confirm the template settings. Under Capabilities, select all of the check boxes to acknowledge that the template creates AWS Identity and Access Management (IAM) resources that might require the ability to automatically expand macros.
-
Choose Create stack. The stack takes about 30 minutes to deploy.
-
Monitor the stack’s status, and when the status is CREATE_COMPLETE, the Salesforce Connect Adapter for GraphQL deployment is ready.
-
To view the created resources, choose the Outputs tab.
Postdeployment steps
Test the deployment
Copy the database secret ARN from Secrets Manager
-
Sign in to the AWS Management Console and open the Secrets Manager console.
-
In the left navigation pane, choose Secrets.
-
Choose the secret for your deployment, either
/graphqlrdsserverless/dbsecret(Aurora Serverless v.1) or/graphqlrds/dbsecret(Aurora PostgreSQL-compatible). -
On the secret details page, copy the Secret ARN.
Run a SQL query to test the database
-
Open the Amazon RDS console.
-
In the left navigation pane, choose Query Editor.
-
For Database instance or cluster, choose your database cluster.
-
For Database username, choose Connect with a Secrets Manager ARN.
-
Enter the database secret ARN that you copy from Secrets Manager. Refer to Copy the database ARN from Secrets Manager, earlier in this guide.
-
For Enter the name of the database, enter
graphqlrds. -
In the query editor, enter the following statement.
SELECT * FROM graphqlsample.my_order WHERE order_id = 'ORD-100';
-
Choose Run and the query editor displays the results.
Run a GraphQL query to test the AppSync API
-
Open the AWS AppSync console.
-
In the left navigation pane, choose APIs.
-
Choose the deployment GraphQL API.
-
In the left navigation pane, choose Queries.
-
On the Queries page, enter the following query code. The code provided runs a GraphQL query identical to the previous SQL query.
query MyQuery {
  graphqlsample_MyOrder(where: {OrderId: {eq: "ORD-100"}}) {
    edges {
      node {
        OrderDate
        SourceIpAddress
        CustomerId
        Status
        TotalCost
      }
    }
  }
}
-
Choose the play button to run the query. The query editor displays the results in the right pane. Your results should match the following example.
{
  "data": {
    "graphqlsample_MyOrder": {
      "edges": [
        {
          "node": {
            "OrderDate": "2022-09-13T10:10:01Z",
            "SourceIpAddress": "169.114.197.175",
            "CustomerId": "CUST-3675",
            "Status": "Placed",
            "TotalCost": 500.55
          }
        }
      ]
    }
  }
}
| Because a new Lambda function must be created and initialized, the query may take a minute or so to display the results. |
When you get more familiar with AppSync, you can use the AppSync query explorer to create similar queries.
Test the API Key
Test the API key and auth functionality by running a query from the command line to simulate a Salesforce HTTP call to AppSync. You can use the curl command or Postman. The following example that you can copy uses the curl command.
curl -XPOST -H "Content-Type:application/graphql" -H "x-api-key:YOUR-API-key" -d '{ "query": "query MyQuery {graphqlsample_MyOrder(where: {OrderId: {eq: \"ORD-100\"}}) {edges {node {OrderDate SourceIpAddress CustomerId Status TotalCost}}}}" }' https://YOUR-APPSYNC-ENDPOINT/graphqlYour results should match the following, which are formatted for readability.
{
  "data": {
    "graphqlsample_MyOrder": {
      "edges": [
        {
          "node": {
            "OrderDate": "2022-09-13T10:10:01Z",
            "SourceIpAddress": "169.114.197.175",
            "CustomerId": "CUST-3675",
            "Status": "Placed",
            "TotalCost": 500.55
          }
        }
      ]
    }
  }
}
Salesforce configuration tutorial
Complete the following tutorial to learn how to configure Salesforce to view and interact with external data without copying or storing them. Using a sample data set, these instructions demonstrate how to augment Salesforce customer data with order data stored externally.
-
Create a sample data file containing the following fields:
customer_id,customer_name,type,industry,phone,address,city,state,zip,contact_first_name,contact_last_name,contact_email,contact_phone, andcontact_title.You can generate mock data and save them as a CSV file using Mockaroo. -
Sign in to your Salesforce org.
-
Create a text field in the standard
customerIDaccount object. In General Options, ensure that you choose the Unique and External ID settings. -
Use the Salesforce Data Import Wizard to import your sample data.
-
For What kind of data are you importing?, choose Accounts and Contacts.
-
Ensure that you import the first column of your file (
customer_id) into the newcustomerIDfield you create in the previous step. For more information, refer to Use the Data Import Wizard.
-
-
Configure a Salesforce named credential so that Salesforce can invoke AWS services.
-
Configure an external data source for the AppSync API and use the exposed metadata to help create Salesforce external objects. For more information, refer to Access External Data with the Salesforce Connect Adapter for GraphQL.
-
Edit the Customer ID field on the new order object you created in step 6.
-
Change the field type to Indirect Lookup Relationship.
-
Configure the field to link to the Account field by way of the field you created in the standard
CustomerIDobject in step 3. For more information, refer to Create an Indirect Lookup Relationship.
-
-
After you create an indirect lookup, Salesforce adds a new related list on the Account page. To make the order data appear to Salesforce end users, add the related list for orders to the page layout for the account object. For more information, refer to Add Related Lists to Page Layouts.
After completing the tutorial, you can link your own tables to AppSync and Salesforce.
Attach your own database table (in the same RDS DB instance)
-
Sign in to the AWS Management Console and open the AWS AppSync console.
-
Update the Schema in AppSync by adding the
typeandinputdeclarations for the additional table. For the correct syntax, refer to the pattern in theGraphqlsample_MyOrdertype. -
Choose Save Schema to capture your updates.
-
Attach the included resolver to the query and mutations for the new table.
-
In the Resolvers section of the Schema tab in AWS AppSync console, select the query or mutation, and choose Attach.
-
On the Create new Resolver page, for Data source name, choose the Lambda function.
-
Repeat the process to attach the resolver for all the queries and mutations defined in the GraphQL schema. For example, if Salesforce Connect can perform create, read, update and delete operations on records, you must attach the resolver four times.
-
-
Add additional entries in the Parameter Store in Systems Manager to specify the metadata. Follow the example in
/appsync/typemetadata/Graphqlsample_MyOrderand create an additional parameter for each table, includingfieldTypesandkeyColumns.
Attach your own database table (in a different RDS instance)
If you are using a different RDS DB instance, add the Amazon RDS credentials to Secrets Manager. Set up port forwarding so that the resolver can have a persistent connection to Amazon RDS. For more information, refer to How Amazon RDS uses AWS Secrets Manager or contact AWS support.
After the new GraphQL type is successfully added to the API endpoint, validate the endpoint with curl. Then, in your External Data Source definition in Salesforce, sync the metadata so that Salesforce Connect can pull in the new object(s) and fields. From there, you can decide where exactly to make this data appear in the Salesforce UI.
Troubleshooting
For troubleshooting common Partner Solution issues, refer to the AWS Partner Solution General Information Guide and Troubleshooting CloudFormation.
Customer responsibility
After you deploy a Partner Solution, confirm that your resources and services are updated and configured—including any required patches—to meet your security and other needs. For more information, refer to the Shared Responsibility Model.
Feedback
To submit feature ideas and report bugs, use the Issues section of the GitHub repository for this Partner Solution. To submit code, refer to the Partner Solution Contributor’s Guide. To submit feedback on this deployment guide, use the following GitHub links:
Notices
This document is provided for informational purposes only. It represents current AWS product offerings and practices as of the date of issue of this document, which are subject to change without notice. Customers are responsible for making their own independent assessment of the information in this document and any use of AWS products or services, each of which is provided "as is" without warranty of any kind, whether expressed or implied. This document does not create any warranties, representations, contractual commitments, conditions, or assurances from AWS, its affiliates, suppliers, or licensors. The responsibilities and liabilities of AWS to its customers are controlled by AWS agreements, and this document is not part of, nor does it modify, any agreement between AWS and its customers.
The software included with this paper is licensed under the Apache License, version 2.0 (the "License"). You may not use this file except in compliance with the License. A copy of the License is located at https://aws.amazon.com/apache2.0/ or in the accompanying "license" file. This code is distributed on an "as is" basis, without warranties or conditions of any kind, either expressed or implied. Refer to the License for specific language governing permissions and limitations.