Snyk Developer-First Security on AWS
Partner Solution Deployment Guide

May 2023
Jay Yeras, John Smith, Carwin Young, David Schott, Snyk
Dylan Owen, AWS Integration & Automation team

| Refer to the GitHub repository to view source files, report bugs, submit feature ideas, and post feedback about this Partner Solution. To comment on the documentation, refer to Feedback. |
This Partner Solution was created by Snyk in collaboration with Amazon Web Services (AWS). Partner Solutions are automated reference deployments that help people deploy popular technologies on AWS according to AWS best practices. If you’re unfamiliar with AWS Partner Solutions, refer to the AWS Partner Solution General Information Guide.
Overview
This guide provides instructions for deploying Snyk integration resources in the AWS Cloud. If you are unfamiliar with AWS Partner Solutions, refer to the AWS Partner Solution General Information Guide.
This Partner Solution is for developers, DevOps, security teams, and others who want to quickly integrate the Snyk Container and Snyk Cloud products with their AWS environment.
Costs and licenses
The Snyk Container portion of this Partner Solution is available to Snyk customers of all pricing plans, including the free plan. If you’re not a Snyk customer, you can create a free account on the Snyk web page.
Other portions of this Partner Solution, such as Snyk Cloud integration and the automated configuration template for Amazon ECR, require a paid plan. For information about payment plans, refer to Snyk: Developer Security Platform (Team and Enterprise Tiers).
There is no cost to use this Partner Solution, but you will be billed for any AWS resources it deploys. For more information, refer to the AWS Partner Solution General Information Guide.
Architecture
The following resources may be created in your AWS account depending on how you configure and deploy this Partner Solution.
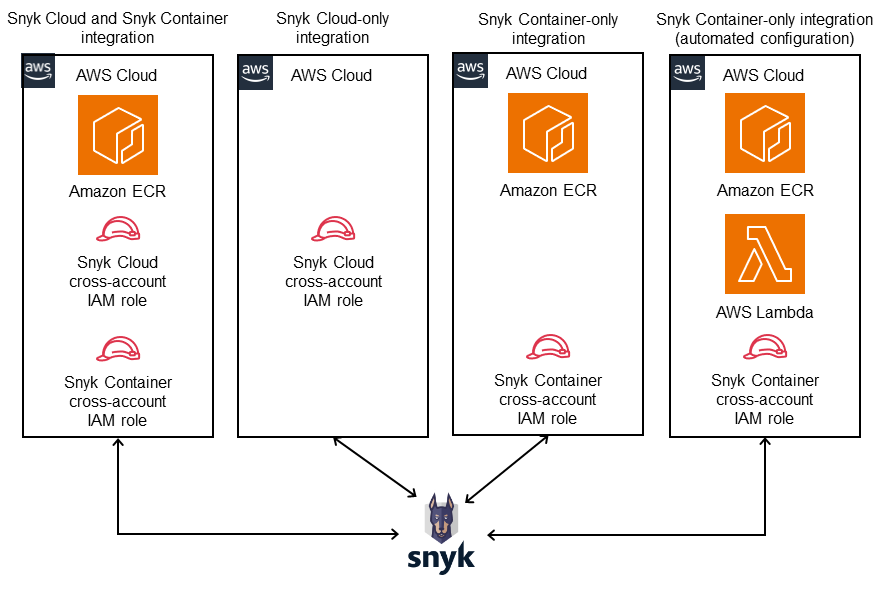
As shown in Figure 1, this Partner Solution for Snyk provides the following deployment options:
-
Snyk Cloud and Snyk Container integration in a single deployment with Amazon Elastic Container Registry (Amazon ECR) and cross-account AWS Identity and Access Management (IAM) roles.
-
A Snyk Cloud-only integration option with cross-account IAM role for Snyk Container.
-
A Snyk Container-only integration option with Amazon ECR and cross-account IAM role for Snyk Container.
-
A Snyk Container-only integration option with Amazon ECR, a cross-account IAM role for Snyk Container, and AWS Lambda. This deployment option uses Lambda to create and configure a new organization in Snyk’s system.
Deployment options
This Partner Solution provides four deployment options:
-
Deploy Snyk full integration. This option deploys both Snyk Container and Snyk Cloud integrations as a single deployment.
-
Deploy Snyk Cloud integration. This option deploys only the Snyk Cloud integration.
-
Deploy Snyk Container integration. This option deploys only the Snyk Container integration.
-
Deploy Snyk Container integration with automatic installation. This option deploys the Snyk Container integration and creates a new Snyk organization that’s preconfigured with an Amazon ECR integration.
The Partner Solution provides separate AWS CloudFormation templates for each of these options.
Pre-deployment steps
Prepare your AWS account
This Partner Solution assumes that you already have at least one Amazon Elastic Container Registry (ECR) as well as other AWS resources deployed in your account.
Prepare your Snyk account
During deployment, you must enter your Snyk organization ID. To find your Snyk organization ID, refer to Finding the Snyk ID and internal name of an Organization.
Snyk AWS account numbers
During deployment, enter the folllowing values for the Snyk Container AWS account number and Snyk Cloud AWS account number parameters. These parameters are required to enable the deployed IAM roles to function.
-
Snyk Container AWS account number:
198361731867 -
Snyk Cloud AWS account number:
370134896156
| This deployment enables Snyk to assume an IAM role in your AWS account. |
[Optional] Automatic installation for Amazon ECR
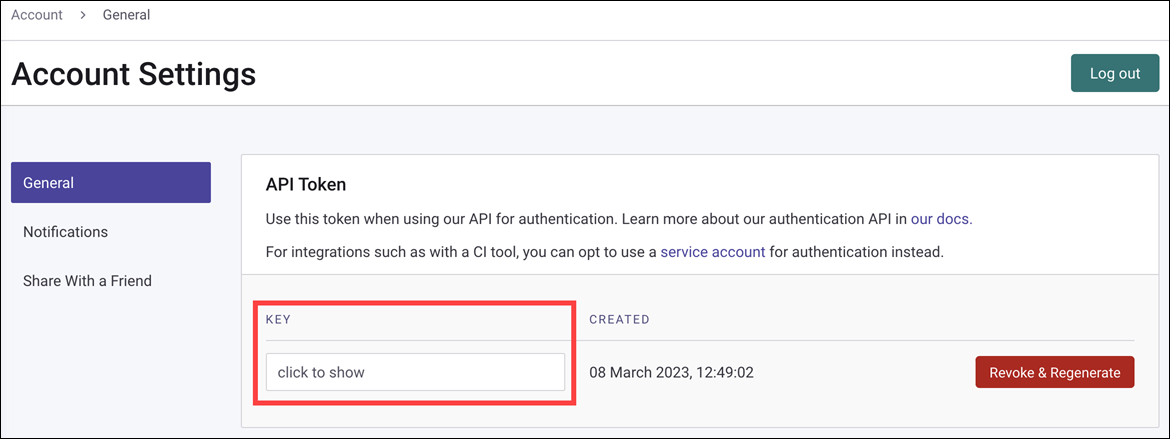
To deploy the automatic installation option for Amazon ECR, obtain an API authentication token. AWS Lambda and the Snyk API are used to automate the creation of organizations and ECR integrations within Snyk.
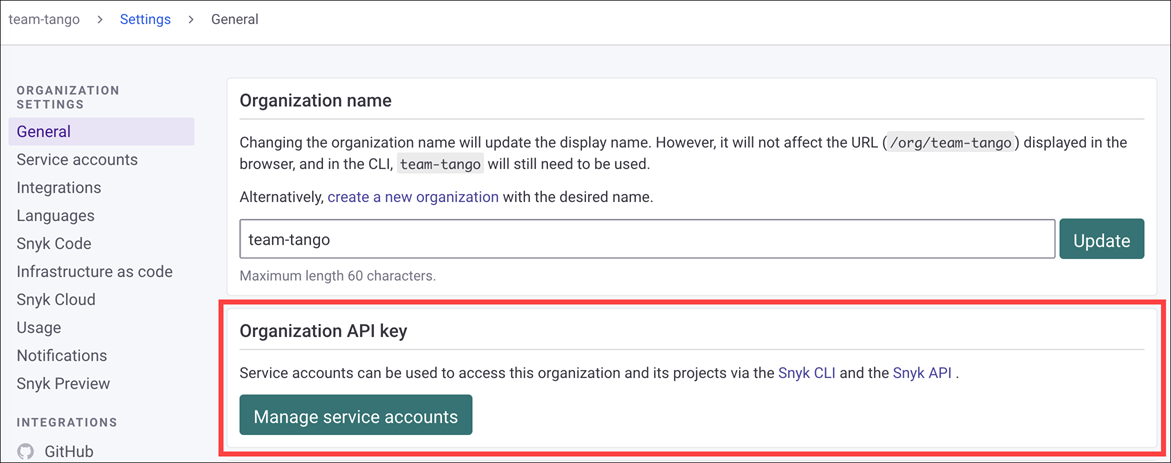
You may use either your personal account token, available through your Snyk account’s settings page, as shown in Figure 2, or a service account token. Service account tokens can be generated through the Settings page for your organization within Snyk, as shown in Figure 3. For more information, refer to Service accounts.
| Automatic installation requires a paid Snyk subscription to use the Snyk API. |
Deployment steps
-
Sign in to your AWS account, and launch this Partner Solution, as described under Deployment options. The AWS CloudFormation console opens with a prepopulated template.
-
Choose the correct AWS Region, and then choose Next.
-
On the Create stack page, keep the default setting for the template URL, and then choose Next.
-
On the Specify stack details page, change the stack name if needed. Review the parameters for the template. Provide values for the parameters that require input. For all other parameters, review the default settings and customize them as necessary. When you finish reviewing and customizing the parameters, choose Next.
Unless you’re customizing the Partner Solution templates or are instructed otherwise in this guide’s Predeployment section, don’t change the default settings for the following parameters: QSS3BucketName,QSS3BucketRegion, andQSS3KeyPrefix. Changing the values of these parameters will modify code references that point to the Amazon Simple Storage Service (Amazon S3) bucket name and key prefix. For more information, refer to the AWS Partner Solutions Contributor’s Guide. -
On the Configure stack options page, you can specify tags (key-value pairs) for resources in your stack and set advanced options. When you finish, choose Next.
-
On the Review page, review and confirm the template settings. Under Capabilities, select all of the check boxes to acknowledge that the template creates AWS Identity and Access Management (IAM) resources that might require the ability to automatically expand macros.
-
Choose Create stack. The stack takes about 5 minutes to deploy.
-
Monitor the stack’s status, and when the status is CREATE_COMPLETE, the Snyk Developer-First Security deployment is ready.
-
To view the created resources, choose the Outputs tab.
Post-deployment steps
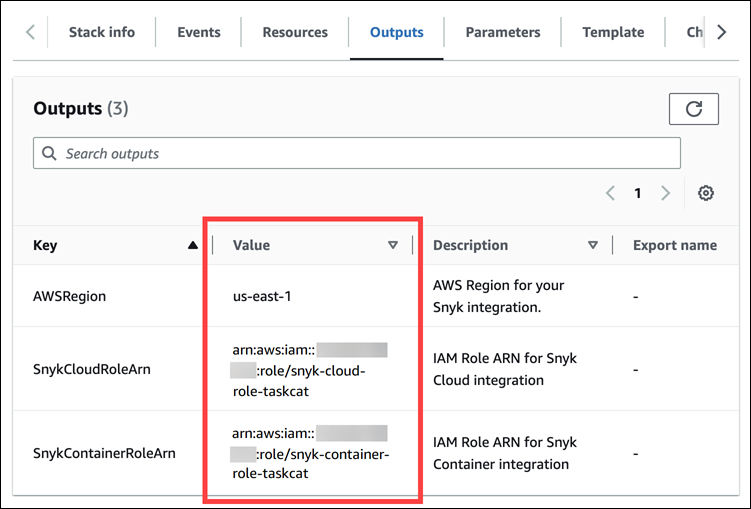
Check CloudFormation outputs
In the AWS CloudFormation console, navigate to the Outputs tab on the root stack that you deployed, as shown in Figure 4. You will copy and paste these values into the Snyk UI in subsequent steps.
Snyk Contaner integration
Configure the integration in Snyk
| If you used the Snyk Container integration with automatic installation option to deploy Snyk Container integration with Amazon ECR, you can ignore this section. |
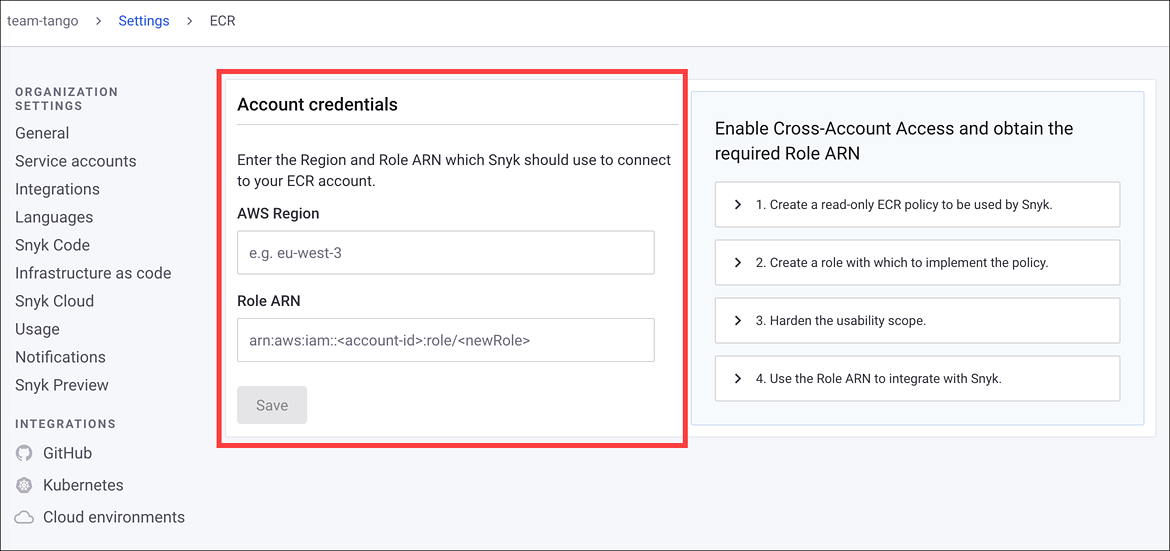
In the Snyk UI, navigate to your organization’s Integrations page, then click on ECR in the Container registries section. Copy the values from the CloudFormation outputs into the Snyk UI as shown in Figure 5.
Import your container images into Snyk
After installing Snyk Container integration with Amazon ECR, import your container images into Snyk.
-
Log in to your Snyk account.
-
Navigate to Projects, choose Add projects, and then choose Amazon ECR.
-
Select either single or multiple images.
-
Choose Add selected images.
For more information, refer to Scan Containers.
Snyk Cloud integration
Configure the integration in Snyk
-
In the Snyk UI, navigate to your organization’s Integrations page.
-
In the Cloud platforms section, choose AWS.
-
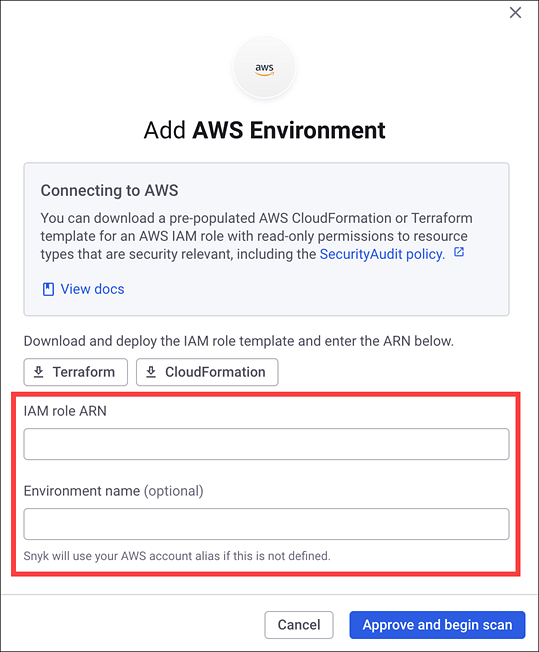
Copy the values from the CloudFormation outputs to the AWS configuration user interface, as shown in Figure 6.
Scan your AWS Cloud environment with Snyk
After you install Snyk Cloud integration and Snyk scans your AWS environment, it may take several minutes for scan results to appear. In your Snyk organization, choose Cloud to view the scan results.
For more information, refer to Snyk Cloud.
Troubleshooting
For common Partner Solution issues, refer to the AWS Partner Solution General Information Guide and Troubleshooting CloudFormation.
Customer responsibility
After you deploy a Partner Solution, confirm that your resources and services are updated and configured—including any required patches—to meet your security and other needs. For more information, refer to the Shared Responsibility Model.
Feedback
To submit feature ideas and report bugs, use the Issues section of the GitHub repository for this Partner Solution. To submit code, refer to the Partner Solution Contributor’s Guide. To submit feedback on this deployment guide, use the following GitHub links:
Notices
This document is provided for informational purposes only. It represents current AWS product offerings and practices as of the date of issue of this document, which are subject to change without notice. Customers are responsible for making their own independent assessment of the information in this document and any use of AWS products or services, each of which is provided "as is" without warranty of any kind, whether expressed or implied. This document does not create any warranties, representations, contractual commitments, conditions, or assurances from AWS, its affiliates, suppliers, or licensors. The responsibilities and liabilities of AWS to its customers are controlled by AWS agreements, and this document is not part of, nor does it modify, any agreement between AWS and its customers.
The software included with this paper is licensed under the Apache License, version 2.0 (the "License"). You may not use this file except in compliance with the License. A copy of the License is located at https://aws.amazon.com/apache2.0/ or in the accompanying "license" file. This code is distributed on an "as is" basis, without warranties or conditions of any kind, either expressed or implied. Refer to the License for specific language governing permissions and limitations.