Tableau for Amazon SageMaker on AWS
Partner Solution Deployment Guide

February 2021
Holt Calder, InterWorks, and Madeleine Corneli, InterWorks Inc.
Dylan Tong, AWS AI Augmented Analytics
Shivansh Singh, Tony Bulding, AWS Integration & Automation team

| Refer to the GitHub repository to view source files, report bugs, submit feature ideas, and post feedback about this Partner Solution. To comment on the documentation, refer to Feedback. |
This Partner Solution was created by InterWorks Inc. in collaboration with Amazon Web Services (AWS). Partner Solutions are automated reference deployments that help people deploy popular technologies on AWS according to AWS best practices. If you’re unfamiliar with AWS Partner Solutions, refer to the AWS Partner Solution General Information Guide.
Overview
This guide covers the information you need to deploy the Tableau for Amazon SageMaker Partner Solution in the AWS Cloud.
This Amazon Web Services (AWS) Partner Solution deploys a REST API managed by Amazon API Gateway, lambda functions to connect Tableau and SageMaker, and Amazon Cognito for user authentication. The deployment is designed to work with ML models trained with Amazon SageMaker Autopilot without the need for customizations. However, it supports integration of any ML models hosted by SageMaker. You’re responsible for customizing the deployment to match the Tableau Analytics Extension API and your custom-model input and output formats. For more information, see Customization, later in this guide.
This Partner Solution reference deployment guide provides step-by-step instructions for deploying Tableau for Amazon SageMaker. This Partner Solution extends your Tableau dashboard functionality so you can integrate Amazon SageMaker machine learning (ML) models in Tableau’s calculated fields. The serverless application it deploys is based on Tableau’s analytics extension framework. With it, you can connect SageMaker ML models to Tableau workbooks in both Tableau Desktop and Tableau Server.
Costs and licenses
There is no cost to use this Partner Solution, but you will be billed for any AWS services or resources that this Partner Solution deploys. For more information, refer to the AWS Partner Solution General Information Guide.
Architecture
Deploying this Partner Solution with default parameters builds the following Tableau for SageMaker environment in the AWS Cloud.
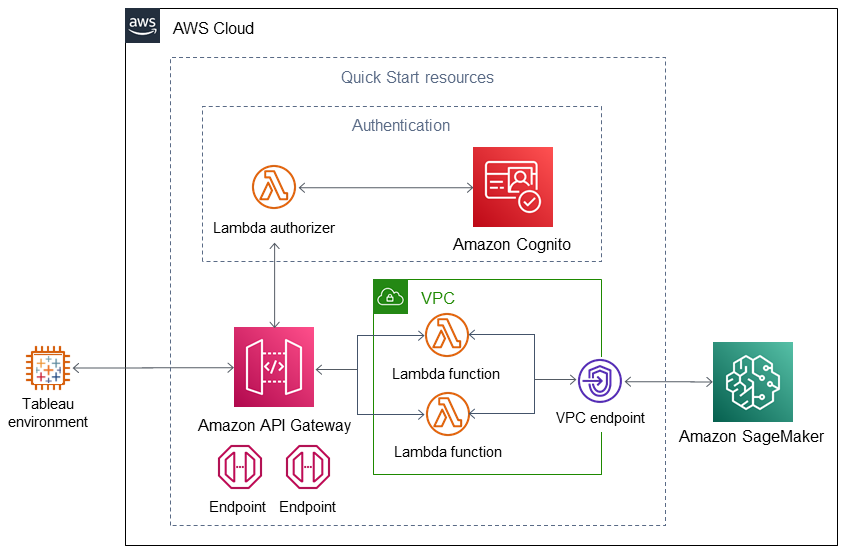
As shown in Figure 1, this Partner Solution sets up the following:
-
In the authentication group:
-
Amazon Cognito to provide a managed portal for sign-up and sign-in of connector users and a user pool for authentication.
-
An Amazon API Gateway lambda authorizer to connect API Gateway to the Amazon Cognito user pool.
-
-
Amazon API Gateway with REST API containing endpoints (GET /info and POST /evaluate).
-
A VPC, configured according to AWS best practices, to provide you with your own virtual network on AWS.*
-
In the VPC:
-
Two lambda functions, one for each REST API endpoint.
-
A VPC endpoint connected to Amazon SageMaker.
-
* The template that deploys this Partner Solution into an existing VPC skips the components marked by asterisks and prompts you for your existing VPC configuration.
Deployment options
This Partner Solution provides the following deployment options:
-
Deploy Tableau for SageMaker into a new VPC. This option builds a new AWS environment that consists of the VPC, subnets, NAT gateways, security groups, bastion hosts, and other infrastructure components. It then deploys Tableau for SageMaker into this new VPC.
-
Deploy Tableau for SageMaker into an existing VPC. This option provisions Tableau for SageMaker in your existing AWS infrastructure.
This Partner Solution provides separate templates for these options. It also lets you configure Classless Inter-Domain Routing (CIDR) blocks, instance types, and Tableau for SageMaker settings.
Predeployment steps
Before deploying the Tableau for Amazon SageMaker on AWS, you must have the following:
-
An AWS account.
-
A domain managed by Amazon Route 53.
-
An SSL certificate managed by AWS Certificate Manager.
Deployment steps
-
Sign in to your AWS account, and launch this Partner Solution, as described under Deployment options. The AWS CloudFormation console opens with a prepopulated template.
-
Choose the correct AWS Region, and then choose Next.
-
On the Create stack page, keep the default setting for the template URL, and then choose Next.
-
On the Specify stack details page, change the stack name if needed. Review the parameters for the template. Provide values for the parameters that require input. For all other parameters, review the default settings and customize them as necessary. When you finish reviewing and customizing the parameters, choose Next.
Unless you’re customizing the Partner Solution templates or are instructed otherwise in this guide’s Predeployment section, don’t change the default settings for the following parameters: QSS3BucketName,QSS3BucketRegion, andQSS3KeyPrefix. Changing the values of these parameters will modify code references that point to the Amazon Simple Storage Service (Amazon S3) bucket name and key prefix. For more information, refer to the AWS Partner Solutions Contributor’s Guide. -
On the Configure stack options page, you can specify tags (key-value pairs) for resources in your stack and set advanced options. When you finish, choose Next.
-
On the Review page, review and confirm the template settings. Under Capabilities, select all of the check boxes to acknowledge that the template creates AWS Identity and Access Management (IAM) resources that might require the ability to automatically expand macros.
-
Choose Create stack. The stack takes about 15 minutes to deploy.
-
Monitor the stack’s status, and when the status is CREATE_COMPLETE, the Tableau for Amazon SageMaker deployment is ready.
-
To view the created resources, choose the Outputs tab.
Postdeployment steps
The following resources display on the Outputs tab after deploying the Partner Solution:
-
SageMakerTableauApi: The URL for users to connect to the deployment from Tableau.
-
UserPoolDomain: The Amazon Cognito URL to sign up and sign in users of the deployment.
Test the deployment
To test the deployment, navigate to the UserPoolDomain URL displayed in the Outputs tab, and sign up as a user. Then, sign in with the new credentials.
Optionally, you can test from Tableau (version 2020.1 or later) by doing the following:
-
In Tableau Desktop, choose Help, Settings & Performance, Manage Analytics Extension Connection.
-
For Select an Analytics Extension, choose TabPy/External API.
-
Choose a server from the dropdown list.
-
For Port, enter 443.
-
Select Sign in with a username and password, then enter your user name and password.
-
Select Require SSL.
-
Choose Test Connection.
-
Click OK. If successful, the message Successfully connected to the analytics extension displays. If unsuccessful, an error message displays.

After testing verify that the SolutionSG security group’s inbound and outbound rules conform to your VPC security policies. Modify them as needed. The SolutionSG security group is found on the Resources tab of the CloudFormation console after deploying the stack. For more information, see Work with security groups.
Additional Information
Best practices for using Tableau for Amazon SageMaker on AWS
While using the Tableau for Amazon SageMaker deployment, it is important to follow Tableau Desktop and SageMaker best practices. You can use any ML model hosted by SageMaker. However, you should pass data from Tableau’s calculated fields to the analytics extension at the granularity expected by the model (for example, with no aggregation or translation).
This deployment can be called with Tableau SCRIPT_REAL, SCRIPT_STR, SCRIPT_INT, and SCRIPT_BOOL functions. With these table-calculation functions, you can pass a script and block of data to an external analytics engine. Use these functions with the following syntax:
Script_Function (‘[SageMaker Hosted Endpoint]’, <fields in dataset to pass to model>)

|
Customization
We recommend that you use Autopilot-trained ML models with this deployment. To use models that are not trained by Autopilot, you may need to customize the deployment. Tableau sends data from the analytics extension in the following format:
{'_arg1': [37, 40, 56, 45, 46, 55, 52, 45], '_arg2': ['services', 'admin.', 'services', 'services', 'blue-collar', 'retired', 'technician', 'blue-collar'], '_arg3': ['married', 'married', 'married', 'married', 'married', 'single', 'married', 'married'], '_arg4': ['high.school', 'basic.6y', 'high.school', 'basic.9y', 'basic.6y', 'high.school', 'basic.9y', 'basic.9y'], '_arg5': ['no', 'no', 'no', 'unknown', 'unknown', 'no', 'no', 'no'], '_arg6': ['yes', 'no', 'no', 'no', 'yes', 'yes', 'yes', 'yes'], '_arg7': ['no', 'no', 'yes', 'no', 'yes', 'no', 'no', 'no'], '_arg8': ['telephone', 'telephone', 'telephone', 'telephone', 'telephone', 'telephone', 'telephone', 'telephone'], '_arg9': ['may', 'may', 'may', 'may', 'may', 'may', 'may', 'may'], '_arg10': ['mon', 'mon', 'mon', 'mon', 'mon', 'mon', 'mon', 'mon'], '_arg11': [226, 151, 307, 198, 440, 342, 1666, 225], '_arg12': [1, 1, 1, 1, 1, 1, 1, 2], '_arg13': [999, 999, 999, 999, 999, 999, 999, 999], '_arg14': [0, 0, 0, 0, 0, 0, 0, 0], '_arg15': ['nonexistent', 'nonexistent', 'nonexistent', 'nonexistent', 'nonexistent', 'nonexistent', 'nonexistent', 'nonexistent'], '_arg16': [1.1, 1.1, 1.1, 1.1, 1.1, 1.1, 1.1, 1.1], '_arg17': [93.994, 93.994, 93.994, 93.994, 93.994, 93.994, 93.994, 93.994], '_arg18': [-36.4, -36.4, -36.4, -36.4, -36.4, -36.4, -36.4, -36.4], '_arg19': [4.857, 4.857, 4.857, 4.857, 4.857, 4.857, 4.857, 4.857], '_arg20': [5191, 5191, 5191, 5191, 5191, 5191, 5191, 5191]}The evaluate endpoint’s AWS Lambda function contains the function create_sagemaker_body. It transforms Tableau JSON into the following comma-separated text output:
37,services,married,high.school,no,yes,no,telephone,may,mon,226,1,999,0,nonexistent,1.1,93.994,-36.4,4.857,5191
40,admin.,married,basic.6y,no,no,no,telephone,may,mon,151,1,999,0,nonexistent,1.1,93.994,-36.4,4.857,5191
56,services,married,high.school,no,no,yes,telephone,may,mon,307,1,999,0,nonexistent,1.1,93.994,-36.4,4.857,5191
45,services,married,basic.9y,unknown,no,no,telephone,may,mon,198,1,999,0,nonexistent,1.1,93.994,-36.4,4.857,5191
46,blue-collar,married,basic.6y,unknown,yes,yes,telephone,may,mon,440,1,999,0,nonexistent,1.1,93.994,-36.4,4.857,5191
55,retired,single,high.school,no,yes,no,telephone,may,mon,342,1,999,0,nonexistent,1.1,93.994,-36.4,4.857,5191
52,technician,married,basic.9y,no,yes,no,telephone,may,mon,1666,1,999,0,nonexistent,1.1,93.994,-36.4,4.857,5191
45,blue-collar,married,basic.9y,no,yes,no,telephone,may,mon,225,2,999,0,nonexistent,1.1,93.994,-36.4,4.857,5191
The evaluate endpoint’s AWS Lambda function is found on the Resources tab of the AWS CloudFormation console after stack deployment is complete. It is authored in Python 3.7.
The preprocessing logic accommodates additional data transformations and facilitates the integration of your customizations of this deployment. We do not recommend modifying AWS Lambda function code itself if your ML model needs additional transformations. The best practice is to package preprocessing logic with the ML model as an SageMaker inference pipeline. For more information, see Preprocess input data before making predictions using Amazon SageMaker inference pipelines and Scikit-learn.
References
AWS services
Partner Solution reference deployments
GitHub repository
You can visit our GitHub repository to download the templates and scripts for this Partner Solution, to post your comments, and to share your customizations with others.
Troubleshooting
For troubleshooting common Partner Solution issues, refer to the AWS Partner Solution General Information Guide and Troubleshooting CloudFormation.
Q. How do I launch the Partner Solution into AWS GovCloud (US)?
A. While AWS GovCloud (US) isn’t listed as a supported Region, this Partner Solution can be deployed into AWS GovCloud (US) with a few modifications to the workload template. To do this, make the following changes to the SageMakerAPI section of the workload template:
Domain:
  CertificateArn: !Ref CertificateARN
  DomainName: !Ref DomainName
  EndpointConfiguration: EDGE
  Route53:
   HostedZoneId: !Ref HostedZoneId
-
Change the
EndpointConfigurationparameter fromEDGEtoREGIONAL. -
Delete
Route53:andHostedZoneId: !Ref HostedZoneId, the two lines immediately following theEndpointConfigurationparameter.
Domain:
  CertificateArn: !Ref CertificateARN
  DomainName: !Ref DomainName
  EndpointConfiguration: REGIONAL
These changes require a modification to the deployment steps, as your certificate is deployed in the same Region as your AWS deployment to support the Regional domain configuration.
After modifying the workload template, you can launch the Partner Solution into your AWS account. After the stack is deployed, navigate to Route 53 and identify the alias record created for the custom domain (matching the output in your CloudFormation console). Manually modify this record to change it from an alias record to a CNAME record. For more information about AWS GovCloud (US) and Route 53, see Amazon Route 53.
With these modifications, the deployment should be accessible from AWS GovCloud (US). You can test this by calling the info endpoint of your API using the custom domain name.
Customer responsibility
After you deploy a Partner Solution, confirm that your resources and services are updated and configured—including any required patches—to meet your security and other needs. For more information, refer to the Shared Responsibility Model.
Feedback
To submit feature ideas and report bugs, use the Issues section of the GitHub repository for this Partner Solution. To submit code, refer to the Partner Solution Contributor’s Guide. To submit feedback on this deployment guide, use the following GitHub links:
Notices
This document is provided for informational purposes only. It represents current AWS product offerings and practices as of the date of issue of this document, which are subject to change without notice. Customers are responsible for making their own independent assessment of the information in this document and any use of AWS products or services, each of which is provided "as is" without warranty of any kind, whether expressed or implied. This document does not create any warranties, representations, contractual commitments, conditions, or assurances from AWS, its affiliates, suppliers, or licensors. The responsibilities and liabilities of AWS to its customers are controlled by AWS agreements, and this document is not part of, nor does it modify, any agreement between AWS and its customers.
The software included with this paper is licensed under the Apache License, version 2.0 (the "License"). You may not use this file except in compliance with the License. A copy of the License is located at https://aws.amazon.com/apache2.0/ or in the accompanying "license" file. This code is distributed on an "as is" basis, without warranties or conditions of any kind, either expressed or implied. Refer to the License for specific language governing permissions and limitations.