AWS Marketplace Serverless SaaS Integration on the AWS Cloud
Quick Start Reference Deployment

January 2022
AWS Marketplace SaaS Integration team
| Visit our GitHub repository for source files and to post feedback, report bugs, or submit feature ideas for this Quick Start. |
This Quick Start was created by Amazon Web Services (AWS). Quick Starts are automated reference deployments that use AWS CloudFormation templates to deploy key technologies on AWS, following AWS best practices.
Overview
This guide provides instructions for deploying AWS Marketplace Serverless SaaS Integration on the AWS Cloud.
This Quick Start is for registered AWS Marketplace sellers who want a lightweight serverless solution for completing the required integration on new software as a service (SaaS) listings.
AWS Marketplace Serverless SaaS Integration on AWS
The AWS Marketplace Serverless SaaS Integration deployment fulfills the core capabilities required to successfully integrate a vendor’s SaaS solution with its corresponding listing on AWS Marketplace. These capabilities include accepting new customer registrations, granting and revoking customer access, updating customer entitlements, and reporting metered usage.
AWS costs
You are responsible for the cost of the AWS services and any third-party licenses used while running this Quick Start. There is no additional cost for using the Quick Start.
The AWS CloudFormation templates for Quick Starts include configuration parameters that you can customize. Some of the settings, such as the instance type, affect the cost of deployment. For cost estimates, see the pricing pages for each AWS service you use. Prices are subject to change.
| After you deploy the Quick Start, create AWS Cost and Usage Reports to deliver billing metrics to an Amazon Simple Storage Service (Amazon S3) bucket in your account. These reports provide cost estimates based on usage throughout each month and aggregate the data at the end of the month. For more information, see What are AWS Cost and Usage Reports? |
Software licenses
No licenses are required to deploy this Quick Start. All AWS service resources consumed during the launch of the Quick Start incur AWS service usage costs.
Architecture
Deploying this Quick Start builds the following AWS Marketplace Serverless SaaS Integration environment in the AWS Cloud.
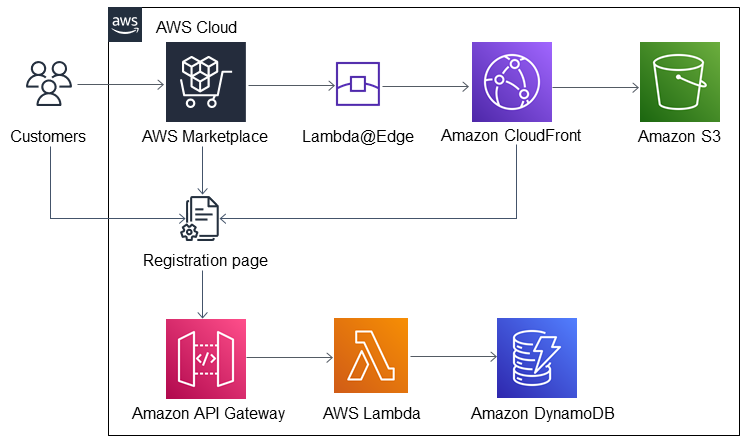
As shown in Figure 1, the Quick Start sets up the following environment:
-
AWS Marketplace for managing customer subscriptions and passing tokens with customer billing identifiers and product codes to AWS Marketplace Metering Service and Entitlement Service APIs.
-
CloudFront Lambda@Edge for intercepting, transforming, and passing customer tokens.
-
Amazon CloudFront for providing the configurable registration page URL for the SaaS product integration.
-
Amazon S3 for storing the static HTML pages that accept and submit registration input to the AWS Marketplace customer endpoints.
-
Amazon API Gateway for receiving tokens from form data on the registration page and generating the new endpoint base URL after the AWS CloudFormation stack is deployed.
-
AWS Lambda for handling customer endpoints and validating AWS Marketplace customer tokens.
-
Amazon DynamoDB for storing valid customer records in a DynamoDB table.
For workflow details, see How it works.
Planning the deployment
Specialized knowledge
This deployment requires a moderate level of familiarity with AWS services. If you’re new to AWS, see Getting Started Resource Center and AWS Training and Certification. These sites provide materials for learning how to design, deploy, and operate your infrastructure and applications on the AWS Cloud.
This deployment guide requires a moderate level of familiarity with AWS services. If you’re new to AWS, refer to the Getting Started Resource Center.
This Quick Start also assumes familiarity with AWS Marketplace and the SaaS product listing process. An existing SaaS listing and the associated product code is required to complete the deployment. To learn more about SaaS listing processes, refer to Software as a service (SaaS)–based products in the AWS Marketplace Seller Guide.
AWS account
If you don’t already have an AWS account, create one at https://aws.amazon.com by following the on-screen instructions. Part of the sign-up process involves receiving a phone call and entering a PIN using the phone keypad.
Your AWS account is automatically signed up for all AWS services. You are charged only for the services you use.
Technical requirements
Before you launch the Quick Start, review the following information and ensure that your account is properly configured. Otherwise, deployment might fail.
Resource quotas
If necessary, request service quota increases for the following resources. You might need to request increases if your existing deployment currently uses these resources and if this Quick Start deployment could result in exceeding the default quotas. The Service Quotas console displays your usage and quotas for some aspects of some services. For more information, see What is Service Quotas? and AWS service quotas.
| Resource | This deployment uses |
|---|---|
S3 Buckets |
2 |
SNS Topics |
2 |
DynamoDB Tables |
2 |
Lambda Functions |
7 |
API Gateway APIs |
1 |
SQS Queues |
3 |
Supported AWS Regions
For any Quick Start to work in a Region other than its default Region, all the services it deploys must be supported in that Region. You can launch a Quick Start in any Region and see if it works. If you get an error such as “Unrecognized resource type,” the Quick Start is not supported in that Region.
For an up-to-date list of AWS Regions and the AWS services they support, see AWS Regional Services.
| Certain Regions are available on an opt-in basis. For more information, see Managing AWS Regions. |
IAM permissions
Before launching the Quick Start, you must sign in to the AWS Management Console with IAM permissions for the resources that the templates deploy. The AdministratorAccess managed policy within IAM provides sufficient permissions, although your organization may choose to use a custom policy with more restrictions. For more information, see AWS managed policies for job functions.
Deployment options
This Quick Start provides the following deployment options:
-
A full deployment option that supports both contracts and subscriptions. This option provides all required services to manage both contract entitlements and metered usage.
-
A contracts-only deployment that provides only the resources required to manage contract entitlements.
-
A subscriptions-only deployment that provides only the resources required to manage subscription-based metered usage.
The Quick Start provides a single template that includes all three deployment options.
Prepare for the deployment
Ensure that you have the product code for your SaaS listing. This code is assigned to your SaaS listing when you create it. You can find the product code in your SaaS product catalog within the AWS Marketplace Management Portal.
Ensure that you have the relevant SNS topic Amazon Resource Name (ARNs) for your pricing model. For contract pricing, you must have the entitlements SNS topic. For subscription pricing, you must have the subscription SNS topic. For both contract and subscriptions pricing, you must have both the entitlements and subscription SNS topic ARNs.
Deployment steps
Confirm your AWS account configuration
-
Sign in to your AWS seller account at https://aws.amazon.com with an IAM user role that has the necessary permissions. For details, see Planning the deployment earlier in this guide.
-
Make sure that your AWS account is configured correctly, as discussed in the Technical requirements section.
Launch the Quick Start
| Ensure that your are signed into you seller account. This is the AWS account that you would have used to register with AWS Marketplace. This is necessary to access the various SNS topics and APIs that the solution is dependent on. |
Each deployment takes about 5-10 minutes to complete.
-
Sign in to your AWS account, and launch the following AWS CloudFormation template. For help understanding the details of the deployment, see Deployment options earlier in this guide.
Deploy AWS Marketplace Serverless SaaS Integration into a new VPC on AWS
-
Check the AWS Region that’s displayed in the upper-right corner of the navigation bar, and change it if necessary. The template is launched in the us-east-1 Region by default. For other choices, see Supported Regions earlier in this guide.
-
On the Create stack page, keep the default setting for the template URL, and then choose Next.
-
On the Specify stack details page, change the stack name if needed. Review the parameters for the template. Provide values for the parameters that require input. For all other parameters, review the default settings and customize them as necessary. When you finish reviewing and customizing the parameters, choose Next.
-
On the Configure stack options page, you can specify tags (key-value pairs) for resources in your stack and set advanced options. When you finish, choose Next.
-
On the Review page, review and confirm the template settings. Under Capabilities, select the two check boxes to acknowledge that the template creates IAM resources and might require the ability to automatically expand macros.
-
Choose Create stack to deploy the stack.
-
Monitor the status of the stack. When the status is CREATE_COMPLETE, the AWS Marketplace Serverless SaaS Integration deployment is ready.
-
To view the created resources, see the values displayed in the Outputs tab for the stack.
How it works
As shown in Figure 2,the AWS Marketplace Serverless SaaS Integration on AWS environment sets up the following workflow of events.

Register new customers
With SaaS subscriptions and contracts, customers subscribe to your products through AWS Marketplace, but they access the product on an environment that you manage in your AWS account. After subscribing to a product, customers are directed to a product registration page that you create and manage as a part of your SaaS product.
On your software’s registration page, you can collect whatever information is required to create an account for your customer. AWS Marketplace recommends collecting email addresses if you plan to send customers usage notifications.
The registration page identifies and accepts the x-amzn-marketplace-token token from the AWS Marketplace form data. The token includes the customer’s identifier for billing. The page then passes the token value to the AWS Marketplace Metering Service and AWS Marketplace Entitlement Service APIs to resolve for the unique customer identifier and corresponding product code.
The Quick Start creates a static HTML registration page hosted on Amazon S3. The page takes user inputs that are defined in the HTML form and submits them to the customer endpoint on AWS Marketplace. The page is delivered via a CloudFront distribution, which can be configured to use domain/CNAME. The POST request coming from AWS Marketplace is intercepted by the Lambda@Edge src/lambda-edge/edge-redirect.js function, which transforms the POST request to a GET request and passes the x-amzn-marketplace-token in the query string. The handler for the customer endpoint on AWS Marketplace is defined in the src/register-new-subscriber.js function, which calls the resolveCustomer endpoint and validates the token. If the token is valid, the customer record is created in the AWSMarketplaceSubscribers DynamoDB table, and the new customer data is stored.
Grant access to new subscribers
After the resolveCustomer endpoint returns a successful response, you (the SaaS provider) must provide the new subscriber access to the solution. Based on the type of listing (contract or subscriptions), different conditions are defined in the grant-revoke-access-to-product.js stream handler that’s initiated when adding new or updating existing rows.
In the Quick Start deployment, the AWS Marketplace Tech Admin email address (which is defined as the MarketplaceTechAdmin deployment parameter) receives email notifications when new services must be provisioned or existing services must be updated for a customer. AWS Marketplace strongly recommends automating the access and environment management by modifying the grant-revoke-access-to-product.js function. The property successfully subscribed is set when a successful response is returned by the Amazon Simple Queue Service (Amazon SQS) entitlement handler for SaaS contract-based listings or for subscriptions-based listings after receiving the subscribe-success message from the subscription Amazon Simple Notification Service (Amazon SNS) topic in the subscription-sqs-handler.js function.
Update entitlement levels to new and existing subscribers (SaaS contracts only)
If a customer’s entitlement changes, a message is received on the Amazon SNS topic for the entitlement. On each new message, the entitlement-sqs.js Lambda function calls the AWS Marketplace EntitlementService endpoint and stores the response in the AWSMarketplaceSubscribers DynamoDB table. When the entitlement is updated, a notification is sent to the AWS Marketplace Tech Admin email address.
Revoke access to customers with expired contracts and canceled subscriptions
The revoke-access logic is implemented in a similar way as the grant-access logic. The AWS Marketplace Tech Admin address receives an email when the contract expires or the subscription is canceled. AWS Marketplace strongly recommends automating the access and environment management by modifying the grant-revoke-access-to-product.js function.
Meter for usage
For SaaS subscriptions listings, the SaaS vendor must meter for all usage and report the metering record to AWS Marketplace, which then bills customers based on the records provided. For SaaS contracts, the vendor only meters for usage beyond a customer’s contract entitlements. The SaaS provider must send AWS a quantity of usage accrued for each customer on the dimensions defined when you created your product, such as gigabytes transferred or hosts scanned in a given hour.
The MeteringSchedule CloudWatch event rule is triggered every hour. At that time, the metering-hourly-job.js function queries all of the pending and unreported metering records from the AWSMarketplaceMeteringRecords table using the PendingMeteringRecordsIndex index. All pending records are aggregated based on the customerIdentifier property and dimension name and sent to the SQSMetering queue. The records in the AWSMarketplaceMeteringRecords table should be inserted programmatically by your SaaS application. To allow write access to the AWSMarketplaceMeteringRecords table, you must give permissions to the service in charge of collecting usage data in your existing SaaS product.
The metering-sqs.js Lambda function sends all queued metering records to the AWS Marketplace Metering Service API. After each call to the batchMeterUsage endpoint, the rows in the AWSMarketplaceMeteringRecords table are updated with the response returned from the Metering Service. Responses are stored in the metering_response field. If the request is unsuccessful, the metering_failed value is set to true, and you must investigate the error defined in the metering_response field.
New records in the AWSMarketplaceMeteringRecords table should be stored in the following format:
{
  "create_timestamp": 113123,
  "customerIdentifier": "ifAPi5AcF3",
  "dimension_usage": [
    {
      "dimension": "users",
      "value": 3
    },
     {
      "dimension": "admin_users",
      "value": 1
    }
  ],
  "metering_pending": "true"
}
The create_timestamp attribute is the sort key, and the customerIdentifier attribute is the partition key. The sort and partition keys are combined to form the primary key.
After the record is submitted to the AWS Marketplace API, the record updates, and the entry looks similar to the following:
{
   "create_timestamp": 113123,
   "customerIdentifier": "ifAPi5AcF3",
   "dimension_usage": [
     {
       "dimension": "admin_users",
       "value": 3
     }
   ],
   "metering_failed": false,
   "metering_response": "{\"Results\":[{\"UsageRecord\":{\"Timestamp\":\"2020-06-24T04:04:53.776Z\",\"CustomerIdentifier\":\"ifAPi5AcF3\",\"Dimension\":\"admin_users\",\"Quantity\":3},\"MeteringRecordId\":\"35155d37-56cb-423f-8554-5c4f3e3ff56d\",\"Status\":\"Success\"}],\"UnprocessedRecords\":[]}"
 }
Post-deployment steps
Set up your registration page
After your stack has launched successfully, set up your registration page and connect it with the API Gateway created by the stack. Your registration page will be hosted in the website S3 bucket that was created by the stack earlier.
-
Download the website files to your local computer.
-
Unzip the file and open the web folder to access the files inside.
-
Retrieve the API ID of the API Gateway deployed by the stack.
-
Open the file named scripts.js and update the baseUrl property in line 1 with the API ID you just retrieved from the API Gateway console. Save the changes to the file.
Example
-
Before:
const baseUrl = 'https://API-ID.execute-api.us-east-1.amazonaws.com/Prod/'; -
After:
const baseUrl = 'https://qy7ryx6nkg.execute-api.us-east-1.amazonaws.com/Prod/';
-
Open the website S3 bucket created by the stack in your S3 console, and upload the five files in the web folder to the S3 bucket.
Your integration is now ready for use. Since CloudFront distribution is used to ensure low latency for the registration page, the SaaS fulfillment URL is the CloudFront CName (domain name) of the distribution created by the stack.
Go to the CloudFront console to retrieve the domain name. Be sure to provide the domain name to the AWS Marketplace Seller Operations team to associate with your limited SaaS listing.
-
SaaS fulfillment URL format: https://<domain name>
-
Example URL: https://d142rocbcrghws.cloudfront.net
Confirm the Amazon SNS subscription
To receive email notifications on the MarketplaceTechAdmin email address for subscription events, confirm the subscription to the newly deployed SNS topic. You must have received an email susbcription confirmation link after the stack was launched. Choose the confirmation link and confirm your subscription.
FAQ
Q. I encountered a CREATE_FAILED error when I launched the Quick Start.
A. If AWS CloudFormation fails to create the stack, relaunch the template with Rollback on failure set to Disabled. This setting is under Advanced in the AWS CloudFormation console on the Configure stack options page. With this setting, the stack’s state is retained so that you can troubleshoot the issue.
| When you set Rollback on failure to Disabled, you continue to incur AWS charges for this stack. Delete the stack when you finish troubleshooting. |
For more information, see Troubleshooting AWS CloudFormation.
Q. I encountered a size-limitation error when I deployed the AWS CloudFormation templates.
A. Launch the Quick Start templates from the links in this guide or from another S3 bucket. If you deploy the templates from a local copy on your computer or from a location other than an S3 bucket, you might encounter template-size limitations. For more information, see AWS CloudFormation quotas.
Troubleshooting
Check the following: * Ensure that you deploy in a supported Region (see Supported Regions) * Confirm that you are deploying into your registered seller account. * Ensure that the names assigned for WebsiteS3BucketName, NewSubscribersTableName, and AWSMarketplaceMeteringRecordsTableName parameters don’t already exist within S3 and DynamoDB.
Customer responsibility
After you successfully deploy this Quick Start, confirm that your resources and services are updated and configured — including any required patches — to meet your security and other needs. For more information, see the AWS Shared Responsibility Model.
Parameter reference
| Unless you are customizing the Quick Start templates for your own deployment projects, keep the default settings for the parameters labeled Quick Start S3 bucket name, Quick Start S3 bucket Region, and Quick Start S3 key prefix. Changing these parameter settings automatically updates code references to point to a new Quick Start location. For more information, see the AWS Quick Start Contributor’s Guide. |
Deploy AWS Marketplace SaaS entitlement and subscription portal
| Parameter label (name) | Default value | Description |
|---|---|---|
SaaS pricing model
( |
|
The SaaS pricing model of your product. |
Registration page
( |
|
Choose 'true' to create a new registration page hosted by Amazon CloudFront. If you already have a custom registration page, choose 'false'. |
S3 bucket name
( |
|
The S3 bucket that holds the static HTML registration page files. If this bucket doesn’t exist, it is created. |
Product code
( |
|
The product code provided by AWS Marketplace at the time the limited listing was published. |
Subscriptions SNS topic ARN
( |
|
If your product is a SaaS subscription or Saas contract with subscription, use the entitlement SNS topic provided by AWS Marketplace at the time the limited listing was published. |
Entitlements SNS topic ARN
( |
|
If your product is a SaaS contract, use the entitelement SNS topic provided by AWS Marketplace at the time the limited listing was published. |
New subscribers DynamoDB table name
( |
|
The custom value for the New Subscribers table. Value must be unique per product. |
Metering records Amazon DynamoDB table name
( |
|
Custom value for the metering records table. Value must be unique per product. |
Admin email address
( |
|
The email address that receives SNS notifications for new customer registrations, entitlement changes, and subscription events. |
Artifact S3 bucket name
( |
|
Name of the S3 bucket name that contains that artifacts. This string can include numbers, lowercase letters, uppercase letters, and hyphens (-). It cannot start or end with a hyphen (-). |
Send us feedback
To post feedback, submit feature ideas, or report bugs, use the Issues section of the GitHub repository for this Quick Start. To submit code, see the Quick Start Contributor’s Guide.
Quick Start reference deployments
See the AWS Quick Start home page.
GitHub repository
Visit our GitHub repository to download the templates and scripts for this Quick Start, to post your comments, and to share your customizations with others.
Notices
This document is provided for informational purposes only. It represents AWS’s current product offerings and practices as of the date of issue of this document, which are subject to change without notice. Customers are responsible for making their own independent assessment of the information in this document and any use of AWS’s products or services, each of which is provided “as is” without warranty of any kind, whether expressed or implied. This document does not create any warranties, representations, contractual commitments, conditions, or assurances from AWS, its affiliates, suppliers, or licensors. The responsibilities and liabilities of AWS to its customers are controlled by AWS agreements, and this document is not part of, nor does it modify, any agreement between AWS and its customers.
The software included with this paper is licensed under the Apache License, version 2.0 (the "License"). You may not use this file except in compliance with the License. A copy of the License is located at http://aws.amazon.com/apache2.0/ or in the accompanying "license" file. This code is distributed on an "AS IS" BASIS, WITHOUT WARRANTIES OR CONDITIONS OF ANY KIND, either expressed or implied. See the License for specific language governing permissions and limitations.